EasyManua.ls Logo

Coleman HOOLIGAN 3 2000001590 User Manual

Coleman HOOLIGAN 3 2000001590
2 pages
To Next Page IconTo Next Page
Page #1 background imageLoading...
Page #1 background image
7. Assemble thin, black, shock-corded Vent Pole.
8. Insert Vent Pole through
sleeve at back of tent.
(Fig. 5)
9. Insert metal tip into
grommet. Go to opposite
end of Vent Pole and
gradually apply pressure to
pole forming an arch then
insert metal tip into grommet.
(Fig. 6 & 6A)
Fig. 5
Back of Tent
Fig. 3
Stake
Stake
Fig. 8
HOOLIGAN
TM
3 MODEL 2000001590
STITCH LINE
To Set Up Tent
1. Unfold tent and spread out on a clean, level surface with the
door facing perpendicular to the wind direction. Unzip door.
2. Assemble Main Poles by interlocking the black, shock-cord-
ed, sections.
3. Insert Main Poles through sleeves in top of tent. (Fig. 1)
4. Insert one end of black main pole into pin on metal loop
located at either end of tent. (Fig. 2)
5. Go to opposite end of Main Pole and gradually apply pressure
to pole forming an arch. Insert pin into
the pole end (Fig. 2 & 3). Repeat for the
remaining Main Pole.
To Attach Rainfly
1. Drape Rainfly over tent. Make sure seams on Rainfly are
facing down and centered over poles and the vestibule is
over to door of the tent. (Fig. 7)
NOTE: Hook and loop fasteners, located on seams of under -
side of rainfly, should be centered over black poles.
(continued on other side)
Metal
Loop
& Pin
Main
Pole
Fig. 2
6. Stretch out corners and sides of
tent. Drive in stakes at an angle
through the metal loops to help
anchor the corners & sides of the
tent. (Fig. 3 & 4)
2. Fold Rainfly at front of tent back as shown in Fig. 8.
3. Assemble Vestibule Pole by interlocking the grey, shock-
corded, sections.
4. Insert one end of grey Vestibule Pole into pin on metal loop
located at either side of tent. (Fig. 8 & 8A)
5. Go to opposite end of Vestibule Pole and gradually apply
pressure to pole forming an arch. Insert pin into the pole end
(Fig. 8 & 8A).
Pole Descriptions
Pole Pole Pole
Description Qty. Dia. Repair Kit Replacement Kit
Main Pole, black 2 8.5mm 5010000541 5010000547
Vestibule Pole, grey 1 8.5mm 5010000541 5010000547
Vent Pole, black
with pre-bent ferrules 1 6.0mm 5010000639 5010000639
Fig. 4
Fig. 6
6A
Fig. 7
Front of Tent
Rainfly
Vestibule
over Door
8A
Grey Vestibule Pole
Front of
Tent
Door
Hook & Loop
Fasteners
Fig. 1
Sleeve
Door
Back of Tent
Main
Pole
Sleeve
Main
Pole
Sleeve
Vent Pole
Before you begin
Read all instructions before set up.
• Select a level site clear of rocks, branches, and other hard or
sharp objects, to install your tent.
WARNING: Keep clear of overhead power lines.
Do not set up your tent under trees because of potential
lightning strikes or falling tree limbs in inclement weather.
Secure with all stakes and guylines provided to prevent
property damage or personal injury.
For best results in windy conditions, position narrow end of
tent into the wind.
Enlist the help of at least one other person to assist you when
it is time to assemble the tent.
Question and Answer IconNeed help?

Do you have a question about the Coleman HOOLIGAN 3 2000001590 and is the answer not in the manual?
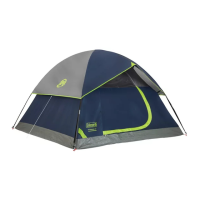
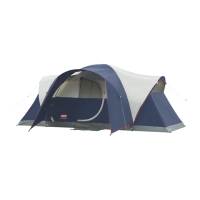
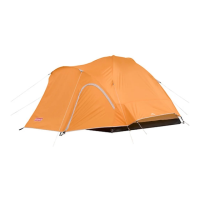
Coleman HOOLIGAN 3 2000001590 Specifications

General IconGeneral
Capacity3-person
Setup TypeFreestanding
Pole MaterialFiberglass
Floor MaterialPolyethylene
Seasonality3-season
Doors1
RainflyYes
Body MaterialPolyester
Rainfly FabricPolyester
Poles2
VentilationMesh panels
Center Height4 ft 10 in

Summary

Before You Begin Setup

Tent Pole Identification

Tent Setup Instructions

Main Pole Installation

Unfold tent and insert main poles through sleeves in top of tent.

Securing Main Poles

Insert main poles into metal loops and apply pressure to form an arch.

Staking the Tent

Stretch tent corners and sides, then drive stakes through metal loops.

Rainfly Attachment Instructions

Positioning the Rainfly

Drape rainfly over tent, ensuring seams face down and vestibule is over the door.

Vestibule Pole Installation

Assemble and insert vestibule pole into pins to form an arch.

Completing Rainfly Attachment

Securing Rainfly Fasteners

Secure hook & loop fasteners on rainfly to poles for added strength.

Attaching Elastic Straps

Attach hooks on elastic straps to metal loops on web straps and tent corners.

Securing with Guylines

Stretch elastic straps and guylines taut, then secure with stakes.

Vestibule and Door Features

Managing Vestibule Flap

Unzip vestibule flap, roll up, and store in pocket for maximum air flow.

Managing Door Flap and Vent

Unzip door flap or vent, roll up, and secure for ventilation.

Tent Storage Instructions

Packing Tent Components

Store poles and stakes separately after cleaning and drying the tent.

Storage Location

Store the tent in a clean, dry area to maintain its condition.

Important Usage and Safety Notes

Understanding Condensation

Condensation can form inside tent due to humidity and breath; improve ventilation.

Protecting Tent from Tree Damage

Avoid setting up under trees to prevent damage from sap, droppings, or falling limbs.

Proper Tent Drying and Cleaning

Always dry tent thoroughly and brush off dirt before storage to prevent damage.

Safe Stake Removal

Pull stakes by the stake itself, not the tent, to prevent damage or injury.

Tent Pole Storage

Do not leave tent poles telescoped together during storage.

UV Exposure Effects

Prolonged sun exposure can damage tent material and cause discoloration.

Related product manuals