This document is a user manual for the COLZER Dehumidifier, models PD123A and PD223A. It provides comprehensive instructions for operating, maintaining, and troubleshooting the device, ensuring its reliability and longevity.
Function Description
The COLZER Dehumidifier is designed to remove excess moisture from the air, creating a healthier and more comfortable indoor environment. It operates by drawing in humid air, passing it over cooling coils to condense the moisture, and then releasing drier air back into the room. The collected water is stored in a removable bucket or can be continuously drained via a hose. The dehumidifier offers two primary working modes: DEHUMIDIFY (DH) mode for general moisture removal and DRY (Laundry Dry) mode for drying clothes.
Usage Features
Before First Use:
To prevent internal damage, especially to the refrigeration system, it is crucial to keep the dehumidifier upright during transport and allow it to stand upright and outside its box for 24 hours before plugging it in. This allows the oil in the compressor to settle.
Installation and Positioning:
The dehumidifier should be placed on a smooth, level floor, table, or shelf that is strong enough to support it when the water bucket is full. For optimal efficiency, it should be operated in an enclosed area with doors and windows closed. A minimum clearance of 20 cm (7.9 inches) on the sides and back, and 40 cm (16 inches) on the top, is required for proper air circulation. When used for drying wet clothes, a minimum clearance of 40 cm (16 inches) to the air outlet is necessary to prevent water dripping into the unit. The recommended ambient operating temperature is between 5°C (41°F) and 35°C (95°F). The power cord should be uncoiled and firmly plugged into a properly grounded 110-120 volt AC outlet. Upon plugging in, the control panel will light up for 1-2 seconds and then turn off, indicating a normal self-diagnosis process.
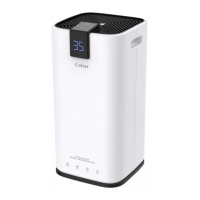
Control Panel and Display:
The dehumidifier features a top control panel with a digital display and six buttons: POWER, MODE, HUMIDITY, SPEED, TIMER, and LIGHTING. The top digital display shows the current settings and status, while a front digital display mirrors this information for easy visibility from a distance.
Power ON/OFF:
Press the POWER button to turn the dehumidifier on or off. When turned on, it typically defaults to 30% set humidity at low fan speed in DEHUMIDIFY mode. If the "FULL" icon illuminates upon startup, the water bucket needs to be properly re-installed.
Working Modes:
-
DH (DEHUMIDIFY) Mode: In this mode, the dehumidifier operates as a humidistat, automatically stopping and restarting to maintain the room humidity within ±3% of the set point. For example, if the set humidity is 50%, the unit will stop at 47% and restart at 53%. If the set humidity level is not at least 3% lower than the room humidity, the dehumidifier will not start, and the DH icon will flash. If the room humidity drops to the set-point, the dehumidifier will auto-stop, and the DH icon will flash. Setting the target humidity to 30% activates CONTINUOUS Mode, where the dehumidifier runs continuously until the water bucket is full.
- Selecting DH Mode: Press the MODE button until the "DH" icon lights up.
- Checking Room Humidity: The digital number on the display shows the inlet air humidity.
- Setting Desired Humidity: Press the HUMIDITY button repeatedly to adjust the set-point between 30%-80% in 5% increments. The digital number will flash during adjustment. The set humidity must be at least 5% lower than the room humidity. The setting is registered after 5 seconds.
- Fan Speed: The SPEED button allows selection between FAST and SLOW fan speeds, indicated by "FAST" or "SLOW" icons. High fan speed results in quicker moisture removal. The SPEED button is disabled in DRY mode.
-
DRY (Laundry Dry) Mode: This mode is designed for drying clothes. The dehumidifier runs continuously at high fan speed. The HUMIDITY and SPEED buttons are disabled in this mode.
- Selecting DRY Mode: Press the MODE button until the "DRY" icon lights up.
- Optimizing Drying: For best results, hang clothes in a small room, maintain a minimum clearance of 40 cm (16 inches) from the air outlet, close windows and doors, and run the dehumidifier in DRY-CLOTHES mode.
Timer Setting:
The TIMER function allows setting an AUTO-ON or AUTO-OFF timer for 1 to 24 hours.
- Setting AUTO-ON: When the dehumidifier is off, select Timer to turn it on after the set hours. Ensure power is supplied before setting.
- Setting AUTO-OFF: When the dehumidifier is on, select Timer to turn it off after the set hours.
- Steps to Set Timer: Press the TIMER button once (display shows "00" and flashes), repeatedly press TIMER to adjust in 1-hour increments up to 24 hours. Wait 5 seconds for the setting to register. The display will count down the remaining time. Press TIMER again to check the remaining time. To disable, manually turn on/off the dehumidifier or set the timer to "00". The TIMER feature is a one-shot function and will not cycle indefinitely.
Press the LIGHTING button to put the display into sleep status, turning off the digital display and button backlights (except POWER and LIGHTING buttons). The dehumidifier continues running. Press LIGHTING again to restore the display and button functions.
Temperature Readout:
Press and hold the SPEED button for 3-5 seconds to display the room temperature in Fahrenheit. After 5 seconds, the LCD will revert to displaying room humidity.
Water Collection and Drainage:
- Emptying the Water Bucket: When the bucket is full, the dehumidifier automatically stops, emits a 5-second beep, displays an E7 error message, and the "FULL BUCKET" icon illuminates. Do not move the dehumidifier to prevent spills. To empty, gently remove the bucket by gripping both top and bottom sides and pulling outward. Open the drain outlet lid on the bucket cover, pour out the water, close the lid, and replace the bucket. The E7 error will clear, and operation will resume in 1-3 minutes.
- Continuous Drain by Gravity: Water can be continuously drained into a floor drain or larger external bucket using the included drain hose (or any hose with a 5/8-inch inner diameter). Remove the plastic cover from the continuous drain outlet, remove the water bucket, attach the drain hose, replace the water bucket, and direct the other end of the hose to a drainage facility lower than the dehumidifier's drain outlet. Ensure the connection is tight and leak-free. The hose should slope downward without kinks or bends and should not be submerged in water. A short hose is recommended to prevent stagnant water and mildew buildup. Remove the drain hose when not using continuous drain.
Smart Functions:
- Auto Shut Off: The dehumidifier automatically stops when the water bucket is full or the room humidity reaches the set point.
- Wait 3 Minutes before Resuming Operation: To protect the compressor, it will not restart immediately after a complete cycle or being turned off. There is a 3-minute delay. During this delay, the Mode icon (DH or DRY) will flash. Once the compressor kicks in, the dehumidifier will shake slightly, and the Mode icon will illuminate steadily.
- Auto Defrost: If frost builds up on the evaporator coils, the compressor cycles off, and the fan continues to run until the frost disappears.
- Auto-Restart: If power is unexpectedly cut while the dehumidifier is running or in standby mode, it will automatically restart with its previous function settings (working mode, set humidity, fan speed, etc.) when power resumes.
Maintenance Features
To avoid electric shock, always turn off and unplug the dehumidifier from the power source before performing any cleaning or maintenance.
Clean the Vent and Case:
- Use water and mild detergent for cleaning. Avoid bleach or abrasives.
- Do not splash water directly onto the main dehumidifier, as this can cause electric shock, insulation deterioration, or rust.
- The air intake and outlet vents tend to get soiled easily; use a vacuum attachment or brush to clean them.
Clean the Reservoir:
- Clean the reservoir every few weeks to prevent mold, mildew, and bacteria growth.
- Steps to Clean:
- Take out the water reservoir.
- Pick up the handle at a 45° angle and pull one side outward horizontally to detach it (handle slots may help find the correct angle).
- Locate the clasps on the bucket lid, press the bucket inward to release the lid.
- Partially fill the reservoir with clean water and add a little mild detergent.
- Swish the water around, then empty and rinse.
- Note: Do not clean the reservoir in a dishwasher.
Clean the Air Filter:
- The air filter is located behind the rear intake grill and prevents dust from entering the dehumidifier.
- Clean the filter approximately every 2 weeks, or more frequently if there is significant dander or fur in the air.
- Steps to Clean:
- Grasp the bottom of the air inlet grill and pull it out. The filter is attached behind the grill.
- Use a vacuum cleaner with a soft brush attachment to remove large debris or dust buildup.
- Wash the filter in lukewarm, soapy water (below 40°C/104°F) or with a neutral cleaning agent.
- Rinse thoroughly with clean water and dry completely.
- Re-install the filter.
- Note: Do not operate the dehumidifier without a filter, as dirt and lint will clog it, reducing performance.
When Not Using the Dehumidifier for Long Periods:
- Operate the dehumidifier on high fan mode for half a day, then wait 1 day before emptying the reservoir.
- Clean the main dehumidifier, water reservoir, and air filter, ensuring the entire unit is clean and dry.
- Wrap and bundle the power cord.
- Cover the dehumidifier with a plastic bag.
- Store the dehumidifier upright in a dry, well-ventilated place.