This document is an instruction manual for the COMBI-CAMP trailer tent, covering its setup, use, maintenance, and technical specifications. The manual is presented in English.
Function Description
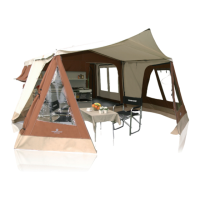
The COMBI-CAMP is a trailer tent designed for camping, offering a compact and portable living space that can be easily towed by a vehicle. It transforms from a trailer into a tent, providing sleeping areas, an integrated sun canopy/awning, and an optional kitchen unit. The design emphasizes ease of setup and versatility for various camping needs, including overnight stops and longer stays.
Important Technical Specifications
COMBI-CAMP Valley Model:
- Net weight: 350 kg
- Gross weight: 750 kg
- Dimensions (closed trailer):
- Length: 4160 mm
- Width: 1680 mm (top), 1260 mm (bottom)
- Height: 1140 mm (trailer body), 470 mm (ground clearance to trailer bottom)
- Tow bar length: 2680 mm
- Roof rack width: 535 mm
COMBI-CAMP Country Model:
- Net weight: 450 kg
- Gross weight: 750 kg
- Dimensions (closed trailer):
- Length: 4160 mm
- Width: 1680 mm (top), 1260 mm (bottom)
- Height: 1150 mm (trailer body), 425 mm (ground clearance to trailer bottom)
- Tow bar length: 2720 mm
- Roof rack width: 535 mm
- Additional width for side storage: 380 mm
General Specifications:
- Approved gross weight for all COMBI-CAMP trailers: 750 kg
- Luggage space (inside closed trailer): Approx. 34 cubic feet (1 cubic meter)
- Hitch weight: Should be between 44-110 pounds (20 to 70 kg)
- Electrical connection: 13-pole Jaeger/Multicon plug for trailer lights and power.
- Pin assignments:
- 1/L: Left turn signal (yellow)
- 2/54G: Fog light (blue)
- 3/31: Ground (contacts 1-8) (white)
- 4/R: Right turn signal (green)
- 5/58R: Right taillight/sidelight and license plate light (brown)
- 6/54: Brake light (red)
- 7/68L: Left taillight/sidelight (black)
- 8/8: Reversing light (grey)
- 9/9: Permanent power for fridge (brown/blue)
- 10/10: No assignment (brown/red)
- 11/11: No assignment (white/red)
- 12/12: No assignment
- 13/13: Ground (contacts 9-12) for fridge (black/white)
Usage Features
Before Setting Out:
- Checkpoints: Ensure all locks on the trailer and kitchen are closed and secure. Verify proper function of all road lights. Tighten wheel nuts and adjust brakes (if equipped) after the first 200 km of driving. Confirm hitch is correctly attached and the jockey wheel is tightened in its upper position. Be aware of trailer speed limits and fit national identification plates.
- Packing: Distribute heavy items over the axle line. Maintain a hitch weight of 20-70 kg. Leave 8 inches of space between luggage and outer walls for tent accommodation. Unzip the tent door and close the vent flap before folding down the trailer tent. Never overload the trailer.
Hitching:
- Lower the hitch onto the tow bar using the jockey wheel. A green indicator on the hitch confirms correct attachment.
- Attach the safety cable to activate brakes if the trailer detaches.
- Insert the trailer's electrical plug into the vehicle.
Opening the Trailer and Erecting the Tent:
- Park on a level site, avoiding placement under trees.
- Unhitch the COMBI-CAMP and level it using the front support leg/jockey wheel and rear jack legs.
- Unhook and lift the roof rack over the trailer.
- Open the trailer top, pulling it past the roof rack position until it reaches the ground. Do not use the roof rack as a lever.
- Inside the tent, push up the two connect poles on the center trailer frame until the tent is fully erected, then tighten the handscrew.
- Adjust internal frame adjusters. Level the tent floor using the jockey wheel, ensuring it's supported by the roof rack (now below the floor). Adjust rear jack legs if needed.
Final Adjustment:
- Pull the rain protection skirt over the trailer and adjust the nylon skirt over the floor edge.
- Windows have ventilation panels with mosquito nets. For ventilation, roll the canvas part to the side and tie it. For rain, open the panel slightly with a guy rope to the "D" ring.
- Open the outside vent by zipping it up, placing the fiberglass section into the sleeve, bending it, and inserting it into the pocket on the other side.
- Keep zippers on both ends of the hinge closed by approx. 15 cm.
- Ensure bands with buckles on all corners of the main tent are tight to prevent leaks. If a buckle comes loose, pull the band until the roof is flat, then close the buckle.
Integrated Sun Canopy/Awning:
- Erection: Lower the body canvas using two thumb screws to allow frames to move freely. Zip the canvas onto the COMBI-CAMP. Pull out the integrated frames (25 mm and 22 mm) until the pressure spring engages and the 25 mm frame is pulled out 3/4 way. Attach the front section of the frame. Adjust frame height and lock adjusters. Peg the side or roll it back to the trailer. Ensure the elastic flap covers the zipper.
- Backrest/Foot Adjustment (Country model): Lift and fix in stages. To return to flat, move it fully towards you to unlock.
- Draught Skirt: Fitted below the kitchen.
- Closing: When closing the trailer, the sun canopy can be left attached and stored on top of the trailer roof. Integrated frames must be pushed all the way back.
Sun Canopy as Kitchen Canopy:
- For overnight stops, move integrated frames halfway out and fold the rest of the roof below the canopy roof.
- If the sun canopy is on top of the trailer, pull out the 22 mm frame approx. 10 cm (4") until the pressure spring is visible. Then pull out the 25 mm frame approx. 1m (3'4").
- Pull the sun canopy forward and insert the frame into the small grey PVC pockets.
- Ensure the canopy is on top of all frames.
- Tighten frame adjusters and the loose hanging sun canopy to the trailer body canvas using ribbons.
- Sides can be pegged or attached to the body canvas.
Accessories (Annex and Door Canopy):
- Fitting the annex: Zip out the detachable side of the trailer's body canvas. Zip in the annex cabin. Insert poles with two round corners into the sleeve inside the annex. Insert support poles with hook ends into holes in the trailer's steel section at the floor. Place two support poles with clamps in the floor corners to fix the main tent. Stretch and peg the PVC floor of the annex (do not overtighten). Place the fiberglass pole inside the ventilation flap, then fit the inner tent.
- Fitting the door canopy: Zip it together and fit poles with guy ropes.
- Extra sun canopy: Has 3 brass eyelets at each end. One fits the awning frame spigots, and the others attach to guy ropes. The 3 legs are fitted and pegged with guy ropes.
Kitchen:
- Fridge: Clean inside and out with lukewarm water and mild detergent. Rub rubber-seal with talcum powder periodically. Can operate on 12V, 220/240V, or gas (Propane or Butane). Pre-cool with mains for 12 hours before touring. Mains connected via two-pin plug on the back.
- Liquid Gas Operation: Press regulator B down for 10 seconds to clear pipes. Ignite burner by pressing button "E" down a few times. Turn regulator "B" backwards to "MIN" for desired temperature. Cut gas supply when not in use.
- Gas Burners: Open gas supply tap. Turn control switch to big flame and press in. Depress control switch and ignite with a lighter. Keep pressing for 5-10 seconds for automatic ignition. Release control switch and turn to desired position. Do not cover front panel ventilation.
- Gas Taps: One tap for the fridge, one for the gas burners on the cooker top. Open position is vertical. Taps can be used separately.
- Water Tap: Electrically operated, powered by two 4R 25, 6-volt batteries (not supplied) in the battery box behind the lower plastic drawer. Pump activates when tap is turned on. Do not use if pump is not fully covered in water. Remove pump and use closed cap for water container while driving.
- General: Do not damage wiring of lights when placing items in the kitchen.
Maintenance Features
Tent:
- Drying: If packed wet or in misty weather, open the trailer as soon as possible to air and dry the tent canvas and mattresses to prevent mould and rot. If mould occurs, dry the spot thoroughly, brush it down, clean, and re-impregnate the canvas.
- Storage: Do not leave the COMBI-CAMP closed wet for more than 24 hours.
- Cleaning: Avoid chemical cleaners. Mattress covers should be dry-cleaned. Normal dirt can be washed with water, a little vinegar, and a soft brush. A vacuum cleaner can remove more resistant dirt.
- Poles: Separate all poles, ensure they are dry, and store them in the provided bag. Telescopic poles of the awning should be taken out and stored dry with other poles.
- Leaks: Leaking seams can be sealed with seam sealer.
- Shrink to Fit: Cotton tent canvases are designed to "shrink to fit." For the first use, spray the tent canvas with water while windows and doors are closed to ensure uniform shrinkage. Do not fold down the tent until absolutely dry.
- Natural Material: Cotton is a natural material, so color differences may occur.
Chassis / Roof Rack:
- Rust Proofing: Both chassis and roof rack have effective rust proofing.
- Protection: The roof rack is fitted with plastic protectors to minimize damage when opened against the ground.
Storage:
- Ensure the trailer and tent are completely dry before storage.
- Remove mattresses and inner tent, storing them in a totally dry spot during winter.