Do you have a question about the Comfort Zone CZST185 Series and is the answer not in the manual?
Basic safety precautions to reduce risk of electric shock, fire, or injury when using the fan.
Covers shock, hot surfaces, fire hazards, and electrical shock risks during fan operation.
Guidelines for fan location, placement, and electrical connection to a 120V outlet.
Explains how to use the On/Off/Speed and Oscillation controls.
Step-by-step guide for assembling the fan components, including base and grilles.
Instructions for cleaning the fan, motor maintenance, and general repair advice including fuse replacement.
Outlines the one-year limited warranty, exclusions, and manufacturer information.
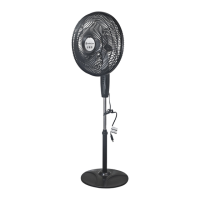
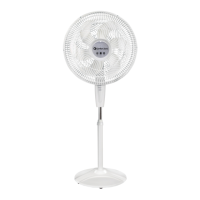
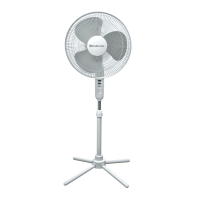
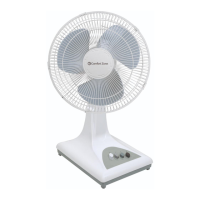
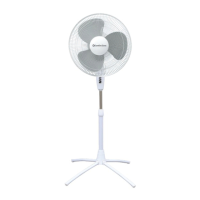
The Comfort Zone CZST185 Series is an 18" oscillating stand fan designed for indoor residential and office use. This fan provides cooling through its wide-area oscillation and adjustable settings, making it suitable for various room sizes and personal preferences. It features a patented fast assembly Quad-Pod® folding base, which simplifies setup and storage.
The fan operates by drawing in air and circulating it through its high-performance blades, providing a cooling breeze. The motor is designed for efficient operation, and the fan includes safety grilles to prevent accidental contact with the blades. The oscillation function allows the fan head to sweep from side to side, distributing air across a wider area, which is particularly useful in larger rooms or when multiple people are present. Users can control the oscillation feature via a dedicated knob located on the motor housing.
The fan offers three-speed settings—low, medium, and high—which can be selected using the ON/OFF switch. This allows users to customize the airflow intensity to their comfort level. The adjustable height feature, facilitated by a chrome extension pole, enables users to position the fan head at an optimal level for their needs. Additionally, the fan head can be tilted vertically, directing airflow precisely where it is desired.
For safety, the fan is equipped with a polarized two-prong plug, ensuring it is properly grounded when inserted into a matching outlet. Some models also include a replaceable fuse within the plug, which acts as an overload protection mechanism, preventing damage from short circuits.
To operate the fan, it should be placed on a smooth, non-combustible, level surface in an upright position. The fan connects directly to a 120V A.C., 60Hz wall outlet. It is crucial to ensure the plug fits tightly to prevent overheating. The fan should not be plugged into a circuit that is already servicing other electrical needs to avoid overloading.
Assembly of the fan is straightforward, starting with unfolding the patented Quad-Pod® base legs. The decorative plastic flange is then placed over the extension pole, which slides into the base receptacle and is secured with a nut. The chrome extension pole can be pulled out from the fan pedestal to adjust the height. The control panel and motor assembly are attached to the chrome extension, secured by a thumb screw.
Before installing the fan blade, any protective covering over the motor shaft should be removed. The blade cap is removed by twisting it clockwise while holding the metal shaft tightly, noting that the threads are reversed (unscrew = clockwise). The rear grille is assembled onto the motor housing, aligning with the pins. The fan blade is then placed onto the motor shaft, ensuring the pin on the shaft fits into the blade's slots. The blade cap is threaded onto the motor shaft in a counter-clockwise direction to tighten it (threads are reversed). Finally, the front grille is attached to the rear grille, starting by inserting it onto the slotted bottom clip, and then pressing the remaining grille clips to secure it. The fan should never be operated without the grilles in place.
To turn the fan on, users press the desired speed button (1-LOW, 2-MED, 3-HIGH). To turn it off, the 0-OFF button is pressed. The fan should be unplugged when not in use or when moving it. The oscillation function is activated by pressing down the Oscillation Control Knob and stopped by pulling it up.
Regular care and maintenance are essential for the fan's longevity and safe operation. Before cleaning, the fan must be unplugged from the outlet. The grille surface can be cleaned with a clean, damp cloth. Harsh chemical or abrasive cleaners should not be used. It is important never to immerse the fan or any electrical wires in water. The front grille must be replaced and allowed to dry completely before using the fan again. Periodic cleaning of the grille with a vacuum can help prevent dust buildup.
The internal motor bearings are permanently lubricated at the factory and do not require any additional lubrication from the user.
If the fan malfunctions or is damaged in any way, it should not be operated. Similarly, the fan should not be used if the blade, safety cage, or any visual imperfections are present. Power should be disconnected before servicing. For repairs covered under warranty, users should refer to the warranty statement. For other repairs, Comfort Zone® Customer Service can be contacted for assistance.
For models with a replaceable fuse in the plug, the fuse can be replaced if it blows due to an overload or short-circuit. To replace the fuse, grasp the plug and remove it from the receptacle. Open the fuse cover by sliding it towards the blades. Carefully remove the old fuse using a small tool, taking care not to break the glass window. Replace it with an identical 2.5 or 5.0 Amp, 125 Volt fuse (3.6mm x 10mm), ensuring it is properly seated. Then, slide the fuse cover back to its original closed position.
When storing the fan, it should be kept in its original carton. The power cord should be coiled and tied to prevent damage.
| Model | CZST185 Series |
|---|---|
| Type | Stand Fan |
| Speeds | 3 |
| Oscillation | Yes |
| Tilt Adjustment | Yes |
| Height Adjustment | Yes |
| Blade Size | 18 inches |
| Power Source | Electric |