ComfortNet HiDef Control System Installation Guide / 5
Installing Thermostat
■
Carefully separate the thermostat body from the thermostat base.
■
Place base at installation location and mark mounting hole locations on wall using base as a template.
■
Drill mounting holes.
■
Attach base snugly to wall using two mounting screws. Levelling is for appearance only and will not affect
thermostat operation.
■
Connect wires to terminal block on base.
■
18 AWG solid wire is recommended.
■
Push excess wire into wall and plug hole with a fire resistant material (such as fiberglass insulation) to prevent drafts
from affecting thermostat operation.
■
Carefully line up the thermostat with the base and snap into place.
Two Ways to Connect to the Outdoor Unit
METHOD ONE: 4-WIRE CONNECTION
Connect 4-Wire
Indoor Unit
Terminals 1 & 2 are communications wires.
They should never be connected to the 24 VAC
R&C power supply terminals.
Two Ways to Connect to the Outdoor Unit
METHOD TWO: 2-WIRE/TRANSFORMER CONNECTION
Low (24 VAC)
Voltage
High
Voltage
Transformer
Low Voltage
Connected to
R and C Terminals
Connect 2-Wires
to Indoor Unit
Connect High Voltage Transformer Leads to
L1 and L2 Male Spade Terminals on
Circuit Board.
Optional transformer
(P/N B1141643)
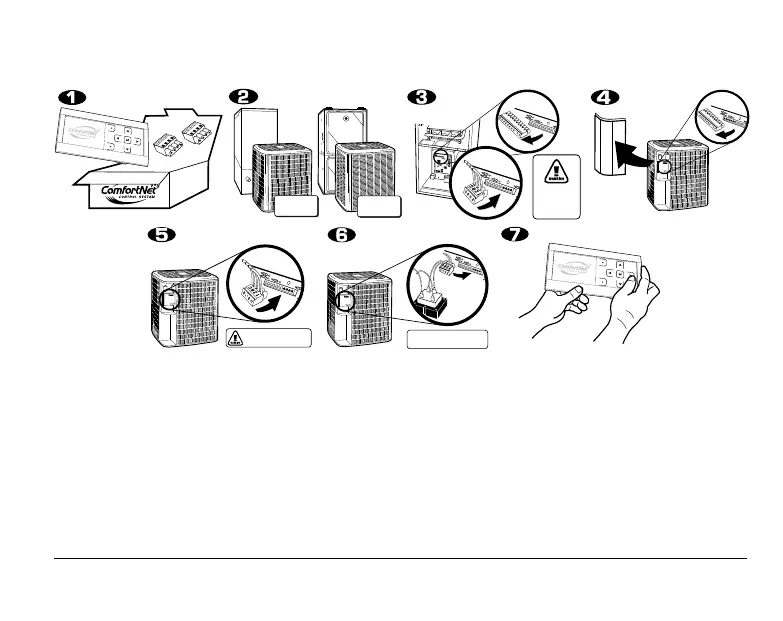
Install Thermostat on Interior Wall
NOTE: Thermostat
will automatically
configure to the
system once high
voltage power is
applied to the indoor
and outdoor equipment.
Remove and Inventory All
ComfortNet
™
Components
Remove Outdoor Unit Cover
and 7-Pin Connector
P/N F0430675005
Install HVAC Components
Gas
Furnace
Air
Handler
Air Conditioner
or Heat Pump
Air Conditioner
or Heat Pump
Terminals 1 & 2 are
communications wires.
They should never be
connected to the 24 VAC
R&C power supply
terminals.
Remove 9-Pin Connector
from Furnace or
Air Handler Control
Connect 4-Wires
from Stat and 2 or
4 Wires from Outdoor Unit
P/N F0430679005
P/N F0430673005
 Loading...