① Press the entrance button in status of hooking well (LED blinking status)
② Press the BRIGHT button in the right for 2 seconds in status of the screen on
③ Power LED is blinked as fast (BRIGHT control mode)
④ Control the BRIGHT as the user wants by pressing UP / DOWN button
⑤
Save the fixed default by pressing BRIGHT button for 2 seconds after setting done
⑥ Power LED is blinked as normal
2
① Press the entrance button in status of hooking well (LED blinking status)
② Press the COLOR button in the right for 2 seconds in status of the screen on
③ Power LED is blinked as fast (COLOR control mode)
④ Control the COLOR as the user wants by pressing UP / DOWN button
⑤
Save the fixed default by pressing COLOR button for 2 seconds after setting done
⑥ Power LED is blinked as normal
3
① Press the entrance button in status of hooking well (LED blinking status)
② Press the CONT button in the right for 2 seconds in status of the screen on
③ Power LED is blinked as fast (CONT control mode)
④ Control the CONT as the user wants by pressing UP / DOWN button
⑤
Save the fixed default by pressing CONT button for 2 seconds after setting done
⑥ Power LED is blinked as normal
4
① Press the BRIGHT button for 2 seconds in status of the screen on
② Video status is initialized to the factory delivery status
3
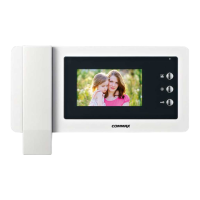
① Red: Voice
② Blue: GND
③ Yellow: Power (+12V)
④ White: Video
1
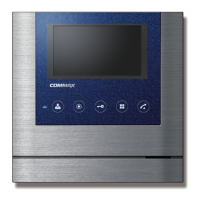
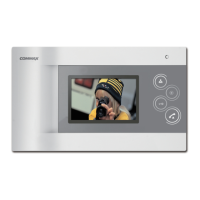
Ⅳ. Installation
Ⅴ. Wiring
N
① Do not install the camera where
it is exposed to Direct sunlight
② Keep cleaning up its lens to
capture good views.
N
① Avoid the range of direct sunlight
② Recommended height is pertinent
from 1450 ~ 1500mm
③ Avoid the installation near magnetic
activity, humid temperatures and gas
1). If high voltage cables are present in the vicinity, use a coaxial cable with
metal outer casing.
2). If any internal wires are exposed through mis-wiring, it may cause a short and
become a cause of malfunction or fire.
3).When connecting the monitor and camera, please make sure that the monitor
power is off.(turn on the power after plugging the AC power cord into the outlet)
4). Attend the wiring as it is a polarity
5). make it short for camera 2 connector in case of installing only one camera
(the default factory state)
6).Delete the optional camera pin of the above camera when to install two cameras
N
Image and call quality can be down when the monitor is expanded randomly.
SCREW T4(2EA)
SCREW M3
DRC-40CK