EasyManua.ls Logo

ConvaTec Esteem + - User Manual

ConvaTec Esteem +
2 pages
Print Icon
To Next Page IconTo Next Page
Loading...
Esteem
+ One-Piece Pouch with
ConvaTec Moldable Technology
6. Remove liner 2.
1. In the Box 2. Remove the moldable disk from the pouch.
12. Place the pouch on the body - 2.
10. Remove liner 4.
9. Make place for the stoma.
11. Place the pouch on the body - 1.
4. Molding.
4. Check the size of the molding.
3. Remove liner 1.
7. Place the disk on the body. 8. Remove liner 3.
4
Moldable disc & pouch come attached.
4
Remove moldable disc from the pouch.
6. Remove liner 2.
1. In the Box 2. Remove the moldable disk from the pouch.
12. Place the pouch on the body - 2.
10. Remove liner 4.
9. Make place for the stoma.
11. Place the pouch on the body - 1.
4. Molding.
4. Check the size of the molding.
3. Remove liner 1.
7. Place the disk on the body. 8. Remove liner 3.
4
Remove liner marked #1. This is
the molding side.
6. Remove liner 2.
1. In the Box 2. Remove the moldable disk from the pouch.
12. Place the pouch on the body - 2.
10. Remove liner 4.
9. Make place for the stoma.
11. Place the pouch on the body - 1.
4. Molding.
4. Check the size of the molding.
3. Remove liner 1.
7. Place the disk on the body. 8. Remove liner 3.
4
Roll and mold the disc to the size of the
stoma. Do not stretch, pull or cut. Pinch
into place once desired size is reached.
6. Remove liner 2.
1. In the Box 2. Remove the moldable disk from the pouch.
12. Place the pouch on the body - 2.
10. Remove liner 4.
9. Make place for the stoma.
11. Place the pouch on the body - 1.
4. Molding.
4. Check the size of the molding.
3. Remove liner 1.
7. Place the disk on the body. 8. Remove liner 3.
4
Check the size of the molding.
6. Remove liner 2.
1. In the Box 2. Remove the moldable disk from the pouch.
12. Place the pouch on the body - 2.
10. Remove liner 4.
9. Make place for the stoma.
11. Place the pouch on the body - 1.
4. Molding.
4. Check the size of the molding.
3. Remove liner 1.
7. Place the disk on the body. 8. Remove liner 3.
4
Remove liner marked #2.
This side will go on the skin.
6. Remove liner 2.
1. In the Box 2. Remove the moldable disk from the pouch.
12. Place the pouch on the body - 2.
10. Remove liner 4.
9. Make place for the stoma.
11. Place the pouch on the body - 1.
4. Molding.
4. Check the size of the molding.
3. Remove liner 1.
7. Place the disk on the body. 8. Remove liner 3.
4
Place the disk on the body. Push the roll
of adhesive toward the stoma to ensure
a close fit. Skin should be clean and dry.
6. Remove liner 2.
1. In the Box 2. Remove the moldable disk from the pouch.
12. Place the pouch on the body - 2.
10. Remove liner 4.
9. Make place for the stoma.
11. Place the pouch on the body - 1.
4. Molding.
4. Check the size of the molding.
3. Remove liner 1.
7. Place the disk on the body. 8. Remove liner 3.
4
Remove liner marked #3.
6. Remove liner 2.
1. In the Box 2. Remove the moldable disk from the pouch.
12. Place the pouch on the body - 2.
10. Remove liner 4.
9. Make place for the stoma.
11. Place the pouch on the body - 1.
4. Molding.
4. Check the size of the molding.
3. Remove liner 1.
7. Place the disk on the body. 8. Remove liner 3.
4
Separate the sides of the
pouch to allow some air to
enter the pouch.
6. Remove liner 2.
1. In the Box 2. Remove the moldable disk from the pouch.
12. Place the pouch on the body - 2.
10. Remove liner 4.
9. Make place for the stoma.
11. Place the pouch on the body - 1.
4. Molding.
4. Check the size of the molding.
3. Remove liner 1.
7. Place the disk on the body. 8. Remove liner 3.
4
Place pouch on the moldable disc
6. Remove liner 2.
1. In the Box 2. Remove the moldable disk from the pouch.
12. Place the pouch on the body - 2.
10. Remove liner 4.
9. Make place for the stoma.
11. Place the pouch on the body - 1.
4. Molding.
4. Check the size of the molding.
3. Remove liner 1.
7. Place the disk on the body. 8. Remove liner 3.
4
Smooth/hold skin barrier in place
for about 30 seconds.
Moldable Disc application
1
6. Remove liner 2.
1. In the Box 2. Remove the moldable disk from the pouch.
12. Place the pouch on the body - 2.
10. Remove liner 4.
9. Make place for the stoma.
11. Place the pouch on the body - 1.
4. Molding.
4. Check the size of the molding.
3. Remove liner 1.
7. Place the disk on the body. 8. Remove liner 3.
4
Remove pouch release liner.
Applying pouch to the Moldable Disc
2
Refer to package insert for complete instructions.
Question and Answer IconNeed help?

Do you have a question about the ConvaTec Esteem + and is the answer not in the manual?

Summary

Moldable Disc Application

Initial Attachment

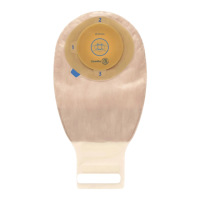
Moldable disc and pouch are provided pre-attached for immediate use.

Disc Removal from Pouch

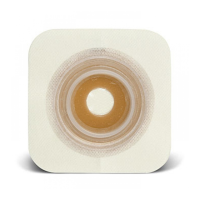
Separate the moldable disc from the pouch before proceeding with molding.

Liner Removal - Molding Side

Remove liner marked #1 to expose the disc's molding side for shaping.

Molding the Disc

Roll and shape the disc to match the stoma size; pinch to set without stretching or cutting.

Size Verification

Confirm the molded disc accurately matches the required stoma size.

Liner Removal - Skin Side

Remove liner marked #2, which is designed to adhere to the skin.

Liner Removal - Pouch Opening

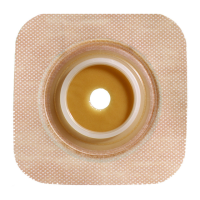
Remove the third liner (marked #3) from the pouch opening.

Pouch Air Venting

Separate pouch sides to allow air entry, facilitating application.

Applying Disc to Skin

Apply disc to clean, dry skin, pressing adhesive towards stoma for a close fit.

Pouch Attachment to Disc

Pouch Release Liner Removal

Peel off the release liner from the pouch's adhesive backing.

Pouch Placement on Disc

Align and place the pouch securely onto the pre-applied moldable disc.

Adhesive Securing

Smooth and hold the skin barrier for approximately 30 seconds to ensure adhesion.

InvisiClose Tail Closure

Securing the Pouch Tail

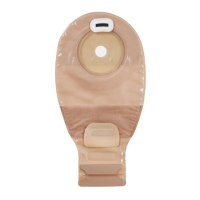
Fold pouch tail three times, align closures, add air, then press and pinch to secure.

Discreet Tail Concealment

Invert the Lock-it-Pocket for enhanced discretion, hiding the pouch tail.

Drainable Pouch Management

Pouch Emptying Procedure

Tilt pouch up, peel open closure, unravel tail, pushing sides for easier emptying.

Pouch and Disc Removal

The entire pouch and disc unit can be removed together when changing is necessary.

Overview

The ConvaTec Esteem™ One-Piece Pouch with Moldable Technology is an ostomy appliance designed for discreet and secure management of stomas. This device integrates a moldable disc and a pouch into a single unit, simplifying the application and removal process.

Function Description

The primary function of the Esteem™ One-Piece Pouch is to collect ostomy output while providing a secure, leak-proof seal around the stoma. The moldable disc conforms to the individual's stoma shape, creating a custom fit that helps protect the skin from effluent and reduces the risk of leakage. The integrated pouch collects the output, and for drainable versions, allows for controlled emptying. The InvisiClose™ Tail Closure system ensures discreet and secure closure of the pouch tail.

Usage Features

1. Moldable Disc Application:

  • Preparation: The moldable disc and pouch come pre-attached. The first step involves carefully removing the moldable disc from the pouch.
  • Liner Removal: Three liners need to be removed in sequence.
    • Liner #1 (molding side): This liner is removed first. The user then rolls and molds the disc to the exact size of their stoma. It is crucial not to stretch, pull, or cut the disc during this process. The disc is pinched into place once the desired size is achieved.
    • Sizing Check: After molding, the user should check the size to ensure it perfectly matches the stoma.
    • Liner #2: This liner is removed next. This side of the disc will be applied to the skin.
    • Liner #3: This liner is removed last.
  • Pouch Preparation: Before application, the sides of the pouch should be separated slightly to allow some air to enter. This helps prevent the pouch from collapsing and ensures proper adherence.
  • Disc Placement: The molded disc is then placed onto the body, centering it around the stoma. The user should push the roll of adhesive toward the stoma to ensure a close and secure fit. The skin around the stoma should be clean and dry before application.

2. Applying Pouch to the Moldable Disc (Integrated Design):

  • Release Liner Removal: The pouch release liner is removed.
  • Pouch Placement: The pouch is then placed onto the moldable disc, aligning it correctly.
  • Secure Adherence: The skin barrier (moldable disc) should be smoothed and held in place for approximately 30 seconds to ensure optimal adhesion to the skin.

3. InvisiClose™ Tail Closure (for drainable pouches):

  • Closing the Pouch: To close the pouch, the end of the tail is folded up towards the user three times until the interlocking closures align. It is important to keep a small amount of air inside the pouch before closing. The user then presses and pinches across the entire closure to secure it.
  • Discretion: For added discretion, the Lock-it-Pocket™ feature allows the user to turn the tail inside-out and hide it within the pocket.

4. Emptying and Removing Drainable Pouch:

  • Emptying: To empty the pouch, the tail is tilted up towards the body. The closure is then peeled open, and the tail is unraveled. For easier opening, the sides of the closure can be pushed together.
  • Removal: When it's time to change the pouch (whether drainable or closed-end), the entire unit – both the disc and the pouch – can be removed as one integrated piece.

Important Technical Specifications

  • One-Piece System: This design integrates the skin barrier (moldable disc) and the collection pouch into a single unit, simplifying application and removal.
  • Moldable Technology: The disc is designed to be rolled and molded to the exact stoma size without the need for cutting, providing a custom, secure fit and helping to prevent leakage and protect peristomal skin.
  • InvisiClose™ Tail Closure: A discreet and secure closure system for drainable pouches, featuring interlocking closures and a Lock-it-Pocket™ for hiding the tail.
  • Adhesive: The device utilizes an adhesive system designed for secure attachment to the skin while being gentle enough for removal.

Maintenance Features

  • Regular Emptying: Drainable pouches should be emptied regularly to prevent overfilling and maintain hygiene.
  • Pouch Change: The entire one-piece system (disc and pouch) is designed for single-use and should be changed as a complete unit according to healthcare professional recommendations or when indicated by wear time or leakage.
  • Skin Care: Maintaining clean and dry peristomal skin is crucial for optimal adhesion and skin health.
  • Refer to Package Insert: The manual explicitly states to "Refer to package insert for complete instructions," indicating that additional detailed maintenance and care instructions are provided with the product.

This Esteem™ One-Piece Pouch with Moldable Technology aims to provide ostomy users with a reliable, comfortable, and discreet solution for managing their stoma, emphasizing ease of use and skin protection.

ConvaTec Esteem + Specifications

General IconGeneral
BrandConvaTec
ModelEsteem +
CategoryPersonal Care Products
LanguageEnglish

Related product manuals