EasyManua.ls Logo

ConvaTec Natura User Manual

ConvaTec Natura
2 pages
To Next Page IconTo Next Page
Page #1 background imageLoading...
Page #1 background image
Natura
Accordion Flange with
ConvaTec Moldable Technology
Accordion Flange application
1
Applying pouch
2
Separate the sides of the pouch to
allow some air to enter the pouch.
PULL UP accordion flange and
hold it with thumbs on top and
fingers underneath. Line up
flanges of pouch and skin barrier.
Start at bottom and apply
pressure completely around
the flanges until the pouch
and flange are snapped
completely together.
Refer to package insert for complete instructions.
There is a clear release liner on back of
skin barrier: DO NOT REMOVE YET.
Roll and mold the moldable adhesive to
the size of the stoma. Do not stretch,
pull or cut. Pinch into place once
desired size is reached.
Remove release liner and center
the opening over the stoma
and apply to clean, dry skin.
Place accordion flange on body.
Push the rolled adhesive toward
to stoma to ensure a close fit.
Remove the white release paper
from the tape collar and press
against the skin. Smooth tape
collar and hold skin barrier in
place for about 30 seconds.

Other manuals for ConvaTec Natura

Question and Answer IconNeed help?

Do you have a question about the ConvaTec Natura and is the answer not in the manual?

ConvaTec Natura Specifications

General IconGeneral
BrandConvaTec
ModelNatura
CategoryPersonal Care Products
LanguageEnglish

Summary

Accordion Flange Application

Prepare Moldable Adhesive

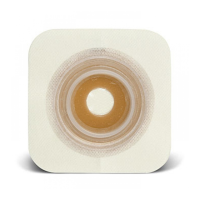
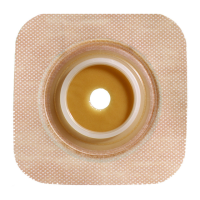
Roll and mold adhesive to stoma size without stretching, pulling, or cutting. Pinch into place.

Apply Flange to Skin

Remove liner, center over stoma, press onto clean, dry skin. Ensure close fit.

Secure Flange and Tape Collar

Remove release paper, press tape collar. Hold skin barrier in place for 30 seconds.

Applying Pouch

Prepare Pouch for Attachment

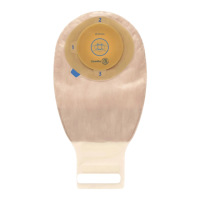
Separate the sides of the pouch to allow some air to enter.

Align Pouch and Flange

Pull up flange, hold with thumbs/fingers. Line up pouch and skin barrier flanges.

Snap Pouch and Flange Together

Start at the bottom, apply pressure around flanges until snapped together.

Closing, Emptying, and Removing Pouch

Close Pouch for InvisiClose Tail

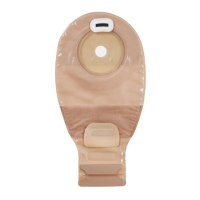
Fold pouch end 3 times until closures line up. Press and pinch to secure.

Empty Pouch and Unravel Tail

Tilt tail up, peel open closure, and unravel tail. Push sides for easier opening.

Remove Pouch from Flange

Hold flange down, gently unsnap pouch with one hand.

Related product manuals