Editing Selections
Once you have selected tracks for copying, you can delete,
insert or change selections before copying takes place.
You can use the and keys to move backwards
and forwards through the selected tracks.
In the example
shown here track 03
is to be deleted
and track 12 is to be
inserted between
tracks 04 and 05.
Deleting
Tracks
By pressing the key, the cursors move back to track
03. As this happens, the menu soft keys change. To remove
track 03, press . The track instantly disappears.
Inserting
Tracks
Pressing the key again moves the cursor back to track 05.
Press to show new key options and select .
This will open a gap...
... to select track 12 using the and keys.
Changing
tracks
You can also change existing track selections.
In the example shown
here track 05 is to be
replaced by track 07.
Again, you can use the and keys to move
backwards and forwards through the selected tracks.
Press the key, followed by the key. Then use
the key to select track 07.
Select when editing is complete. Copying will begin
immediately.
del edit help! go
Copy tracks from A to B
From 04 05 03 13
To 07 08 09 10 11 12 13 14 15
76:34
free
03 09
AB
From 04 05 13
To 07 08 09 10 11 12 13 14 15
From 04 05 13
To 07 08 09 10 11 12 13 14 15
From 04 12 05 13
To 07 08 09 10 11 12 13 14 15
From 04 12 05 13
To 07 08 09 10 11 12 13 14 15
From 04 12 07 13
To 07 08 09 10 11 12 13 14 15
Copyright
This product has been designed for schools use and it is envisaged
that recordings for copying will have been created within the school
environment. Remember that to copy a CD or any portion of a
CD requires the consent of the copyright owner. Coomber does
not endorse the illegal copying of copyright material.
COPYING TRACKS
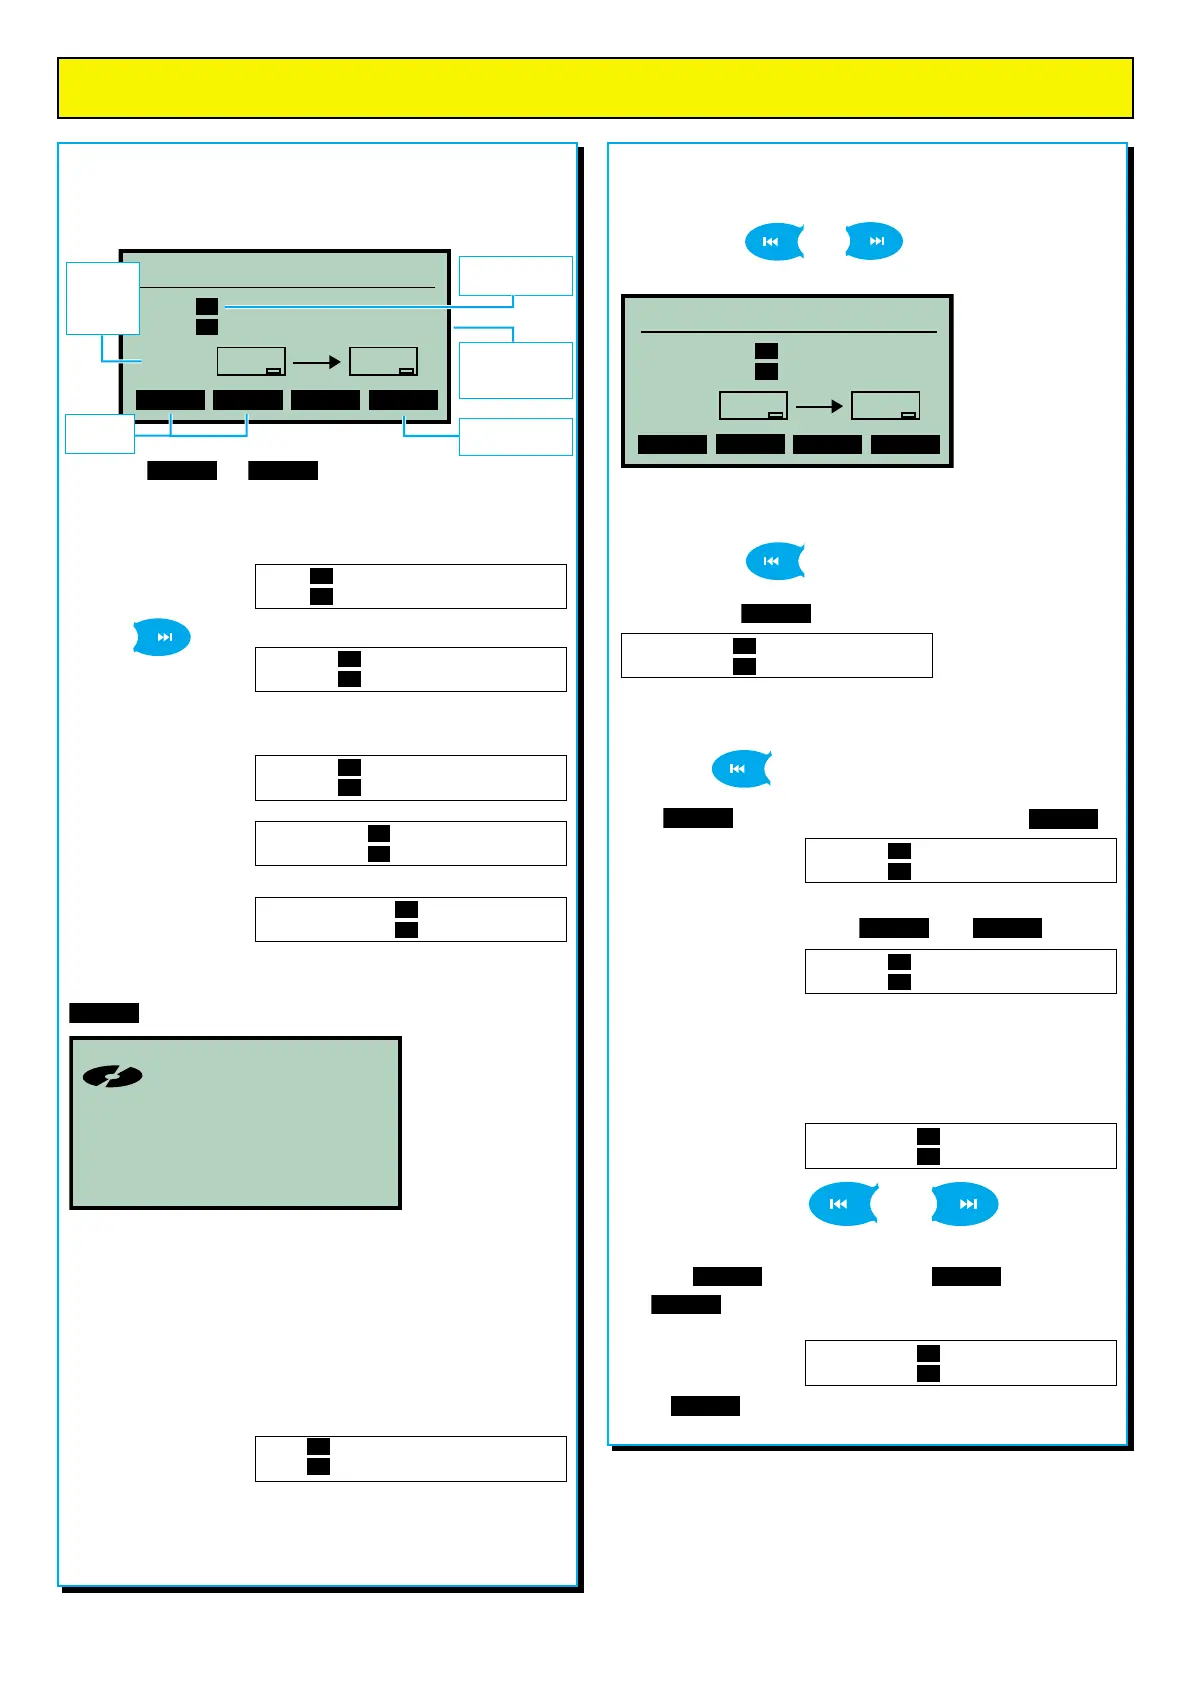
Selecting and copying tracks
Copying to a blank CD
Use the menu to select Copy functions > Copy tracks. A box
appears...
Press the or menu soft keys repeatedly to
select a track to copy.
Imagine you want to copy tracks 3, 14, 9 and 11.
To select the first track
keep pressing the “+1”
key until track 3 appears.
Use the key to
move the cursor to the
next position...
...and select the second track by pressing the
“+10” and “+1”
keys until track 14
is selected.
Repeat the process to
select the third track...
...and again to select
the final track.
To hear and confirm your selection, press PLAY. The first six
seconds of each selected track will play. If satisfied, press the
key. Copying will begin immediately.
The finished CD is
“unfixed” to allow
further copying.
Adding tracks at a later date or time
Copying to a partially completed “unfixed” CD
The only difference is that when you select Copy functions
and Copy tracks the dialogue box looks slightly different.
In the example shown
here an unfixed CD-R
has been inserted.
It already has seven tracks on it - so the first available track for
recording will be track 08!
+10 +1 help! go
Copy tracks from A to B
From 01
To 01 02 03 04 05 06 07 08 09
76:34
free
01 01
AB
Track No. of
original CD
Press only when
ready to copy
Time
remaining
for
copying
Track
selection
Copy spaces
available on
CD/R or CD/RW
From 03
To 01 02 03 04 05 06 07 08 09
From 03 04
To 01 02 03 04 05 06 07 08 09
From 03 14
To 01 02 03 04 05 06 07 08 09
From 03 14 09 11
To 01 02 03 04 05 06 07 08 09
From 03 14 09
To 01 02 03 04 05 06 07 08 09
R
Drive B
04 18:30
Recordable
Remaining 61:27
From 01
To 08 09 10 11 12 13 14 15 16
 Loading...