1 Handle
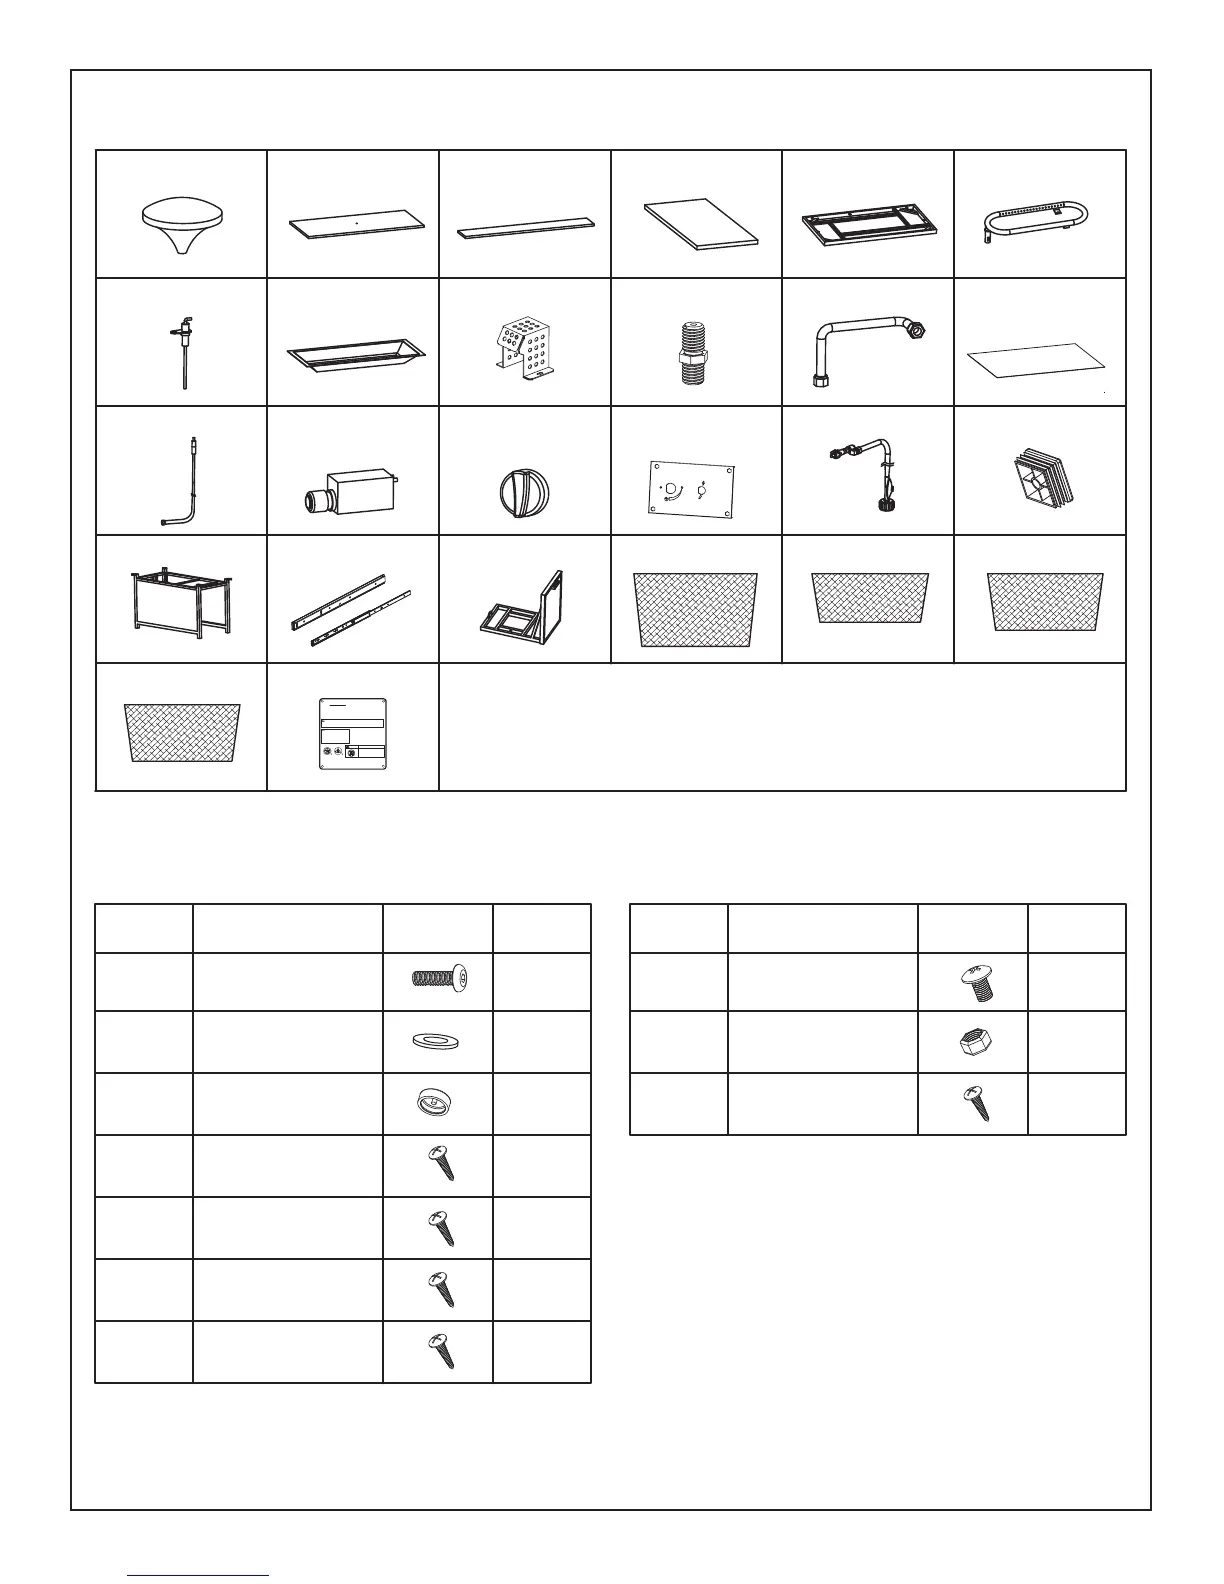
ILLUSTRATED PARTS LIST
2 Burner cover 3 Ceramic tile 4 Ceramic tile 5 Table top rim 6 Burner
7 Electrode tip
8 Fire bowl 9 Pilot box 10 Orifice 11 Bellows 12 Heat shield
13 Thermocouple
14 Pulse ignition system
15 Gas control knob 16 Control panel 17 Hose assembly 18 Foot glider
19 Base
20 Sliding rail assembly
21 Door 22 textile fabric 23 textile fabric 24 textile fabric
25 textile fabric 26 Panel
OFF
FERME
Serial Number
Model
Number:GL2AB-244412-143
CAUTION:
The gas pressure regulator provided with this appliance must be used. This
regulator is set for an outlet pressure of 11 inches water column (2.7kPa). The gas supply
must be turned off at the LP-gas supply cylinder when this appliance is not in use.
Gas: Propane Input: 40,000 BTU/hr.
Minimum clearance from combustible constructions: Rear: 24in.609mm, Top 72
in.1828mm
FOR OUTDOOR USE ONLY .If stored indoors, detach and leave cylinder
outdoors
WARNING : Improper installation, adjustment alteration, service or
maintenance can cause injury or property damage. Read the installation,
operating and maintenance instructions thoroughly before installing or servicing
this equipment.
WARNING: Do not store
or use gasoline or other
flammable vapors and liquids
in the vicinity of this or any
other appliance .An
LP-cylinder not connected for
use shall not be stored in the
vicinity of this or any other
appliance.
LIGHTING
INSTRUCTIONS
TO TURN OFF
GAS
1. Push in gas control knob slightly and turn to "OFF"
CARBON MONOXIDE
HAZARD
This appliance can produce carbon
monoxide which has no odor
Using it in an enclosed space can
kill you.
Never use this appliance in an
enclosed space such as a camper,
tent, car or home.
Design Certified by CSA
International ANSI Z21.97/CSA
2.41-2014
Outdoor Decorative Gas
Appliances
DANGER
CERTIFIED
R
N
G
I
S
E
D
C
E
R
T
I
F
I
E
D
R
1. Push in gas control knob slightly and turn to
"OFF"
2. Turn gas control knob the "ON/MIN"
3. Push in gas control knob all the way and hold
.Continue to press the ignition button for 15 seconds.
4. If the burner does not light in 15 seconds,
release the knob and it will pop back out. Wait 5
minutes before attempting to light the burner again,
repeat step 1 to 3
PART DESCRIPTION IMAGE QTY PART DESCRIPTION IMAGE QTY
A
B
C
D
E
F
G
4
4
4
4
8
80
4
AA
BB
CC
4
4
5
Bolt
(M6*20)
Washer
Plastic bolt cap
Screw
(M4*5)
Screw
(M4*8)
Screw
(M4*15)
Screw
(M4*20)
Bolt
(M6*10)
Nut
Screw
(ST4.2*9.5)
HARDWARE CONTENTS
8
 Loading...