Do you have a question about the Costco Salome 1403230 and is the answer not in the manual?
Covers load limits, flame/heat warnings, weather, and compliance.
Covers weight, adult assembly, keeping area clear, tool use, and structural integrity.
Covers part verification, hardware check, and required tools.
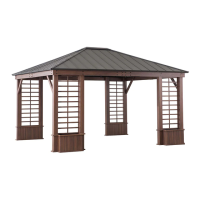
Connect base cover (F2) and plate (F1) to post (E) with bolts (AA).
Secure post (E) to top cover (G) with bolts (AA).
Insert lintels (A1/A3, A2/A4) into connectors (B).
Fix connection pieces (D) and lintel covers (C2) to lintels with bolts.
Attach top covers (G) to left-long lintels (A1) with bolts (AA).
Attach top covers (G) to right-long lintels (A2) with bolts (AA).
Fix support bars (J1) to posts (E) and left-long lintels (A1) with bolts (AA).
Fix support bars (J2) to posts (E) and right-long lintels (A2) with bolts (AA).
Attach posts (E) to left/right-short lintels (A3/A4) using bolts (AA).
Secure support bars (J1/J2) to posts (E) and lintels with bolts (AA).
Connect corner pieces (H) and covers (G1) to top covers (G) using bolts.
Insert top connecting tubes (K2) into small top frames (K1) and connect with bolts (AA).
Attach long-top bars (I1) to corner pieces (H) using bolts (HH).
Secure long-top bars (I1) to small top frames (K1) with bolts (AA).
Connect short-top bars (I2) to top connecting tubes (K2) using bolts (AA).
Secure short-top bars (I2) to small top frames (K1) with bolts (AA).
Connect small top lintels (L1/L2) using bolts (DD).
Connect support bars (N) to center connector (M2) and hook (M3) to connector.
Attach small top lintels (L2) to small top frames (K1) with bolts (AA).
Connect center bars (N1) to top connecting tubes (K2) and center connector (M2) using bolts.
Connect bar-small tops (O/O2) to small top support bars (N) with bolts (AA).
Secure bar-small tops (O1/O2) to small top center bars (N1) with bolts (AA).
Install small top panels (W1, W2, W3) onto long bar-small tops (O1/O2).
Install small top panel (W4) onto the small short top bar (O).
Attach small top panels (T1) to support bar (N) and center connector (M2) to cover (M1) with bolts.
Connect long edge sealing (Q2) to bars (O1/O2) and short edge sealing (Q1) to bar (O) with bolts.
Attach bar-big tops (P1/P2) to long/short top bars (I1/I2) with bolts (AA).
Secure bar-big tops (P3/P4) to long/short top bars (I1/I2) with bolts (AA).
Connect bar-big top (P5) to short-top bars (I2) with bolts (AA).
Install big top panels sequentially and fix with short/long trim strips (S1/S2) using bolts (CC).
Fix L plates (R1-R4) onto top connecting tubes (K1/K2) with bolts (AA).
Attach long-top bars (I1) to big top covers (T2) from inside using bolts (GG).
Connect corner covers (C1) to lintels (A1/A4) using bolts (JJ).
Fix air vents (U/U1) onto small top lintels (L1/L2) as shown.
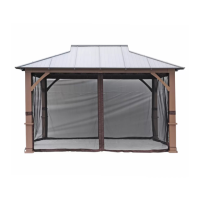
Hang mosquito netting (U2) on the hook of the lintel.
Fix stakes (MM) into the ground through the base plates (F1).
Use mild detergent, rinse with water, and air dry. Avoid harsh chemicals.
Details on product warranty, exclusions, and customer service contact.
| Brand | Costco |
|---|---|
| Model | Salome 1403230 |
| Category | Outdoor Furnishing |
| Language | English |