9For additional information email info@ardisam.com or call 800-345-6007 M-F 8-5
Operator’s Manual
17306 CRT Tiller
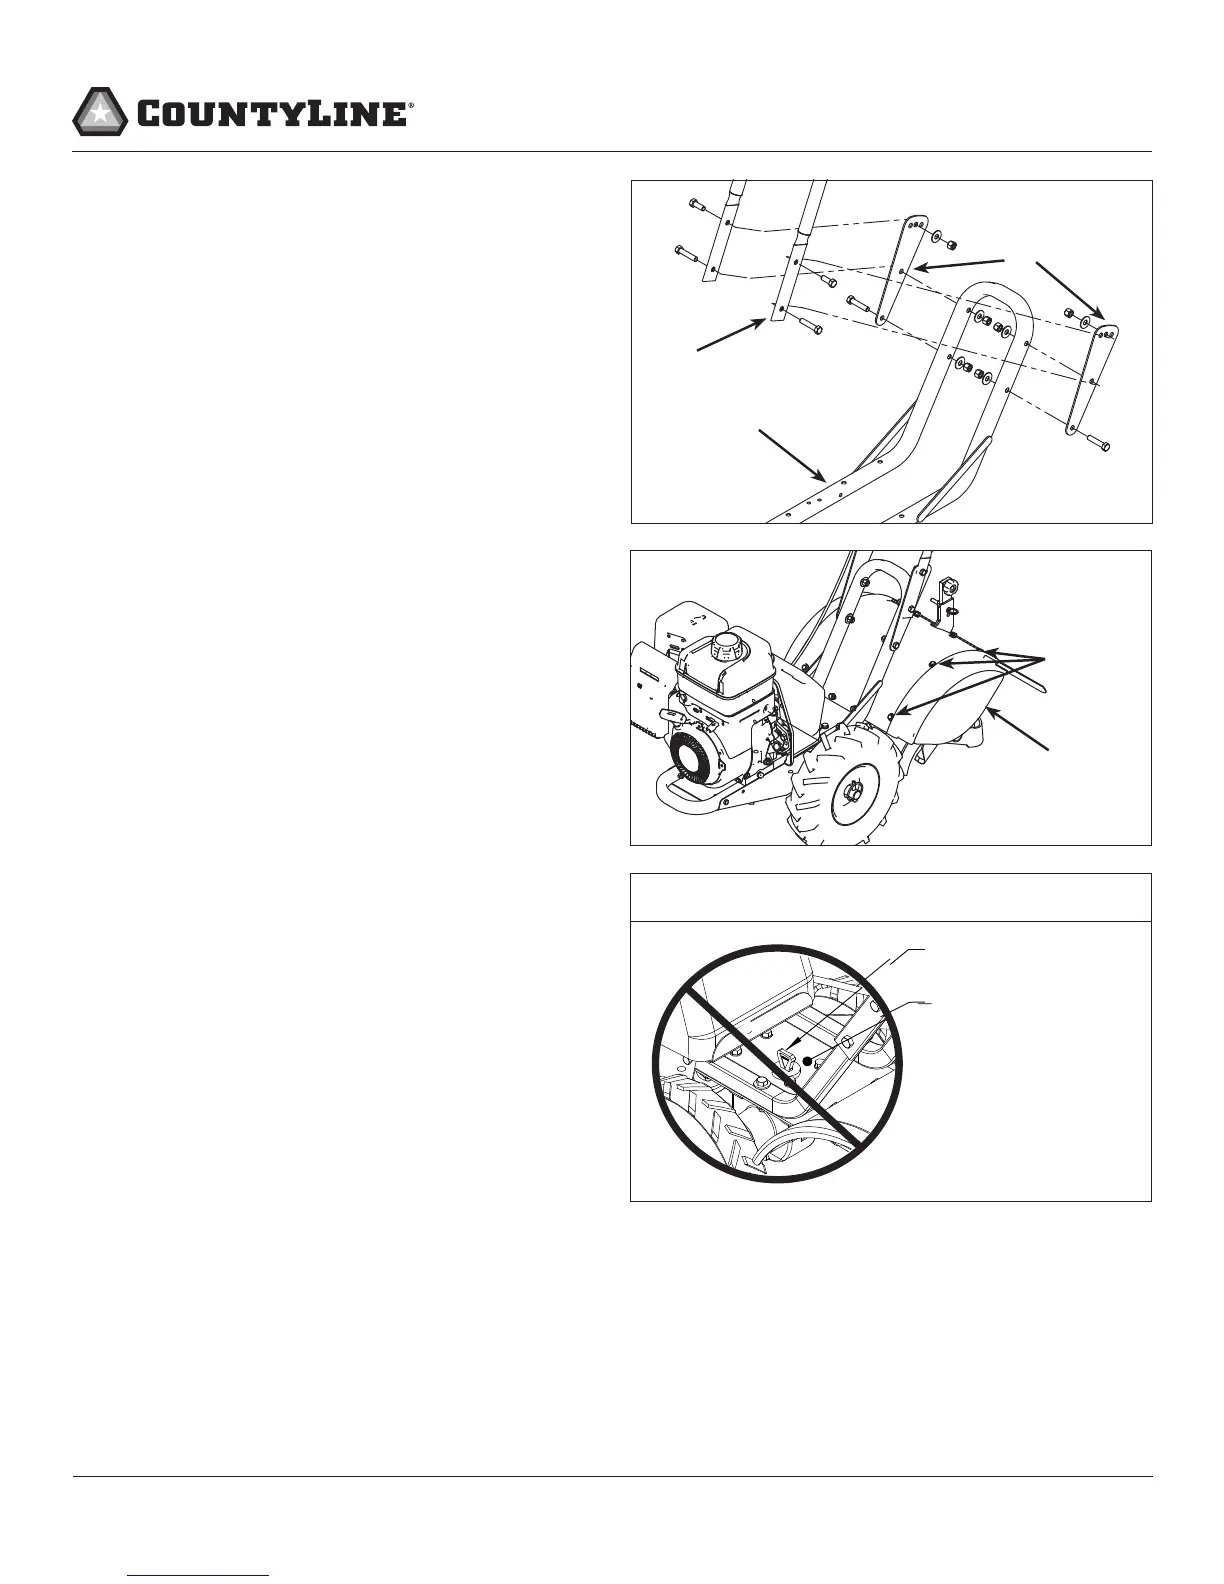
FIGURE 2
handle bar extensions
handle bar
lower handle bar mount
ATTACH HANDLE BAR
1. Locate handle bar extensions. SEE FIGURE 2
2. Place handle bar extensions on outside of lower handle bar
mount. Line up the handle bar extension pieces with the
lower handle bar mount as shown in the decal located on
the lower handle bar mount next to the mounting location.
SEE FIGURE 2
3. Insert one 3/8-16 x 1 3/4” bolt for each side in lower holes of the
extension pieces. The bolts will pass through the lower hole of
the lower handle bar mount. Put 3/8” at washers onto bolts.
NOTE: Always put washers on the tubing side of bolts.
4. Hand tighten 3/8-16 nuts on each bolt.
5. Now assemble the handle bar to the handle bar extensions.
Note: Handle bar goes to the outside of the handle bar
extensions.
6. Insert one 3/8-16 x 1-3/4” bolt for each side in lower holes of
the handle bar. Note: Bolts will be going through the upper
holes of the lower handle bar mount along with the middle
holes of the extensions. Put 3/8” at washers onto bolts.
7. Hand tighten 3/8-16 nuts on each bolt.
8. Insert one 3/8-16 x 1 bolt for each side in upper holes of
the handle bar. Bolts will pass through upper holes of the
extensions. Put 3/8” at washers onto bolts.
9. Hand tighten 3/8-16 nuts on each bolt.
10. Tighten 3/8-16 nuts on each of the 6 bolts connecting the
handle bar, handle bar extensions and handle bar mount
together.
ATTACH TINE SIDE SHIELDS
1. Locate side shields. SEE FIGURE 3
2. Take one side shield, raise it up against one side of the tine
guard and hold in place.
3. Place a 1/4” at washer onto three 1/4-20 x 3/4” bolts. Insert
these three bolts in each of the three holes of the tine guard,
making sure they also pass through the side shield. Put an
additional 1/4” at washers onto the underside of the bolts.
NOTE: The side shield needs to be below the tine hood when
they are attached together.
4. Hand tighten 1/4-20 nuts on each bolt.
5. Tighten 1/4-20 nuts on each of the three bolts connecting the
two side shields to the tine guard.
6. Repeat steps 2-4 for the second side shield.
cover plate
transmission
gear case
dipstick
IMPORTANT
DO NOT PUT
ENGINE OIL IN
TRANSMISSION
LUBRICANT IS ALREADY
INSTALLED IN TRANSMISSION.
FILL ENGINE CRANKCASE
1. Add oil according to engine manual. Do not overll. Use a
clean, high quality detergent oil. Use no special additives with
recommended oils. Do not mix oil with gasoline. Oil level
must be full. Check the oil level by removing oil ll plug. Oil
level should be up to the bottom of the ll plug opening.
2. Always check oil level before starting engine. Refer to engine
manual for capacity and type of oil to use.
FIGURE 3
washers
& botls
side
shield