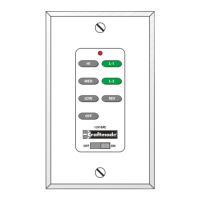
Operation Instructions
ON/OFF For emergency shut off.
HIGH Controls fan motor speed. To select desired speed,
MEDIUM press button once and release
LOW
REVERSE Controls direction of fan blades. To reverse fan blades, press
once and release.
FAN OFF Turns fan motor speed off. Press once to turn off. To start
motor speed again, hit one of the motor speed buttons.
L-1 Controls the on/off and intensity for optional bottom light
kit for Constantina, Crescent, Fresco, Light Rays, Ol’ Madrid,
Valencia, & Wellington models. Push and release for on/off
function. Hold down for full range light dimming.
Controls the on/off and intensity for side body lighting on
Constantina, & Fresco models. Push and release for
on/off function. Hold down for full range light dimming.
Note: This button will not operate any functions for fan
models not listed above.
L-2 Controls the on/off and intensity for the optional bottom
light kit. Push and release for on/off function. Hold down
for full range light dimming.
Controls the on/off and intensity for the indirect uplighting.
Push and release for on/off function. Hold down for full
range light dimming. Note: Uplight control for the
Constantina, Crescent, Fresco, Light Rays, Ol’ Madrid, &
Wellington.
Controls the on/off and intensity for side body lighting for
the Valencia model. Push and release for on/off function.
Hold down for full range light dimming.
NOTE: The "High", "Medium" or "Low" buttons may be used to
start the fan motor. The speed of the fan may be changed at
any time.
Read and Save These Safety Precautions
1. Turn off electricity at main switch before wiring or servicing fan in
order to avoid possible electrical shock.
2. All wiring must be in accordance with the National Electric Code
(ANSI/NFPA 70-1999) and local electrical codes. Electrical installation
should be performed by a qualified licensed electrician.
3. After making the wire connections, the wires should be spread apart
with the grounded conductor and the equipment-grounding conductor
on the one side of the outlet box and the ungrounded conductor on
the other side of the outlet box.
4. The splices after being made should be turned upward and pushed
carefully up into the outlet box.
5. Conductor of a fan identified as grounded conductor to be connected
to grounded conductor of power supply, conductor of a fan identified
as ungrounded conductor to be connected to an ungrounded conductor
of power supply, conductor of fan identified for equipment grounding
to be connected to an equipment-grounding conductor.
6. Fan should not be mounted in an area where it might get wet.
7. The outlet box must be able to support hanging weight of 45 lbs., and
must be secured to a beam with wood screws to prevent box from
coming loose.
8. For safety and best operating results, we recommend that you have a
qualified electrician assemble and install your fan.
9. WARNING: To reduce the risk of fire or electric shock, do not use
this fan with any solid state speed control device.
Tools You Need
1. Phillips Screwdriver (included) 3. Wire Strippers2. Flat Screwdriver
 Loading...