Do you have a question about the Craftsman 113.242502 and is the answer not in the manual?
Proper use, clean area, safe environment, no forcing, correct tool, balance, unattended operation.
Proper apparel, safety goggles, avoid hazardous environments.
Guards, tool removal, maintenance, disconnect power, accessories, parts check, alignment.
Grounding, secure work, keep children away, workshop kid-proof, guards in place.
Ensure saw is stable and positioned safely away from the blade's line of operation.
Comprehensive guide to preventing kickback through proper setup and technique.
Protecting oneself with safety gear and avoiding hazardous practices.
Precautions regarding guard removal, workpiece handling, and general safe practices.
Safety for cutting tools, accessories, table inserts, and workpiece control.
Awareness of noises, vibrations, damaged parts, and familiarity risks.
Details voltage, amperes, hertz, phase, and RPM for the saw's AC motor.
Explains the manual-reset thermal overload protector and its function.
Handle normal loads on voltages within 10% of nameplate, heavy loads require correct voltage.
Check connections, load, and supply circuit for motor troubles.
Ensure saw is grounded; use a 15-amp, 240-volt circuit.
Details of the one-year repair warranty for defects in material or workmanship.
Lists the tools required for assembling the table saw.
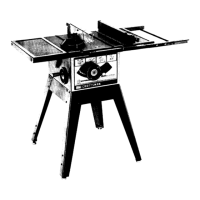
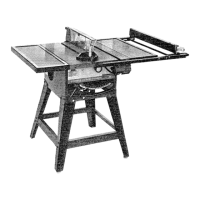
Identifies all the individual parts included in the package.
Details the parts included with the Model 113.242502 table saw.
Instructions for cleaning and waxing the table surface.
Step-by-step guide to attaching the saw legs to the frame.
Ensure the table insert is flush with the table top.
Procedures for removing and reinstalling the table insert.
Procedure to ensure the blade is at a 90° angle to the table.
Method to check if the sawblade is parallel to the miter gauge slots.
Instructions for attaching table extensions and ensuring alignment.
Adjusting table extensions for levelness with the table surface.
Installing the front rip fence guide bars with screws and spacers.
Attaching the rear fence guide bars and rod.
Tightening nuts and screws for the fence guide bars.
Apply wax to table and guide bar for easier fence movement.
Adjusting the front bar for scale alignment and fence height.
Adjusting rear bar for fence parallelism and height.
Adjusting spring pressure for smooth fence movement.
Checking and ensuring the rip fence is parallel to the blade and grooves.
Modifying spring tension to reduce or increase fence sliding pressure.
Positioning the indicator to point to "0" on the rip scale.
Attaching spreader to spreader support and snugging setscrew.
Sliding support onto rod and tightening thumb screw.
Ensuring spreader is parallel to blade and in the middle of the cut (kerf).
Positioning fence parallel to blade, touching teeth, and securing it.
Lifting and holding antikickback pawls out of the way.
How to turn the saw on, off, and lock the switch for safety.
Function of the handwheel for raising and lowering the blade.
Function of the knob to lock the blade's tilt position.
Mechanism for tilting the blade for bevel cutting.
Elevating, lowering, and locking the saw blade height.
Tilting the blade for bevel cuts and locking its position.
Locking and moving the rip fence for ripping operations.
Locking and using the miter gauge for crosscutting and mitering.
Step-by-step process to remove the sawblade safely.
Procedure for installing the sawblade correctly, noting collar orientation.
Explanation of the yellow disc for marking the sawcut path.
Instructions for making push sticks and push blocks for safe operation.
Building an auxiliary fence or work support for added stability.
Safety precautions when using the miter gauge for various cuts.
Safe practices for handling workpieces, avoiding kickback, and freeing stalled blades.
Cutting wood across the grain at 90° using the miter gauge.
Methods for cutting multiple pieces of the same length accurately.
Cutting wood at an angle other than 90° to the edge using the miter gauge.
Cutting wood at an angle to the flat side while crosscutting.
Cutting wood at angles to both edge and flat side simultaneously.
General safety rules for ripping, bevel ripping, resawing, and rabbeting.
Positioning the rip fence for desired rip width and ensuring proper setup.
Performing bevel rips, especially with narrower materials.
Using push sticks or auxiliary supports for different rip widths.
Grooving and shaping wood using the fence with holddowns.
Ripping wood through its thickness, with safety notes for warped material.
Using auxiliary fence/support when fence is outside table surface.
Cutting sections of material across corners or edges.
Using dado and molding heads, including safety and insert requirements.
Using featherboards for workpiece control and kickback prevention.
Adjusting the miter gauge for accuracy, squareness, and pointer alignment.
Adjusting mechanism to make blade parallel to miter gauge groove.
Checking and adjusting blade alignment to miter gauge groove.
Verifying the blade is at 90° to the table.
Adjusting stop screws for precise 90° and 45° blade tilts.
Adjusting the elevation lock for secure blade height.
Cleaning dust, cleaning tools, waxing surfaces, and cord care.
Procedure for sharpening the teeth of antikickback pawls.
Oil points for specific parts like bevel gears and worms.
Catalog numbers for various optional accessories for the table saw.
Resolving issues like excessive vibration and inaccurate cuts.
Diagnosing and fixing problems where the cut binds or motor stalls.
Troubleshooting problems with blade tilt and hard-to-turn cranks.
Addressing slow motor starts, overheating, and starting relay problems.
Troubleshooting motor stalls, blown fuses, and circuit breaker trips.
Exploded view diagram of the main table saw components.
List of standard hardware items for the table saw.
Detailed list of main parts with key and part numbers.
Exploded view diagram of the motor assembly and related components.
Detailed list of motor assembly parts with key and part numbers.
Detailed list of switch assembly parts with key and part numbers.
Exploded view diagram of the rip fence assembly.
Exploded view diagram of the motor assembly.
Exploded view diagram of the switch assembly.
Exploded view diagram of the miter gauge assembly.
Exploded view diagram of the guard assembly.
Exploded view diagram of the table extension assembly.
Information on how to contact Sears for repair parts or service.
Guidelines for providing necessary information when ordering repair parts.
| Model Number | 113.242502 |
|---|---|
| Type | Table Saw |
| Blade Diameter | 10 inches |
| Arbor Size | 5/8 inch |
| Voltage | 120V |
| Max Cut Depth at 90° | 3 inches |
| Amps | 15 Amps |
| No Load Speed | 5000 RPM |