Do you have a question about the Craftsman 139.18860 and is the answer not in the manual?
Crucial introductory notes and safety precautions for safe operation.
Explains the meaning of safety symbols used throughout the manual for hazard awareness.
Lists all necessary hand tools for the installation and assembly process.
Essential pre-installation checks to ensure door balance and disable safety hazards.
Outlines specific conditions and requirements for installing on sectional garage doors.
Details specific conditions and requirements for installing on one-piece garage doors.
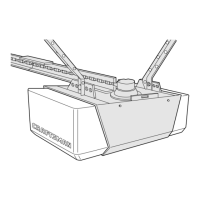
Illustrates and lists all parts found within the opener packaging for verification.
Lists and describes the hardware components for assembling the opener rail.
Lists and describes the hardware components for the overall installation process.
Lists and describes the hardware components specifically for the safety reversing sensor.
Guides on assembling the T-rail sections and attaching the cable pulley bracket.
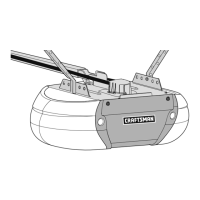
Instructions for installing the trolley onto the T-rail and securing the rail to the opener.
Details on installing the chain and attaching the protective sprocket cover.
Instructions for properly tightening the chain and cable for optimal operation.
Critical safety directives for a secure and safe garage door opener installation.
Guides on finding the correct position for the header bracket above the garage door.
Instructions for securely mounting the header bracket to the wall or ceiling.
Details on connecting the opener's T-rail to the installed header bracket.
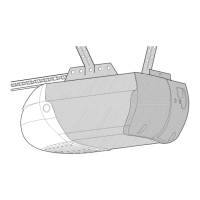
Guidance on correctly positioning and securely hanging the opener unit.
Steps for mounting and wiring the deluxe lighted console wall control unit.
Procedures for installing lights, lenses, and the emergency release rope.
Essential electrical safety information and wiring guidelines for the opener.
Instructions for mounting and aligning the safety reversing sensor units.
Procedures for wiring the safety reversing sensors to the opener unit.
Steps for securely attaching the door bracket to sectional or one-piece garage doors.
Guidance on connecting the garage door arm to the opener's trolley mechanism.
Procedures for setting the door's open and close travel limits.
How to adjust the force required for opening and closing the garage door.
Verifying the correct function of the safety reversing sensor and reverse system.
Instructions on activating the opener using various control devices.
Explains how to use the lock feature and control the opener's light.
Steps to program new transmitters and erase existing learned codes.
Guides users through common issues and their probable causes and solutions.
Identifies and lists replacement parts for the opener's rail assembly.
Identifies and lists replacement parts for the opener's installation components.
Identifies and lists replacement parts for the main opener unit assembly.
Lists and describes optional accessories that can enhance opener functionality.
Provides contact information for ordering repair parts and service calls.
Details Sears warranty coverage and available maintenance agreement plans.
| Brand | Craftsman |
|---|---|
| Model | 139.18860 |
| Category | Garage Door Opener |
| Language | English |