This document provides an operator's manual for a Craftsman 2-1/4 Ton Capacity Floor Jack (Model 50138) and Craftsman 2-1/4 Ton Capacity Jack Stands (Model 950176 per pair).
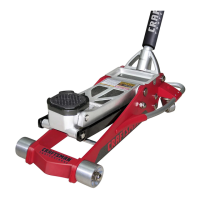
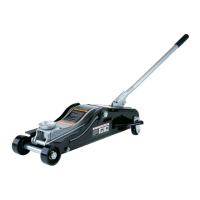
Craftsman 2-1/4 Ton Capacity Floor Jack (Model 50138)
Function Description:
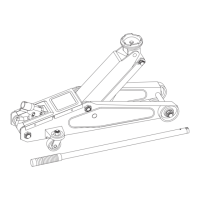
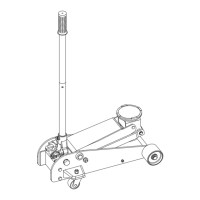
The Craftsman Floor Jack is a lifting device designed to raise vehicles or loads for maintenance or repair. It operates on hydraulic principles, using a jack handle to pump oil and extend a ram, which in turn raises the saddle and the load. A release valve allows for controlled lowering of the load. It is crucial to use appropriately rated jack stands to support the vehicle immediately after lifting, as the jack is only a lifting device and not intended for supporting a load during work.
Important Technical Specifications:
- Rated Capacity: 2-1/4 Ton / 4500 Lbs
- Jack Dimensions: 21" x 8-1/2" x 5-1/2"
- Lifting Range: 5-1/2” ~ 15” (Approx.) (140mm - 381mm)
- Oil Capacity: 90 cc ± 5 cc
- Net Weight: 27.1 lbs. (Approx.)
Usage Features:
- Safety First: Users must read, understand, and follow all instructions before use. Never exceed the rated capacity. Use only on hard, level surfaces. Always use appropriately rated jack stands to support the vehicle after lifting. Never work on, under, or around a load supported only by the jack. Do not move or dolly the vehicle while on the jack.
- Pre-Operation Check: Before first use, or if the jack has been subjected to shock, cycle the jack a few times without applying a load to ensure proper function and release any trapped air. This involves closing the release valve, pumping the handle to maximum height, then opening the release valve to lower the saddle to its lowest position. Repeat this procedure several times.
- Releasing Air from Hydraulic System: If air is trapped, open the release valve (no more than 1/2 full turn), remove the oil filler plug, rapidly pump the jack handle through several full strokes, then reinstall the oil filler plug.
- Raising the Jack: Close the release valve by turning the jack handle clockwise until tight. Chock the vehicle's wheels. Position the jack saddle under the vehicle's approved lifting point (refer to the vehicle manufacturer's manual). Insert the jack handle and pump until the saddle almost contacts the vehicle, then ensure it is centered and firm. Continue pumping to lift the vehicle to the desired height.
- Lowering the Jack: Raise the load high enough to clear the jack stands, then carefully remove the jack stands (always used in pairs). With the notched end of the jack handle, SLOWLY open the release valve by turning the handle counterclockwise (no more than 1/2 full turn). Keep hands and feet clear of the work area. If the load fails to lower, use another jack to raise the vehicle, reinstall jack stands, remove the affected jack and stands, then lower the load with the other jack. After removing the jack, push the saddle down to reduce ram exposure to rust and contamination.
- Overload Protection: The jack features a safety overload valve that automatically releases oil back into the reservoir if the load exceeds the rated capacity, preventing damage to the cylinder.
- Maximum Extension Protection: Oil is bypassed back into the reservoir when the ram reaches maximum extension, preventing over-extension and potential damage.
Maintenance Features:
- Oil Level Maintenance: Periodically check the oil level. With the saddle fully lowered, remove the oil filler plug (under the cover plate). The oil should be about 3/16" above the inner cylinder. Add good grade Hydraulic Jack oil (e.g., Mobil DTE13M or equivalent) as needed. NEVER use Hydraulic Brake Fluid, Alcohol, Glycerine, Detergent, Motor Oil, or dirty oil.
- Oil Replacement: To drain old oil, remove the cover plate and oil filler plug, open the release valve, turn the jack over, and drain into a suitable container. Refill with new hydraulic oil through the filler hole, ensuring no dirt or foreign material enters the system. After refilling, remove air by opening the release valve and rapidly pumping the handle several times.
- Lubrication: Add lubricating oil to all moving parts as needed.
- Rust Prevention: Check the ram and pump plunger every few months for rust or corrosion. Clean as needed by wiping with an oily cloth.
- Storage: Always store the jack with the saddle lowered all the way down.
- Annual Inspection: An annual inspection at a Sears Service Center is recommended to ensure optimum condition.
- Pre-Use Inspection: Inspect before each use. Do not use if broken, bent, cracked, or damaged parts (including labels) are noted. Remove from service immediately if damaged or operating abnormally. If subjected to a shock load, discontinue use until checked by a qualified service center.
Craftsman 2-1/4 Ton Capacity Jack Stands (Model 950176 per pair)
Function Description:
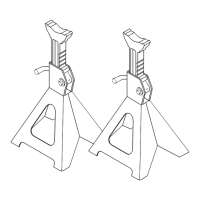
Craftsman Jack Stands are designed to safely support one end of a vehicle or load after it has been lifted by a jack. They feature a ratchet bar and locking handle mechanism to adjust height and secure the load.
Important Technical Specifications:
- Rated Capacity: 2-1/4 Ton per pair
- Minimum Height: 10-5/8 in. (270mm)
- Maximum Height: 17-1/8 in. (435mm)
- Base Dimension: 7-1/2 X 6-3/4 in.
- Net Weight: 11.4 LBS (Approx.) (for 2 pcs.)
Usage Features:
- Safety First: Users must read, understand, and follow all instructions before use. Rated capacity is per pair, NOT the sum of individual capacities. Do not exceed rated capacity. Use only on hard, level surfaces. Center the load on the saddle. Use as a matched pair to support one end of a vehicle only. Do not use to simultaneously support both ends or one side of a vehicle. Never work on, under, or around a load supported only by a jack.
- Assembly: Insert the ratchet bar into the frame, orienting the ratchet side towards the pawl side. Move the ratchet bar to the lowest position by raising the locking handle and guiding the bar downward. Drive the lock pin into the hole at the bottom of the ratchet bar to prevent overextension and loss of the bar.
- Supporting a Vehicle: Raise the vehicle with an automotive jack. Adjust the jack stand height by pulling up on the ratchet bar. Push down on the locking handle to ensure the ratchet bar is secured. Position the stands beneath the load so that the load will contact the center of the jack stand saddles. Slowly and carefully lower the load completely onto the stands, ensuring the load is centered and captured between the outer lugs of each stand's saddle. Check that the load is secure before working under the vehicle.
- Removing and Storing: Raise the vehicle clear of the stands with a suitable jack. Raise the locking handle to allow the ratchet bar to glide down to its lowest position. Carefully remove the stands. Carefully lower the vehicle with the jack. Ensure all tools, equipment, and personnel are clear before lowering the load.
Maintenance Features:
- Pre-Use Inspection: Inspect before each use. Do not use if bent, broken, or cracked components are noted. Ensure all parts move freely. If subjected to a shock load, discontinue use until checked by a Sears service center.
- Periodic Inspection: Periodically inspect each stand.
- Lubrication: Do not apply oil or grease to any portion of this product.
- Rust Prevention: If rust appears, sand the affected area and cover with suitable utility paint.
- Storage: Store stands in an upright position in a clean, dry area.
- Replacement Parts: Note that there are no replacement parts applicable to this device.
Both manuals emphasize the importance of reading and understanding all safety and operating instructions to prevent personal injury and property damage. They also highlight the Craftsman One Year Full Warranty for defects in material or workmanship, with a 90-day warranty for commercial or rental purposes. Sears provides customer support for parts, service, and protection agreements.