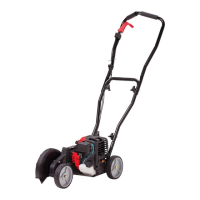
This document describes the Craftsman Edger, Model 536.772360, a lawn care tool designed for edging and trimming. It is powered by a 500 Series Engine with a 9-inch blade.
Function Description
The Craftsman Edger is designed to cut a small trench along sidewalks and driveways, or to trim close to trees, flower beds, and lampposts. Its primary purpose is to enhance the aesthetic appeal of a yard by creating clean, finished edges. The edger can be used on uneven surfaces, such as curbs, due to its adjustable front and rear wheels.
Important Technical Specifications
The edger features a 500 Series Engine with the following specifications:
- Product Model No.: 536.772360
- Gross Torque: 5.00 ft lbs.
- Displacement: 9.67 cu. in. (158.6 cc)
- Gasoline Capacity: 1 quart
- Oil Capacity: 20 oz. SAE-30W
- Spark Plug Gap: 0.030 inch (0.76 mm)
- Bore: 2-9/16 in. (65.09 mm)
- Stroke: 1-7/8 in. (47.63 mm)
- Armature Air Gap: 0.006–0.010 in. (0.15–0.25 mm)
- Blade: 9 inch
The engine's power rating is in accordance with SAE J1940 (Small Engine Power & Torque Rating Procedure), with torque values derived at 3060 RPM and horsepower values at 3600 RPM. Actual gross engine power may vary due to ambient operating conditions and other factors.
Usage Features
The edger includes several features to facilitate its operation:
- Engine Stop Lever (A): Must be engaged to start and run the engine; releasing it stops the engine.
- Starter Rope Handle (B): For easy pull recoil starting.
- Blade Depth Lever (C): Controls the depth of cut.
- Control Rod (D): Connects the handle to the depth control mechanism.
- Air Filter (E): Filters air for the engine.
- Fuel Tank (F): Holds gasoline.
- Primer Button (G): Injects fuel directly into the carburetor for cold starts.
- Dipstick (H): For checking oil level.
- Blade Guard (I): Prevents stones and debris from being thrown at the operator.
- Blade (J): The cutting component.
- Blade Guide (K): Helps align the blade.
- Quill Assembly (L): Part of the blade mechanism.
- Oil Drain Plug (M): Located at the bottom of the engine for oil changes.
- Engine Model Number (N) and Product Model Number (O): Identification labels.
- Adjustable Front Wheel (P): Can be lowered for edging along curbs.
- Adjustable Rear Wheel (Q): Right rear wheel is adjustable to level the edger when edging along curbs.
- Index Lever (R): Used to set the angle of the blade, offering four cutting positions (one vertical, three bevel).
Starting the Engine:
- Raise the blade using the depth control lever (D) to prevent contact with the ground.
- Push the primer button (A) three times, waiting two seconds between each push. (Do not use for a warm engine.)
- Hold the engine stop lever (B) in the operating position.
- Hold the starter rope handle (C) firmly.
- Pull the starter rope slowly until resistance is felt, then pull rapidly. Allow the rope to rewind slowly. If the engine doesn't start after three pulls, prime twice more and pull again.
Stopping the Engine:
- Emergency Stop: Release the engine stop lever (A).
- Normal Stop: Move the depth control lever (B) forward to raise the blade, then release the engine stop lever (A).
Using the Depth Control Lever:
- Start the engine.
- Pull the depth control lever (B) back to lower the cutting blade (C). Push it forward to raise the blade.
- Select the desired edging depth. For deep edging, make shallow cuts first, then increase depth.
Using the Index Lever:
The index lever (A) controls the blade's cutting angle.
- Stop the engine before adjusting the index lever.
- Raise the blade.
- For a vertical cut, set the index lever to 0°.
- For a bevel cut, set the index lever to one of the three bevel positions (15°, 15°, 30°).
- Start the engine and move the depth control lever to the desired height.
Operating the Edger:
- Always dress properly with safety glasses or goggles, substantial shoes, long pants, and close-fitting clothes.
- Inspect the area for stones, sticks, or other objects before operating.
- For concrete driveways or sidewalks, set the wheels on the concrete and position the blade along the left side. Keep the blade guide (B) aligned with the driveway side.
- Move the depth control lever back to lower the blade. Do not try to edge too deep initially.
- Stand behind the edger, hold the handle (D) firmly, and move forward slowly as the blade cuts.
- Proceed at a moderate pace.
Curb-hop feature:
- Stop the engine.
- Set the index lever to the vertical cut position.
- Place the entire edger on the curb (maximum 8 inches high).
- Position the edger so the right rear wheel (A) and front wheel (B) are off the curb, and the left rear wheel is on the curb.
- Loosen the rear wheel knob (C) to lower the right rear wheel to the pavement, ensuring the edger is level side-to-side. Tighten the knob.
- Use the depth control lever (D) to lower the front wheel until it touches the pavement and the edger is level.
Edging Tips:
- Edging is best in dry conditions. Wet soil can pack around the blade, causing premature belt wear.
- If dirt packs around the blade, stop the engine, remove the spark plug wire, and clean the blade.
- For deep edging, make shallow cuts first.
- Ensure the blade guide rides on the surface for uniform edging.
- Edge around the lawn and hard edges (sidewalks, driveways) before mowing.
Maintenance Features
Regular maintenance is crucial for performance and longevity.
Maintenance Chart (Key: E=Every, R=Replace, G=Check, N=Clean)
| Procedure |
Before Each Use |
First 5 to 8 Hours |
Every 25 Hours |
Every 50 Hours |
Every 100 Hours |
Before Storage |
| Lubricate All Pivot Points |
√ |
|
|
|
|
√ |
| Lubricate Wheel Axles |
|
|
|
|
|
√ |
| Drive Belt, Check |
√ |
|
|
|
|
√ |
| Tighten All Fasteners |
√ |
|
|
|
|
√ |
| Check Blade for Wear or Damage |
√ |
|
|
|
|
√ |
| Oil, Check |
√ |
|
|
|
|
|
| Oil, Change *** |
|
√ |
|
√ |
|
√ |
| Cooling System, Clean * |
|
|
√ |
|
|
√ |
| Air Filter, Clean / Replace ** |
|
|
√ |
|
|
√ |
| Muffler, Check |
√ |
|
|
|
|
√ |
| Spark Plug, Clean / Replace |
|
|
|
|
√ |
√ |
| Inspect Spark Arrester |
|
|
|
|
|
√ |
- * In dusty conditions, clean every 25 hours.
- ** In dusty conditions or when airborne debris is present, clean more often. Replace air cleaner if very dirty.
- *** Change oil after first 5 to 8 hours of use, then every 50 hours. Change oil every 25 hours when operating the engine under heavy load or in high temperatures.
Recommended Maintenance:
- Use only original equipment replacement parts.
- Check and tighten all fasteners.
- Wear safety glasses or eye shields during maintenance.
- Disconnect the spark plug wire before adjustments or repairs.
- Use only correct tools.
- Do not tamper with governor spring, links, or other parts to increase engine speed.
- Use an approved spark plug tester for spark tests; do not check spark with the plug removed.
How To Remove The Belt:
- Disconnect the spark plug wire.
- Tilt the machine backward and secure the handle.
- Remove screws (A) from the belt guard (B).
- Note the belt twist (G) around the engine pulley (F).
- Release belt tension by pushing the blade bearing housing (E) toward the engine to compress the spring (D). Remove the old belt and replace with an original equipment belt.
- Reverse steps to install a new belt, ensuring the correct twist.
How To Replace The Blade:
- Disconnect the spark plug wire.
- Remove the blade locknut (B) that holds the blade to the drive shaft. Use a wrench (C) on the nut behind the blade and turn wrench (D) to remove/tighten.
- Remove the blade.
- Install a new blade and secure with the blade locknut, tightening to 40-45 foot pounds.
- Connect the spark plug wire.
- Never sharpen the blade; always replace it to prevent shattering.
Engine Maintenance:
- Emission Control: Maintenance, replacement, or repair of emission control devices must be performed by a factory authorized dealer for warranty coverage.
- Carburetor Adjustment: Do not make unnecessary adjustments. The carburetor is factory-set.
- Spark Plug: Check every 100 hours. Replace if the electrode (A) is burned or worn. Clean if dirty. Check gap with a wire gauge (B) and reset to 0.030” (0.76 mm) if necessary. Use a resistor spark plug if originally equipped.
How To Change The Oil:
Change oil after the first 5 to 8 hours, then every 50 hours (or every 25 hours under heavy load/high temperatures).
- Ensure the engine is level.
- Disconnect the spark plug wire.
- With the engine off but warm, remove the oil drain plug (A) and drain oil into a receptacle.
- Install and tighten the oil drain plug.
- Ensure the engine is level.
- Clean the engine oil fill area.
- Remove the dipstick (B) from the engine oil fill (C) and wipe clean.
- Pour oil slowly into the engine oil fill (20 oz. SAE-30W).
- Wait 2 minutes for oil to drain, then install the dipstick and check the oil level. Fill to the FULL mark; do not overfill.
- Connect the spark plug wire.
How To Service The Air Filter:
Replace the air filter every 50 hours, or more often in dusty conditions.
- Disconnect the spark plug wire.
- Remove screw (A) from the air cleaner.
- Carefully remove the air cleaner to prevent dirt from falling into the carburetor.
- Take the air cleaner apart. If the filter (B) is very dirty or damaged, replace it.
- Wash the filter in liquid detergent and water. Squeeze dry in a clean cloth. Saturate the filter in clean engine oil and squeeze in a clean cloth to remove all excess oil.
- Install the filter and cup in the air cleaner body (C).
- Install the air cleaner onto the carburetor and tighten the screw.
- Connect the spark plug wire.
Storage:
For storage longer than 30 days:
- Edger:
- Completely clean the edger.
- Check for worn/damaged parts.
- Tighten all loose hardware.
- Apply a small amount of engine oil to all moving parts, especially wheels.
- Store in a building with good ventilation.
- Never store with fuel in the tank near open flames or sparks, or in a confined space.
- Store in the operating position (wheels down) to prevent oil from entering the cylinder.
- Cover with a suitable protective cover that does not retain moisture; do not use plastic.
- Never cover while the engine and exhaust areas are warm.
- Engine:
- If no fuel stabilizer is used, drain gasoline or run the engine until it's out of fuel.
- If fuel stabilizer is used, draining is not necessary.
- Change engine oil while the engine is warm.
- Lubricate the piston/cylinder area by removing the spark plug, pouring 1/2 oz. (15 ml) of clean engine oil into the spark plug hole, then reinstalling the plug.
- Slowly pull the starter rope to distribute oil.
- Fuel Stabilizer: If not removing gasoline, add a fuel stabilizer to the tank. Mix with fresh gasoline if the tank is almost empty. Run the engine for 3 minutes to circulate the mixture.
- Storing Gasoline/Equipment with Fuel in Tank: Store away from furnaces, stoves, water heaters, or other pilot-light appliances. Do not remove gasoline indoors or near fire/smoking. Never cover the edger while the engine and exhaust areas are warm.