9
2
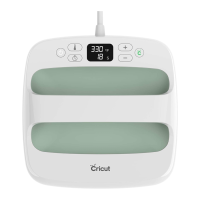
1.) Set Temperature
2.) Set Timer
3.) What the lights mean
Orange light means it’s heating up.
Green light means temperature has been reached.
4.) Start Timer, GO
Using HTV (Heat Transfer Vinyl) Iron On
Using HTV (Heat Transfer Vinyl) Iron On
Lay the HTV sheet on a mat and press it down to
ensure that it is fully adhered to the mat. The transfer
sheet should be lined up with top left corner of the
mat. Cut the HTV with any of the Cricut cutting
machines.
Prepping the HTV to Press:
Prepping the HTV to Press:
Cutting HTV with the Cricut:
Cutting HTV with the Cricut:
Save your design and then click on Make It.
Make sure to cut it out in a mirror setting. Click
the toggle so the mirror setting is on.
Select Iron On as your material in the drop down
settings.
Weeding the HTV:
Weeding the HTV:
Weed out the words, images and edges. There should be a
bottom layer of plastic that sticks out of both sides.
Applying HTV to the Material:
Applying HTV to the Material:
Once the images are weeded, it’s time to apply them on to the items
Scraper
Spatula
Weeder
Tweezers
Scissors
Center the image, then press it down really well. The plastic
backing is sticky so it will stick to the item.