5
6
How to clean machine
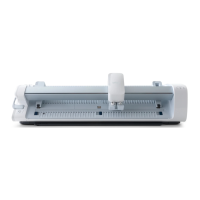
Cricut Venture requires routine cleaning. Heavy use
may result in unwanted debris gathering around
Rail (14) and Drive Rollers (8). If you notice debris, or
whenever Design Space prompts you to do so, use
included cleaning tools with isopropyl alcohol (70% or
higher) to complete the cleaning process.
DO NOT USE acetone-based solutions
or other cleaning products as they may
damage machine.
For more info and recommended cleaning details,
see help.cricut.com/venture/cleaning
Always handle with care
CAUTION: Keep fingers, hair, jewelry, loose
clothing, other body parts, and other items that
could get caught in Carriage (16), Drive Rollers (8),
and other moving parts away from the machine while
it is operating.
CAUTION: During operation, Drive Rollers
(8) move at high speeds. Do not touch during
machine operation.
CAUTION: If Mat Support Arms (7) are
extended, avoid putting downward pressure
on the support arms to avoid the potential to roll
the machine or break the support arms. Retract the
support arms when not in use.
Always use machine on sturdy, non-slick surface.
How to unload material
Do not unload material or mat from machine until
you get an on-screen prompt in Design Space.
Note: Before unloading longer material, trim
using Cutoff Tool [stored in Cutoff Tool Pocket
(28)] in Cutoff Groove (10).
CAUTION: Cutoff Tool contains sharp blade.
Use with extreme care. If tool is broken,
worn down, or blade is showing, carefully discard
immediately, and replace with a new Cutoff Tool
(sold separately).
How to replace a blade
• Open Clamp B (17), then remove blade housing.
• Gently push top plunger to carefully remove
blade.
• Remove protective cover from new blade
(sold separately), carefully insert into housing.
• Re-seat into Clamp B (17), close to lock
into place.
How to change a tool
When prompted, follow on-screen
Design Space instructions.
How to power on
Before operating machine, read enclosed
Important Safety Instructions.
• Connect power cord to machine.
• Make sure to plug other end only into
compatible wall outlet.
• Connect machine to desktop computer using
included USB cord or via Bluetooth
®
.
• Activate machine at cricut.com/setup
• Press Power Button (24) to turn on.
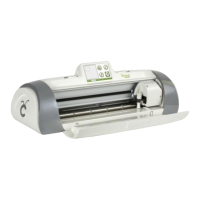
How to load material
Following are basic instructions only. Always defer
to the on-screen Design Space
®
prompts during the
making process. Based on your specific project, the
software will always tell you what to do next.
Load Cricut Smart Materials
™
(no cutting mat required)
• When prompted, lift Lever (1), then adjust
Right Pinch Roller (11) as instructed.
• Lift Left Guide (3), plus either Center (9) or
Right (12) guide to fit material width.
• From back of machine, insert material under
Carriage (16) to front edge.
• Push Lever (1) down.
• Press Load Button (19).
• Return to on-screen Design Space prompts.
EN
Load materials on mat
• When prompted, lift Lever (1).
• Adjust Pinch Roller (4) to position 2 to
fit cutting mat.
• Press Mat Support Button (2) to extend
Mat Support Arms (7).
• From back of machine slide mat under
Carriage (16) to Mat Stops (6).
• Push Lever (1) down.
• Press Load Button (19).
• Return to on-screen Design Space prompts.
Note: If loading bulk-roll Smart Materials,
use Fixed Roll Support (29), and move
Adjustable Roll Support (26) to match roll width.
Use Mat Support Extension when working
with materials on larger Performance Mats
(or if mat is noticably bending).
Every project is unique.
Use help.cricut.com as a resource for
your specific needs.
Morpheus_User_Guide_Intl_v15.indd 5-6Morpheus_User_Guide_Intl_v15.indd 5-6 4/11/23 7:52 PM4/11/23 7:52 PM
 Loading...