reproductive harm.
A
TTENTION
USE ON
LY CU
D
A APP
R
O
VED
DETERGENTS
T
O EXTEND
LABOR
W
ARRANTY
T
O 1-YEAR!
MIX DETERGENTS 1 LB (1/2 KG) PER
5-GALLONS (
15 LITERS) OF
W
A
TER
For CUDA App
ro
ved Dete
r
g
ents visit
http://ww
w
.cudausa.com or
call 888-319-0882
9.807-513.0
90-DAY LABOR WARRANTY
EXTENDS TO 1-YEAR
WITH EXCLUSIVE USE OF
CUDA D
ETERGENTS
LIMITED
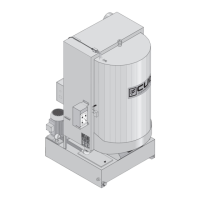
This
is
a
heated
pa
r
ts
c
leane
r
.
Use
on
l
y
nonflamma
b
l
e
,
non-
com
b
usti
b
l
e
,
water
-based
c
leaning
compounds
in
this
ma
c
hin
e
.
Do
not
fill
or contaminate
with
a
n
y
flamma
b
le
or
com
b
us
t
i
ble
material
su
c
h
a
s
gasolin
e
,
alcohol
,
mineral
spir
its
,
etc
.
Drain
pa
r
ts
t
o
be
c
leaned
of
a
n
y
com
b
usti
b
le
or
flamma
b
le
material
be
f
ore
placing
inside
cabinet
.
F
ailure
to
obse
rve
this
w
a
rning
will
create
an
e
xtreme
l
y haza
r
d
ous condition.
E
ste
es
un
limpiador
d
e
pa
r
t
e
s
que
se
calienta
.
Utilice
sola-
mente
en
esta
máquina
componentes
de
limpieza
base
a
gua
,
no
in
fl
am
a
b
les
y
no
com
b
usti
bles
.
No
llena
r
o
contaminar
c
on
algún
material
inflama
b
le
como
,
gasolina
,
alcohol
,
e
sen
c
ias
minerales
,
etc
.
Drene las par
tes a ser limpiadas de
cualquier com
bu
s
ti
ble o
m
aterial
inflama
ble
antes
de
int
r
oducir
en
el
gabinet
e
.
Si
descuida
obse
rvar
estas
precauciones,
pueden
crea
r
se
condic
io
-
nes
e
xtremadamente pelig
r
osa
s.
Ce
nett
o
y
eur
de
pièces
est
c
hauffé
.
Utiliser
dans
cet
appareil
s
eulement
des
nett
oy
eu
r
s
à
base
d’eau
,
non
com
b
usti
b
les
et
non
inflamma
b
les
.
Ne
pas
y
ajouter
ou
contam
i
ner
a
vec
des
matériaux
com
b
usti
b
les
tels
:
gasolin
e
,
alcool
,
e
tc
.
Vider
les
pièces
con
t
enant
des
matériaux
c
om
busti
b
les
ou
inflamma
b
les
a
v
ant
de
les
placer
à
l’int
é
rieur
du
cabinet
.
Ne
pas
obse
rver
ces
a
ve
r
tissem
ents
peut
créer des
situations risquées.
H
O
T
W
A
TER
Be
f
ore opening lid
,
wait 5
seconds to all
ow spr
a
y
arm/turnta
b
le to stop
spinning.
AG
UA
CALIENTE
Antes de
abrir la tapa
,
espere 5 segundos para
que la bar
ra
rotatoria se
detenga.
E
A
U
CH
A
UDE
A
v
ant d’ouvrir le couve
r
t,
attendez 5 secondes pour
permettre au bras
v
aporisa
-
teur/plaque tournante
d’arrêter
de tourne
r
.
W
ARNING
PREC
A
UCION
/
A
D
VE
R
TISSEMENT
C
A
UTION
CUI
D
ADO /
A
TTENTION
OPER
ATING INST
R
UCTIONS
INST
R
UCCIONESDE OPER
A
CION
INST
R
UCTIONS D’OP
É
R
A
TION
IMPO
RT
AN
T
:
Be
f
ore ope
r
ating this machin
e
,
completel
y
f
amilia
r
i
z
e
y
ourself with inst
r
uction
ma
n
ual pr
o
vided
.
Only autho
r
i
z
ed and prope
r
ly
inst
r
ucted individuals
should ope
r
ate this machin
e
.
Be
f
ore loading pa
r
ts onto
tu
r
nta
b
le/ bas
k
et,
be cer
-
tain the pump is off a
nd not
r
unning and the
w
ash
solutions are
at oper
ating tempe
r
atur
e
.
1
.
Fill tank with
water and c
leanin
g solution
.
W
ater l
e
v
el should be 2" bel
o
w the access door
s
.
Che
c
k dail
y
.
2
.
Pro
g
r
am heater timer f
or desired per
iod of
ope
r
ation
.
All
o
w tim
e
f
or unit t
o preheat cleaning
solution.
3.
Open door/lid and
place
a
r
ticles to be clean onto
bas
k
et/tu
r
nta
b
l
e
.
Be ce
r
tain no pa
r
ts prot
r
ude
through the bo
ttom or b
ey
ond the sides of the
bas
k
et/tu
r
nta
b
l
e
.
Do not
e
x
c
eed
the specified
height
or
w
eight limit
f
or this sp
r
a
y
w
ash c
a
bine
t
.
4
.
Close door/lid
and latch securel
y.
With machine
set to w
ash, tu
r
n
“
w
ash cyc
le
”
timer to the desired
cleaning tim
e
.
Pump
w
ill sta
r
t and
r
un until time
has
e
xp
ired.
5
.
Be
f
ore opening
the door/lid, tu
r
n
wash cycle timer
off and
w
ait 5 seconds
f
or machine to stop
spin
-
ning
.
This will all
o
w steam to escape
the cabinet
and
e
xcess
w
ater to d
r
ain from
y
our pa
r
t
s
.
IMPO
R
T
ANTE
:
Antes de opa
r
ar el equip
o
,
f
am
i
liarí
cese com
-
ple
tamente con el
ma
n
ual de ope
r
a
ción que se incl
u
y
e.
Solo
personal auto
r
izado y debidamente cap
acitado debe
opa
r
ar
éste equip
o
.
Antes d
e ab
r
ir la pue
r
t
a/cubie
r
ta
o las piezas de
carga sobre la to
r
namesa/canast
a, asegúrese d
e que la
bomba
esté apagad
a
y sin funciona
r
, y que las soluciones de limpiez
a
estén a tempe
r
a
tu
r
a
de funcionamient
o
.
1.
Llen
e el
d
epósito con agua
y la s
o
l
u
ción pa
r
a
l
i
mpieza
.
El
ni
v
el
del
agua deb
e estar 2" por debajo de las pue
r
ta d
e ac
-
ces
o
.
V
e
r
i
fique el ni
v
el dia
r
iament
e
.
2.
Pro
g
r
ame
el
T
empo
r
izador del calentador
pa
r
a el períod
o
de
o
p
e
r
ación desead
o
.
Deje pasar un tiempo pa
r
a q
ue la unid
ad
precaliente la solución pa
r
a limpieza.
3
.
Ab
r
a
l
a
pue
r
ta/ta
p
a y
coloque
las pi
e
zas
a
l
a
v
ar en la
tor
-
namesa/c
a
nasta
, asegúrese de que ningun
a
pi
ez
a so
-
brepase el fondo ni el perímetro de la to
r
names
a
.
No
e
x
c
eda
los limites especi
ficados de peso y altu
r
a pa
r
a el
gabinete de
l
a
v
ad
o
.
4.
Cierre la pue
rta/tapa y asegure el candad
o
.
Con la máqu
i
na
en posición de
l
av
a
r
, ajuste el t
empo
r
izador de
“
cicl
o
de
l
a
v
ado
”
al ti
empo desead
o
.
La bomba ar
r
ancará y funcionará
du
r
ante el
t
i
empo seleccionad
o
.
5
.
Antes de ab
r
ir la pu
e
r
t
a/cubi
e
r
ta, apague
el tempo
r
izador del
cicl
o de la
v
ado y espere 5 segundos pa
r
a que l
a máquina
deje de gir
a
r
.
Esto pe
r
mitirá qu
e
el
v
apor salga d
el gabinet
e y
el
e
xceso de agua dre
ne
de
l
as pieza
s
.
IMPO
R
T
AN
T:
A
v
ant d’utiliser cette machin
e
,
f
amilia
r
is
e
z
-
v
ous complètement
a
v
ec le ma
n
uel d’in
s
tr
uction
f
ou
r
ni
.
Cette
ma
chine d
e
v
r
ait être utili
s
ée seu
lemen
t
par du personne
l
auto
r
i
sé
et
f
o
r
mé
.
A
v
ant l’ou
v
e
r
tur
e de la po
r
te/du cou
v
ercle
o
u
du charg
ement des
pi
èces
s
ur l
a
t
a
b
le tou
r
nante/le panie
r
,
s’ass
urer
que la pompe est e
n position arrê
t et ne
fo
nct
ionne
p
a
s
et que les solutions de l
a
v
age sont à t
e
mpé
r
ature de
fonctionnement
.
1
.
Re
mp
lir le rése
r
v
oir d’eau
et d’une solution
de nett
o
y
ag
e
.
Le ni
v
eau d’eau
doit se trou
v
er à 5 cm (2 po) sous l
es
po
r
te
s d’accè
s
.
Vé
r
ifier quotidiennemen
t.
2
.
Pro
g
r
ammer l
e mi
n
ute
r
ie de chauf
f
age d
e l’appareil pou
r
la pé
r
iode
de
f
onctionnement
souhaité
e
.
Pré
v
oir du temps
pour que
l’appareil préchauf
fe la
solution de nett
o
y
ag
e.
3.
Ouv
r
ir la po
r
te/couv
er
t
et placez les a
r
ticles à êtr
e
l
a
vé
sur le panier/pl
aque tou
r
nant
e
.
Assurez-
v
ous qu’il n’y est
aucune pièce d
épassant le painer ou dans
le
f
on
d au-del
à
du
paine
r
/plaque
tou
r
nant
e
.
4.
F
e
r
mez la po
r
te/couv
e
r
t et
v
errouillez de
f
açon séc
u
r
itair
e
.
La m
achine prête
pour le l
a
v
ag
e
, tou
r
nez le mi
n
uteur
“
w
ash
cycle”
au temp
s de la l
a
v
age désiré
.
La pompe
f
onctionn
er
a
jusqu’à ce que temps sélection
né soit écoulé.
5
.
A
v
ant d’o
uv
r
ir la p
o
r
te/le co
u
v
ercl
e
, mettre la mi
n
ute
r
ie du
cycle de l
a
v
age à l’arrêt et at
te
ndre pe
ndant 5 seco
n
des que
l’appa
r
e
i
l
s’
ar
rêt
e de tou
r
ne
r
.
Cela pe
r
mett
ra à la
v
apeu
r de
s’échapper d
u
cabinet et
à l’
e
xcès d’e
au de s’écouler de
v
os
pièces
.
W
ARNING
PREC
A
UCION
/
A
D
VE
R
TISSEMENT
•
Ma
c
hine
m
ust be connected to
a
p
r
oper
l
y s
i
z
ed
lo
c
ka
ble disconnect.
•
Installation
m
ust comp
l
y with NEC co
d
e
.
•
For supp
l
y connection
,
use wires accepta
b
le
f
or
at least 90 degrees C.
•
Do not use belo
w grade floor or grade l
e
vel.
Th
e
f
oll
o
wi
n
g
s
chedu
l
e
i
s ba
s
ed
on
a
v
e
r
a
g
e u
s
e
.
Hi
g
her u
sa
ge
m
ay
req
uir
e mo
r
e f
r
equ
en
t
m
a
in
t
e
-
na
n
ce
.
I
MPO
R
T
ANT
:
Be sure el
ect
r
ical supply is OFF
be
-
f
ore d
r
aining sum
p
.
Only qualified personnel should
se
r
vice this mach
in
e
.
D
AIL
Y
:
•
Che
c
k
w
a
ter le
v
el in the sump dail
y
.
T
opping
o
ff the
w
ater daily
will pr
e
v
ent damage
to the
heater e
lement.
•
Rem
o
v
e a
nd clean deb
r
is screen.
•
Visually ch
e
c
k
f
or plugged nozzle
s
.
Rem
o
v
e
an
d clean if needed
.
Reinstall in the
e
xac
t o
r
igi
-
nal position.
WEEKL
Y
:
•
Grease/oil door hi
nge
s
.
M
ONTHL
Y
:
•
P
e
r
f
o
r
m
v
i
s
u
a
l che
c
k o
f
t
u
r
nt
a
b
l
e d
r
i
ve c
h
a
in
.
•
D
r
ain
w
ash solution from
sum
p
, rem
o
v
e sand/
g
r
it from bottom of the sum
p
.
Ca
re should be
ta
k
en to
a
v
oid b
ending or damag
ing
hea
ter ele
-
m
ent dur
in
g t
h
e cleaning proces
s
.
•
When sump
has been cleaned and refille
d with
w
ate
r
, add the
r
ecommended quantity
of deter
-
ge
n
t
f
or
y
ou
r
machin
e
.
N
O
T
E:
Dissol
v
e cleani
ng p
o
wder into
w
a
r
m
w
ate
r
be
f
ore adding the ma
n
u
f
ac
turer
’
s recomm
ended
amount to
the tank.
8.922-4
0
2.0
•
La máq
uina debe estar conectada a un en
c
huf
e
eléctrico de seguridad
.
•
La instalación debe cumplir con el código NEC.
•
P
ara las con
e
xiones de alimentación, use ca
b
lea
-
do para al menos 90 grados centígrados
.
No utilice por debajo del nivel del piso.
•
L
’appareil doit être connecté
à un sectionneur
ver
r
oui
lla
b
le de taill
e
app
r
oprié
e
.
•
L
’i
n
stallation doi
t
se con
f
ormer au code NEC.
•
P
our le racco
r
dement de l’alimentation
, utiliser des
fils pou
v
ant accepter au moins 90 degrés Celsius
.
N
e pa
s util
i
ser un calibr
e ou
un grade infé
rieu
r
.
Le tableau
sui
v
ant es
t
f
ondé sur une util
i
sa
t
ion m
o
y
enn
e
.
Une utilisa
t
ion plus impo
r
ta
nte peut
e
xi
ger un entretien plus
fré
q
uent.
IM
P
O
R
T
ANT
:
S’assurer que le
système élect
r
ique est
à
l
’arr
ê
t
av
ant de vider le rése
r
v
oi
r
.
Seul le personnel q
ual
i
fié d
o
it ré
-
parer cet appareil.
Q
U
O
TIDI
ENNEMEN
T
:
•
Vé
r
i
fier qu
otidie
n
nement le ni
v
eau
d’eau d
ans le
rés
-
e
r
v
oi
r
.
Le remplissage qu
o
tidien d’eau
pe
r
met d
’éviter
d’endommager l’élément c
hauf
f
ant.
•
Démonter
et nett
o
y
er le
fil
tre
à déb
r
i
s
.
•
Vér
ifier visuellem
en
t si des
b
u
s
es sont bouchées/ob
-
st
r
uée
s.
Démonter et nett
o
y
e
r
, le cas é
ch
é
ant
.
Réinstaller
dans la position in
itiale
e
xact
e
.
HEBDOMA
D
AIREMEN
T
:
•
G
r
aisser/hu
iler les p
e
ntures/cha
r
n
ières de la por
t
e
.
MENS
UELLEMEN
T
:
•
Procéder
à un contrô
l
e
visu
el de la chaîne d’ent
r
aînement
d
e
la ta
b
le tou
r
n
a
n
t
e.
•
Assécher la solution de
l
a
v
age du
rése
r
v
oi
r
, et enl
e
v
er tout
sa
b
le/
g
r
a
vier s
e
t
rou
v
ant au
f
on
d
.
Des
précautions do
i
v
ent
être p
r
ises pou
r
évit
er
de pli
er/cou
rber l’élément chauf
f
a
nt
ou de l’endommager au co
u
rs du processus de nett
o
y
ag
e
.
•
L
o
rs
q
u
e
l
e
r
é
s
e
r
v
oir
a
ét
é
net
t
o
y
é
e
t
r
em
pli
d
’ea
u
,
ajo
u
t
e
r l
a
q
u
a
n
ti
té
d
e
d
é
ter
g
e
n
t
r
e
c
o
m
m
an
d
é
e
p
o
u
r
v
o
tre
a
p
p
a
r
e
il
.
N
O
TE: Bien dissoudre la poudre dans l’eau chaude
a
v
ant
d’ajouter dans
le rése
r
v
oi
r
.
El
pl
an
d
e
ma
nt
en
imien
t
o
que
se
p
r
e
s
ent
a a
co
nt
i
n
ua
ció
n, est
á
b
a
s
a
do
en
un
u
so
p
r
o
m
e
d
io
d
e
l
equ
i
p
o
.
Un
u
so m
á
s
fr
ec
u
e
n
te
o
s
e
v
er
o
p
u
e
d
e
re
qu
e
r
i
r
un
m
a
n
t
en
i
m
i
ent
o
m
ás
f
re
cu
e
n
t
e
.
IMPO
R
T
ANTE
:
Asegúrese de que el sistema el
éct
r
i
c
o esté
A
P
A
GADO antes de
v
aciar el cá
r
te
r
.
S
ólo personal calificado
deb
e
repa
r
ar esta máquina.
DIARIAMENTE
:
•
Comp
r
uebe el ni
v
el del agua en el cá
r
ter dia
r
iament
e
.
M
a
ntener el ni
v
el ad
e
c
u
ado del agua
e
v
i
tará dañar el
elem
ento del calentad
o
r
.
•
Retire y limpie los res
iduos de la c
r
iba.
•
Comp
r
ue
be visualmente que l
a
s boquill
as est
án instalad
as
correctament
e
.
Retire y li
m
pie si es necesa
r
i
o
.
Rein
stale en
la po
s
i
c
i
ón
or
igina
l
e
xacta.
SEMANA
L
MEN
T
E:
•
Lub
r
ique las
bisa
g
r
as de l
a
pue
r
ta.
M
ENS
U
A
LM
EN
T
E
:
•
Reali
ce una
v
e
r
ificac
ión
visual de la cadena de propu
lsión
de la to
r
namesa.
•
D
ren
e la solución de
limpie
za
del cá
r
te
r
, retire
d
el
f
ondo
de
cá
r
te
r
los sed
iment
o
s.
Debe tene
r
cu
id
a
do de no d
ob
l
ar
o
dañar el
elemento del ca
l
entador du
r
ante el proceso de
limpieza.
•
Una
v
e
z que
el cá
r
ter está limpio y
r
elleno de ag
u
a,
a
gregu
e la
cantidad recomendada de deterge
n
te
par
a la
máqu
ina.
N
O
T
A:
D
i
s
u
e
l
v
a
e
l
d
e
t
erg
e
nt
e e
n
ag
u
a
c
ali
en
t
e
a
n
t
e
s
de a
grega
r
-
lo
al
t
a
nqu
e
e
n
l
a
can
tid
ad re
c
ome
n
d
a
d
a
por e
l
f
ab
r
i
c
a
n
t
e.
MA
I
N
T
ENANC
E INST
R
UCTIONS
I
NS
T
R
UCC
I
ONES
DE
M
AN
T
EN
IMI
EN
TO
DIRECTIVES D’ENTRETIEN