EasyManua.ls Logo

Cuisinart DGB-450 Series - User Manual

Cuisinart DGB-450 Series
12 pages
Print Icon
To Next Page IconTo Next Page
Loading...
For your safety and continued enjoyment of this product, always read the instruction book carefully before using.
Automatic Grind & Brew 10-Cup Thermal Coffeemaker
DGB-450 Series
INSTRUCTION BOOKLET
Question and Answer IconNeed help?

Do you have a question about the Cuisinart DGB-450 Series and is the answer not in the manual?

Summary

Important Safeguards

Read All Instructions

Emphasizes the necessity of reading all instructions before using the appliance.

General Safety Precautions

Covers essential safety measures for electrical appliances, including handling, water contact, children, and maintenance.

Warnings and Notices

Risk of Fire or Electric Shock Warnings

Explains warning symbols related to electrical hazards and the product's enclosure.

Cord Set and Plug Safety

Provides instructions for safe use of power cords and polarized plugs to prevent shock.

Operating Cautions

Addresses potential issues like clogging, overflow, and safety during brewing cycles.

Important Unpacking Instructions

Unpacking Procedure

Step-by-step guide on how to safely remove the coffeemaker and its accessories from the packaging.

The Quest for the Perfect Cup of Coffee

Importance of Water Quality

Highlights water quality's significant impact on coffee flavor and the role of the charcoal filter.

Selecting Fresh Coffee Beans

Advises on buying fresh beans and storing them to maintain optimal flavor.

Critical Role of Coffee Grind

Explains how grind size affects extraction, bitterness, and potential clogging.

Achieving Optimal Coffee Proportion

Guides on using the correct amount of coffee for desired strength and taste.

Features and Benefits

Water Reservoir and Filter System

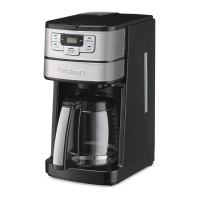
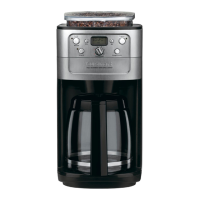
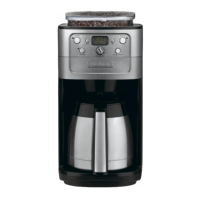
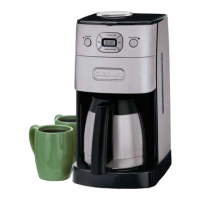
Details the water reservoir, cover, level indicator, showerhead, and charcoal filter holder.

Grinding System Components

Describes the grinder basket, lid, blade, and the gold-tone permanent filter.

Brewing and Filter Basket Components

Covers the filter basket door, release button, filter basket, and Brew Pause feature.

Carafe and Resting Plate

Highlights the 10-cup thermal carafe and the scratch-resistant resting plate.

Control Panel and Accessories

Mentions the control panel, cord storage, measuring scoop, and included paper filters.

Control Panel Overview

Display Functions

Explains the Clock/LCD Display for time and auto-on settings.

Programming Buttons

Details the Program, Hour, and Minute buttons for setting clock and auto-on times.

Operational Buttons

Describes the 1-4 Cup, Grind Off, Clean, and Brew/Off buttons for coffeemaker functions.

Programming Your Coffeemaker

Setting the Clock

Guides on how to set the current time on the coffeemaker's display.

Setting the Program Time

Instructions for setting the auto-on time for automatic brewing.

Activating and Deactivating Auto On

Explains how to enable the programmed brew time and how to turn off the auto-on function.

Before Brewing Your First Pot of Coffee

Initial System Flush

Recommends flushing the system with water before the first coffee brew.

Charcoal Water Filter Installation

Provides detailed steps for preparing and inserting the charcoal water filter.

Making Coffee With Whole Beans

Step 1: Insert Charcoal Water Filter

Instructs to insert the prepared charcoal water filter into the reservoir.

Step 2: Fill the Water Reservoir

Guides on filling the water reservoir to the desired cup level, avoiding overfilling.

Step 3: Add Beans

Details how to fill the grinder basket with whole coffee beans, specifying quantities.

Step 4: Insert Coffee Filter

Explains how to place either a paper or the permanent gold-tone filter in the basket.

Step 5: Place Filter Basket and Close Door

Instructs to put the filter basket in place and securely close the filter basket door.

Step 6: Close Reservoir Cover Lid

Details securing the reservoir cover lid, noting the safety interlock system.

Step 7: Put Carafe in Place

Ensures the thermal carafe is correctly positioned on the resting plate.

Step 8: Brewing

Instructions for initiating brewing immediately or setting a future brew time.

Step 9: After Brewing

Describes signals for cycle completion, auto-shutoff, and residual dripping.

Making Coffee With Pre-Ground Beans

Step 1: Fill Reservoir and Insert Filter

Refers to previous instructions for reservoir filling and filter insertion.

Step 2: Add Pre-Ground Coffee

Guides on adding pre-ground coffee to the filter basket, with quantity recommendations.

Step 3: Press Grind Off Button

Instructs to press the Grind Off button if using pre-ground coffee.

Step 4: Follow Brewing Steps

Directs users to follow steps from the 'Making Coffee With Whole Beans' section.

Brew Pause Feature

How Brew Pause Works

Explains the function of pausing the brew cycle to pour a cup mid-brew.

Tips and Hints

Coffee Bean Storage

Provides advice on storing large portions of beans to preserve freshness.

Cleaning and Maintenance

Daily Cleaning Procedure

Details how to clean all parts of the coffeemaker after each use, including dishwasher safety.

Cleaning the Base Unit and Resting Plate

Instructions for cleaning the main unit and resting plate with a damp cloth.

Decalcification

When to Decalcify

Explains decalcification and when to perform it based on the CLEAN indicator light.

Decalcification Procedure

Step-by-step guide using vinegar and water to remove mineral deposits.

Rinsing the Unit

Details running a cycle with fresh water to rinse after decalcification.

Warranty Information

Limited Three-Year Warranty

Outlines the terms and conditions of the 3-year limited warranty for US consumers.

California Residents Warranty Service

Explains options for California residents regarding in-warranty service and returns.

Hassle-Free Replacement Warranty

Describes the process for obtaining warranty repair or replacement.

Warranty Exclusions

Lists conditions and damages not covered by the warranty, such as misuse or unauthorized repair.

Overview

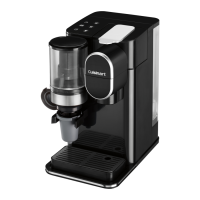
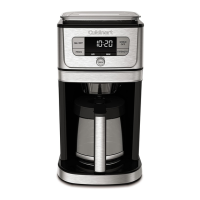
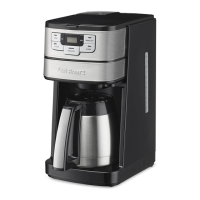
The Cuisinart DGB-450 Series Automatic Grind & Brew 10-Cup Thermal Coffeemaker is designed to provide a fresh and flavorful coffee experience by grinding whole beans just before brewing. It combines the convenience of an automatic coffeemaker with an integrated grinder, ensuring optimal flavor extraction.

Function Description:

This coffeemaker's primary function is to automatically grind whole coffee beans and then brew coffee into a 10-cup thermal carafe. It can also brew pre-ground coffee by allowing the user to turn off the grinding function. The unit features a water reservoir with a level indicator, a charcoal water filter for improved water quality, and a showerhead that evenly distributes water over the coffee grounds. The thermal carafe is designed to keep coffee hot and fresh for an extended period, thanks to its double-wall insulation and a unique lid that seals out air.

Usage Features:

The coffeemaker is equipped with a user-friendly control panel that includes a clock/LCD display, program button, 1-4 cup setting, hour and minute buttons, grind off button, clean button, and brew/off button.

  • Setting the Clock and Program Time: Users can easily set the current time and program an auto-on time for future brewing. The program button allows for scheduled brewing, with a blue LED indicator confirming that the unit is in programmed-start mode.
  • Brewing Options:
    • Whole Beans: For brewing with whole beans, users add the desired quantity of beans to the grinder basket and water to the reservoir. The coffeemaker is preset for a medium grind, which is optimal for this brewing process. A safety interlock system ensures the unit operates only when the reservoir cover and grinder cover are properly closed. If the cover is opened during grinding or brewing, the unit will beep, and the process will pause until the cover is re-secured.
    • Pre-Ground Coffee: When using pre-ground coffee, the "Grind Off" button can be activated to bypass the grinding cycle. Users simply add pre-ground coffee to the filter basket and water to the reservoir.
  • 1-4 Cup Setting: This feature is designed to enhance flavor extraction and temperature when brewing smaller quantities (fewer than 5 cups). It double heats the water to ensure piping hot coffee, addressing the common issue of cooler coffee from small pots.
  • Brew Pause™: This convenient feature allows users to temporarily stop the flow of coffee from the basket to pour a cup mid-brew. However, it's important to note that using this feature may slightly weaken the flavor strength of the finished pot, as the flavor profile changes throughout the brewing cycle. Removing the carafe for more than 20 seconds can cause the filter basket to overflow.
  • Thermal Carafe: The 10-cup thermal carafe is designed for easy pouring with a dripless spout and an ergonomic handle. Its unique lid seals to preserve fresh-brewed flavor, eliminating the need for manual adjustments. Users can preheat the carafe with hot water before brewing to help maintain the coffee's temperature.
  • Safety Features: The coffeemaker includes a safety interlock system that prevents operation if the reservoir or grinder cover is not properly closed. This prevents accidental spills and ensures correct assembly.

Maintenance Features:

Regular cleaning and maintenance are crucial for the coffeemaker's performance and longevity.

  • Daily Cleaning: After each use, all removable parts, including the grinder basket, grinder basket lid, filter basket cover, filter basket, and filter basket holder, should be thoroughly cleaned. These parts can be washed in warm, soapy water or placed in the upper rack of a dishwasher. The carafe and its lid are also dishwasher-safe (upper rack only). The base unit should be wiped with a clean, damp cloth. It's important not to immerse the base unit in water or other liquids.
  • Charcoal Water Filter: The coffeemaker includes a charcoal water filter that removes chlorine, bad tastes, and odors from tap water. The filter should be replaced every 60 days or after 60 uses, or more frequently in areas with hard water. Instructions are provided for preparing, inserting, and flushing the filter.
  • Decalcification: Over time, calcium deposits can build up on the metal parts of the coffeemaker, affecting its performance and coffee flavor. The "CLEAN" LED indicator will illuminate when it's time to decalcify the unit. The decalcification process involves filling the water reservoir with a mixture of white vinegar and water, then pressing and holding the CLEAN button. The coffeemaker will run a cleaning cycle, and the indicator will turn off when complete. If the indicator remains on, the process should be repeated with a fresh solution. After decalcification, a cycle with fresh, cold water should be run to rinse the unit. It's important to remove the charcoal water filter before decalcifying.
  • Reservoir Lid Removal: The reservoir lid can be removed for easier cleaning by opening it 60 degrees and gently pulling it forward. Reversing these steps will reattach it.

The Cuisinart DGB-450 Series is designed for household use and emphasizes user safety with clear warnings regarding fire, electric shock, and proper operation. It aims to deliver a consistent and high-quality coffee experience with minimal effort.

Cuisinart DGB-450 Series Specifications

General IconGeneral
Capacity12 cups
Water FilterCharcoal water filter
Power1000 watts
Grinder TypeBurr
ProgrammableYes
FilterGold-tone
Auto ShutoffYes
MaterialStainless Steel

Related product manuals