MAINTENANCE
25
TAILLIGHT/BRAKE LIGHT
Tool List
•Flat Screwdriver
• Clean Cloth
The taillight/brake light is an LED and does
not have a replaceable bulb. The entire light
must be replaced.
The bulb cannot be replaced in this light
assembly as stated in the first paragraph.
The entire assembly has to be replaced in
case of failure.
To replace the light:
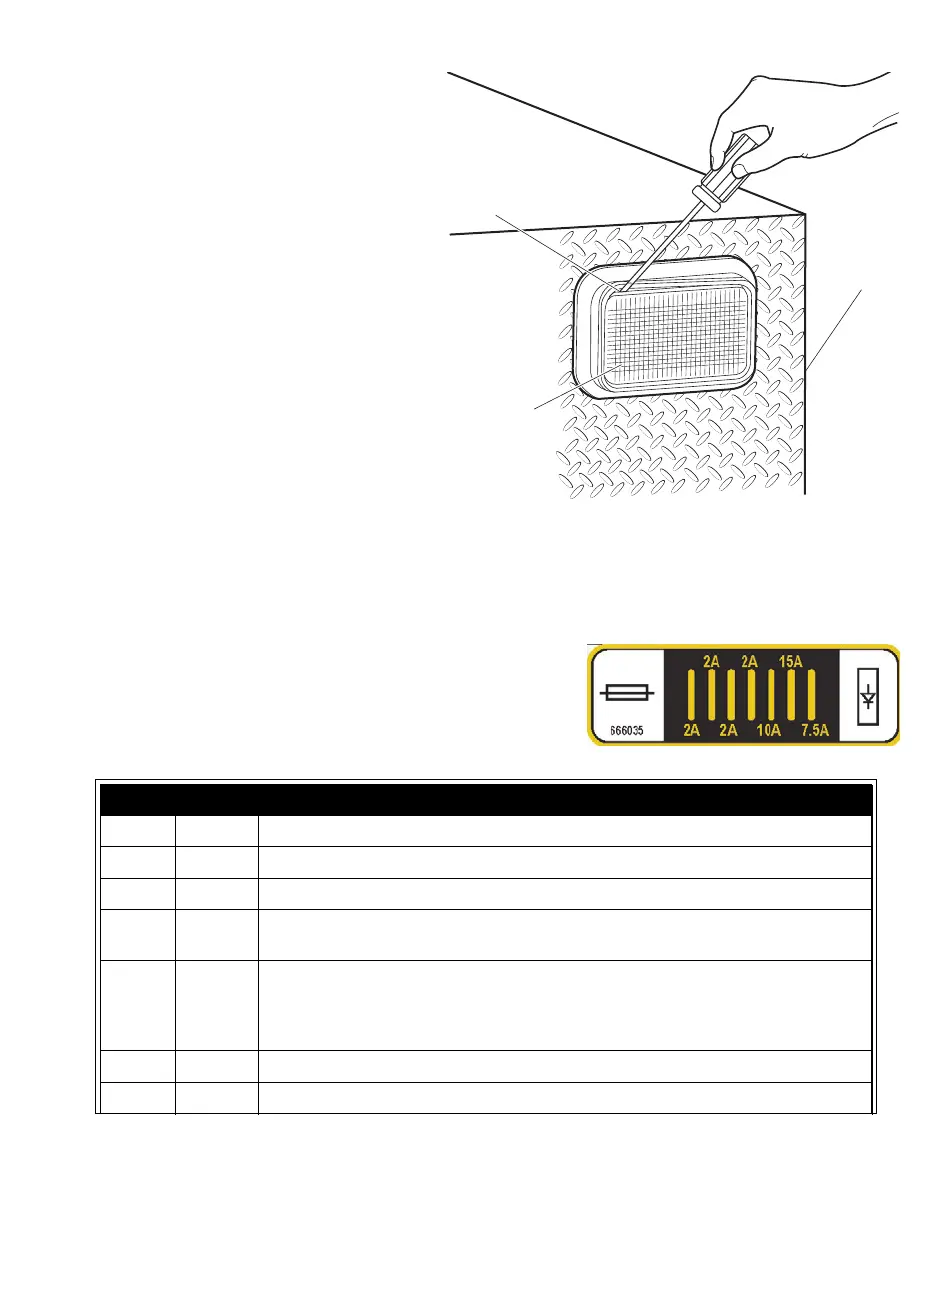
1. Disconnect wires from back of light.
2. Insert a small screwdriver between the
rubber bezel and the lens as shown.
Roll the rubber bezel from around the
edge of the lens and remove the light
assembly from the vehicle.
3. Insert the new light assembly into the
mounting hole.
4. Connect the wires to the new light.
FUSES
Tool List
• Wrench, 5/16”
• Fuse Puller
Fuses on this vehicle are located behind the door on the control panel.
To access the fuses, loosen the hex head screw that secures the door
to the control panel and pivot the door away from the control panel.
Replace blown fuse with specified size only. Secure the door in place
after replacing the fuse with the hex head bolt. Tighten to 40 - 50 in. lbs.
(5 - 6 Nm).
FUSE SIZE FOR
1 2 amp Taillight
2 2 amp Brake Light
3 2 amp Park Brake Coil
4 2 amp Output from Key Switch, Throttle Switch, 3140 Gauge Heater, Seat Switch, Run-
Tow Switch, Reverse Buzzer, DC to DC Converter Enable
5 10 amp Charger Receptacle LED, SOC in 3140 Gauge, Key Switch input, and all circuits fed
by Key Switch (pin 1 logic power for controller, Throttle Switch, 3140 Gauge Heater,
Seat Switch, Run-Tow Switch, Reverse Buzzer, DC-DC Converter Enable, Forward
and Reverse logic inputs to controller pins 22 and 23)
6 15 amp DC-DC Converter Output
7 7.5 amp 7.5 amp DIODE
Rear Body
Taillight/Brake
Light
Roll Rubber Bezel Away From
Lens Using Small Screwdriver
 Loading...