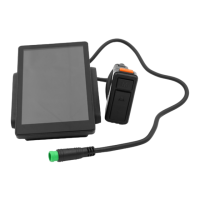
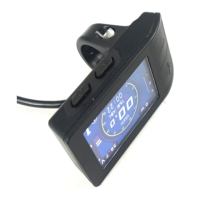
The DS103 Display is an intelligent LCD display designed for CYC motor systems, featuring a 3.5-inch colored TFT screen with high brightness and contrast. It operates with CYCMOTOR LTD specific firmware and is designed for outdoor use with an IP65 waterproof rating. The display is simple and lightweight, featuring a separate installation bracket design. It includes a clock function that remains active even when the display is shut down. For convenient maintenance services, it is equipped with a Micro USB serial communication port.
Technical Specifications:
- Model: DS103
- Firmware: CYCMOTOR LTD specific firmware
- Power Supply: DC 24V/36V/48V/52V
- Rated Current: 30mA/36V
- Shutdown Leakage Current: <1uA
- Screen Specification: 3.5" colored TFT (480x320 pixels)
- Communication Method: UART (default)
- Operating Temperature: -20°C to 60°C
- Storage Temperature: -30°C to 80°C
- Waterproof Level: IP65
- Product Shell Material: ABS + PC plastic
- Transparent Window Material: Tempered glass
- Dimensions: L 72mm x W 14mm x H 90.6mm
- Handlebar Compatibility: 31.8mm, 25.4mm, and 22.2mm diameters
- Certifications: CE / IP65 (waterproof) / ROHS
Usage Features:
Quick Start Guide:
After installation, two main settings need to be configured:
-
Battery No. Settings:
- Upon startup, long-press the MENU button within 15 seconds to access the SETTINGS page.
- Use UP/DOWN buttons to navigate and MENU to select the appropriate battery voltage (e.g., 6s = 22.2V, 10s = 36V, 14s = 52V).
-
Wheel Settings:
- Adjust the wheel size according to your bike's specifications (e.g., 16 inch, 26 inch, 700 C, 29 inch).
-
Parameter Setup:
- Set parameters such as temperature unit (C or F), speed unit (Kph or Mph), and backlight brightness level (1-5).
Basic Operation:
- Power On/Off: Press and hold the POWER button for 3 seconds.
- Navigation: The MENU button is used to access the main settings page and clear data page. It also serves to enter and select settings or functions.
- To access the SETTINGS page, long-press the MENU button within 15 seconds of startup. If the system has been active for more than 15 seconds, a restart is required to enter the settings menu.
- Adjustable Settings include: Trip Mode (Race/Street), Battery No., Wheel size, Start-up Theme (Light/Dark), Backlight, Temp Unit, Speed Unit, Auto Off timer, Assist Levels Select, Clock, Startup Password, System Info, and Reset.
Trip Mode:
- From the SETTINGS page, select "TRIP MODE" to switch between "STREET" and "RACE" modes. This changes the displayed information on the dashboard.
Switch Dashboard:
- Press the MENU button to cycle through different main dashboard displays, showing various information such as speed, voltage, efficiency, motor power, motor RPM, trip time, calories, cadence RPM, odometer, distance, and average speed.
Assist Levels Select:
- Press the UP/DOWN button while riding to change between assist levels. "OFF" means no motor assistance.
- There are three sets of assist levels: 3, 5, and 9. To change the assist level set, long-press the MENU button within 15 seconds of startup and access "ALL GEAR" in the main settings page.
Dark & Light Themed Dashboard:
- From the SETTINGS page, select "THEME" to switch between light and dark themed dashboards.
Walk Assist:
- Hold the DOWN button to activate walk assist. It takes 3 seconds to activate and deactivates immediately when the button is released.
Maintenance Features:
Error Codes:
- If an error code appears on the display, refer to the manual's "Error Code on App & DS103 Display" table. Common errors include:
- Controller Over/Under Voltage
- Controller Over Temperature
- Hall Sensor Error
- Throttle Error
- Speed Sensor Error
- Controller Internal Errors (1-10)
- Contact support@cycmotor.com for assistance with error codes.
Clean Trip Data:
- To clear previous trip data, wait 15 seconds after starting the motor system, then long-press the MODE button to enter the "Clean Data" menu.
- This is a manual process; trip data does not automatically clear upon system restart.
Installation:
- Handlebar Clamp Selection: Determine the appropriate mounting clamp and rubber clip ring based on your handlebar diameter (Φ22.2, Φ25.4, or Φ31.8).
- Display Clamp Assembly: Open the display lock clamp, insert the rubber clip (if applicable), and position it correctly.
- Handlebar Mounting: Place the rubber ring in the bracket (if applicable) and assemble it on the middle of the handlebar. Adjust the display angle for optimal visibility and then tighten the screws to 1N.m.
- Switch Mounting: Open the lock ring of the switch and position it on the left side of the handlebar. Adjust the angle and position of the switch for easy operation.
- Final Tightening: Fix and tighten the handlebar fixing screw with an M3 Hex wrench to 0.8N.m.
- Note: Damage caused by excessive torque is not covered by warranty.
Pin Layout (Male 5-Pin Connector):
- Red Wire: Anode (36V to 72V)
- Black Wire: GND
- Yellow Wire: TxD (display -> controller)
- Green Wire: RxD (controller -> display)
- Blue Wire: Power cord to the controller
For further assistance, contact CYC MOTOR at support@cycmotor.com or +95236908938.