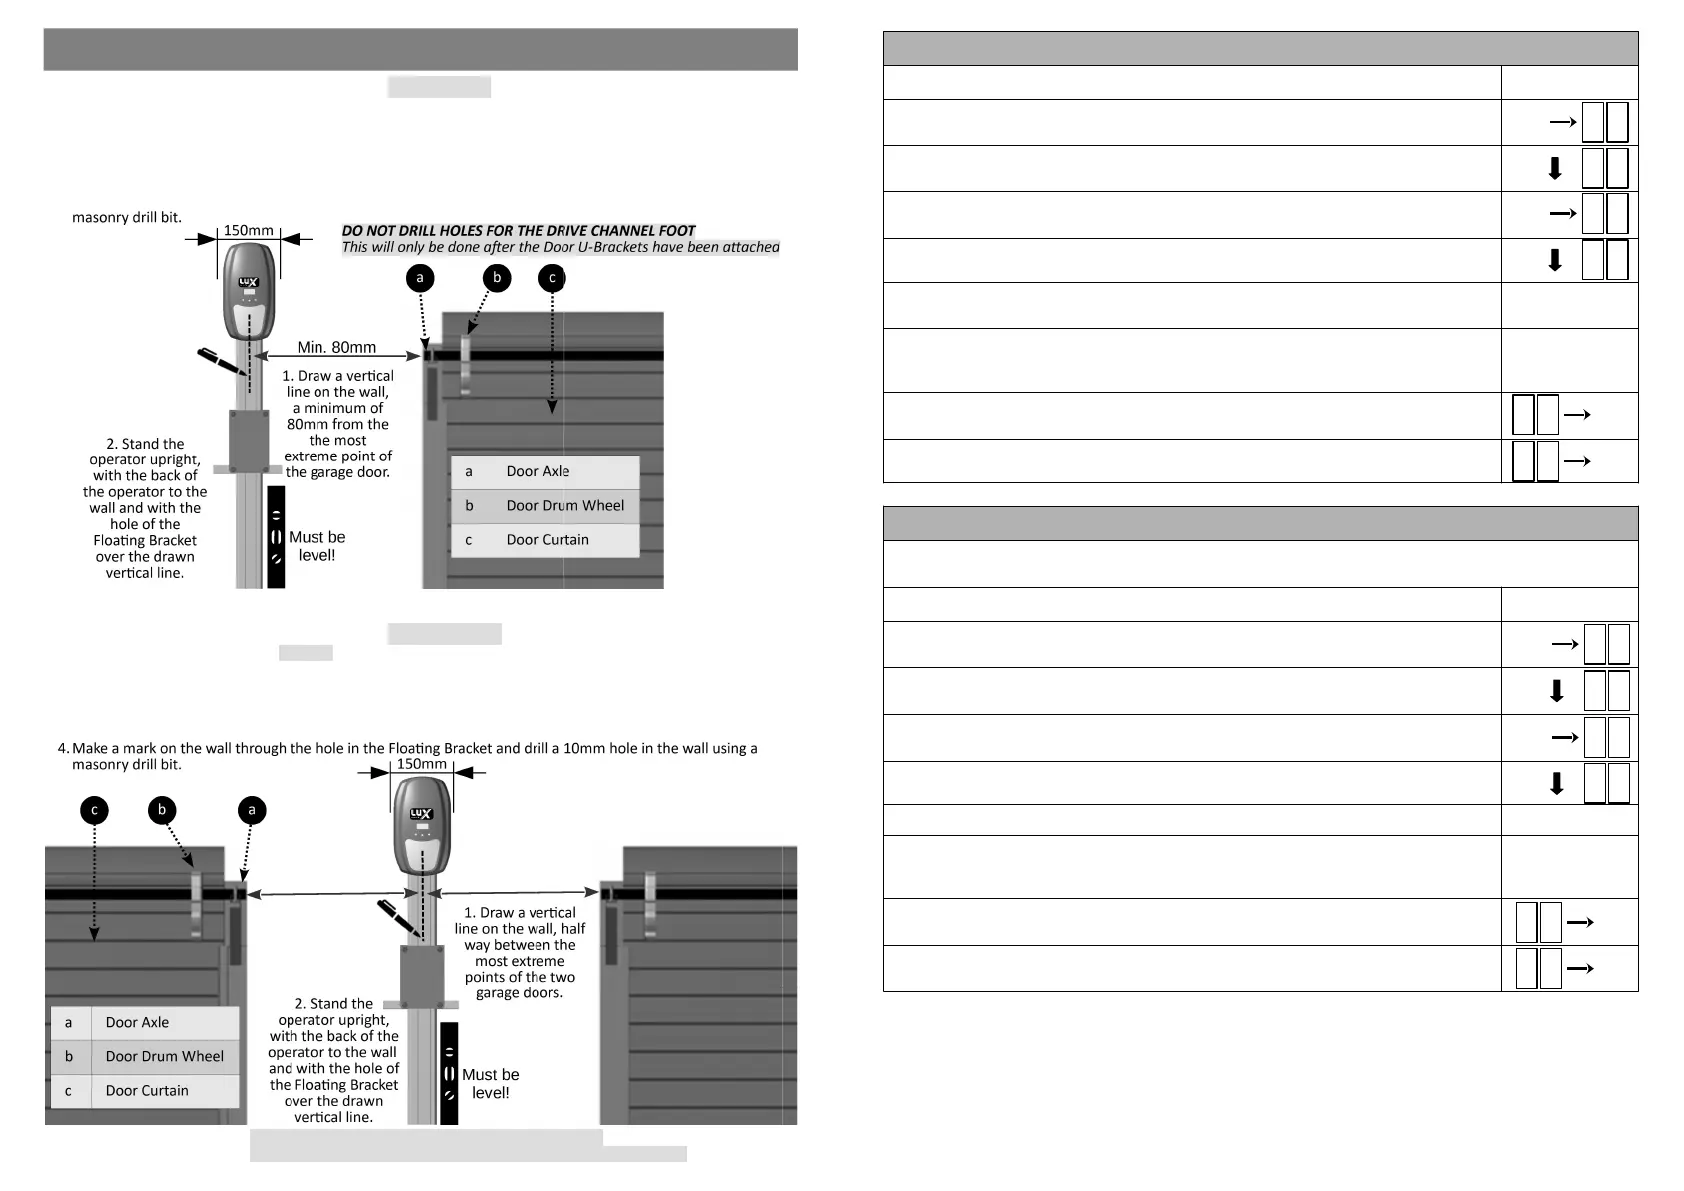
Step 1: Marking & Drilling the Wall (Single door):
1.Draw a vercal line on the wall, a minimum of 80mm from the most extreme point of the garage door
(usually the Door Axle).
2.Stand the operator upright, resng on the Drive Channel Foot and with the back of the operator facing the
wall.
3.Allow the Floang Bracket to rest against the wall so that the hole in the floang bracket lies over the drawn
vercal line.
4.Make a mark on the wall through the hole in the Floang Bracket and drill a 10mm hole in the wall using a
MOUNTING THE FLOATING BRACKET TO THE WALL
Step 1: Marking & Drilling the Wall (Double door):
1.Draw a vercal line on the wall, half way between the most extreme points of the two garage doors (usually
the Door Axle).
2.Stand the operator upright, resng on the Drive Channel Foot and with the back of the operator facing the
wall.
3.Allow the Floang Bracket to rest against the wall so that the hole in the floang bracket lies over the drawn
vercal line.
.
DO NOT DRILL HOLES FOR THE DRIVE CHANNEL FOOT
This will only be done aer the Door U-Brackets have been aached.
8
17
PROGRAMMING A REMOTE BUTTON TO TURN THE OPERATOR LIGHT ON and OFF
1) Ensure the baery is connected to the Operator.
2) Press the SET buon to enter the Programming Menu (Pr).
3) Press the DOWN buon unl the Remote Menu (rc) is visible.
4) Press the SET buon to enter the Remote Menu. The display will change to LE
(Learn).
5) Press the DOWN buon unl Lt (Light) is visible.
6) Press and hold the remote buon that is to be used to turn the operator light on and
off. Do not use the same buon that was programmed to trigger the operator.
7) While holding the remote buon, press the SET buon on the operator. The display
will indicate the stored posion of the remote being programmed (01 to 64). The
buon has now been programmed.
8) To exit the Light Menu (Lt), use the UP or DOWN buons to scroll to bc and press the
SET buon. This will return you to the Programming Menu (Pr).
9) To exit the Programming Menu (Pr), scroll again to bc and press the SET buon.
R c
SET
p r
SET
L E
L t
SET
b c
SET
b c
ERASING A SINGLE REMOTE and ITS BUTTONS FROM THE OPERATOR
To erase a single remote from the operator it is necessary that you know the stored posion of the
parcular remote (01 to 64).
1) Ensure that the baery is connected to the Operator.
2) Press the SET buon to enter the Programming Menu (Pr).
3) Press the DOWN buon unl the Remote Menu (rc) is visible.
4) Press the SET buon to enter the Remote Menu. The display will change to LE
(Learn).
5) Press the DOWN buon unl CI is visible.
6) Press SET buon
7) To erase the remote, press the UP or DOWN buons to select the posion that the
remote was in (01 to 64) and press SET. The remote and all its buons have been
erased from the operator.
8) To exit CI, use the UP or DOWN buons to scroll to bc and press the SET buon. This
will return you to the Programming Menu (Pr).
9) To exit the Programming Menu (Pr), scroll again to bc and press the SET buon.
R c
SET
p r
SET
b c
SET
L E
C 1
SET
b c
SET
SET
 Loading...