www.daewoopower.bg
19
BG
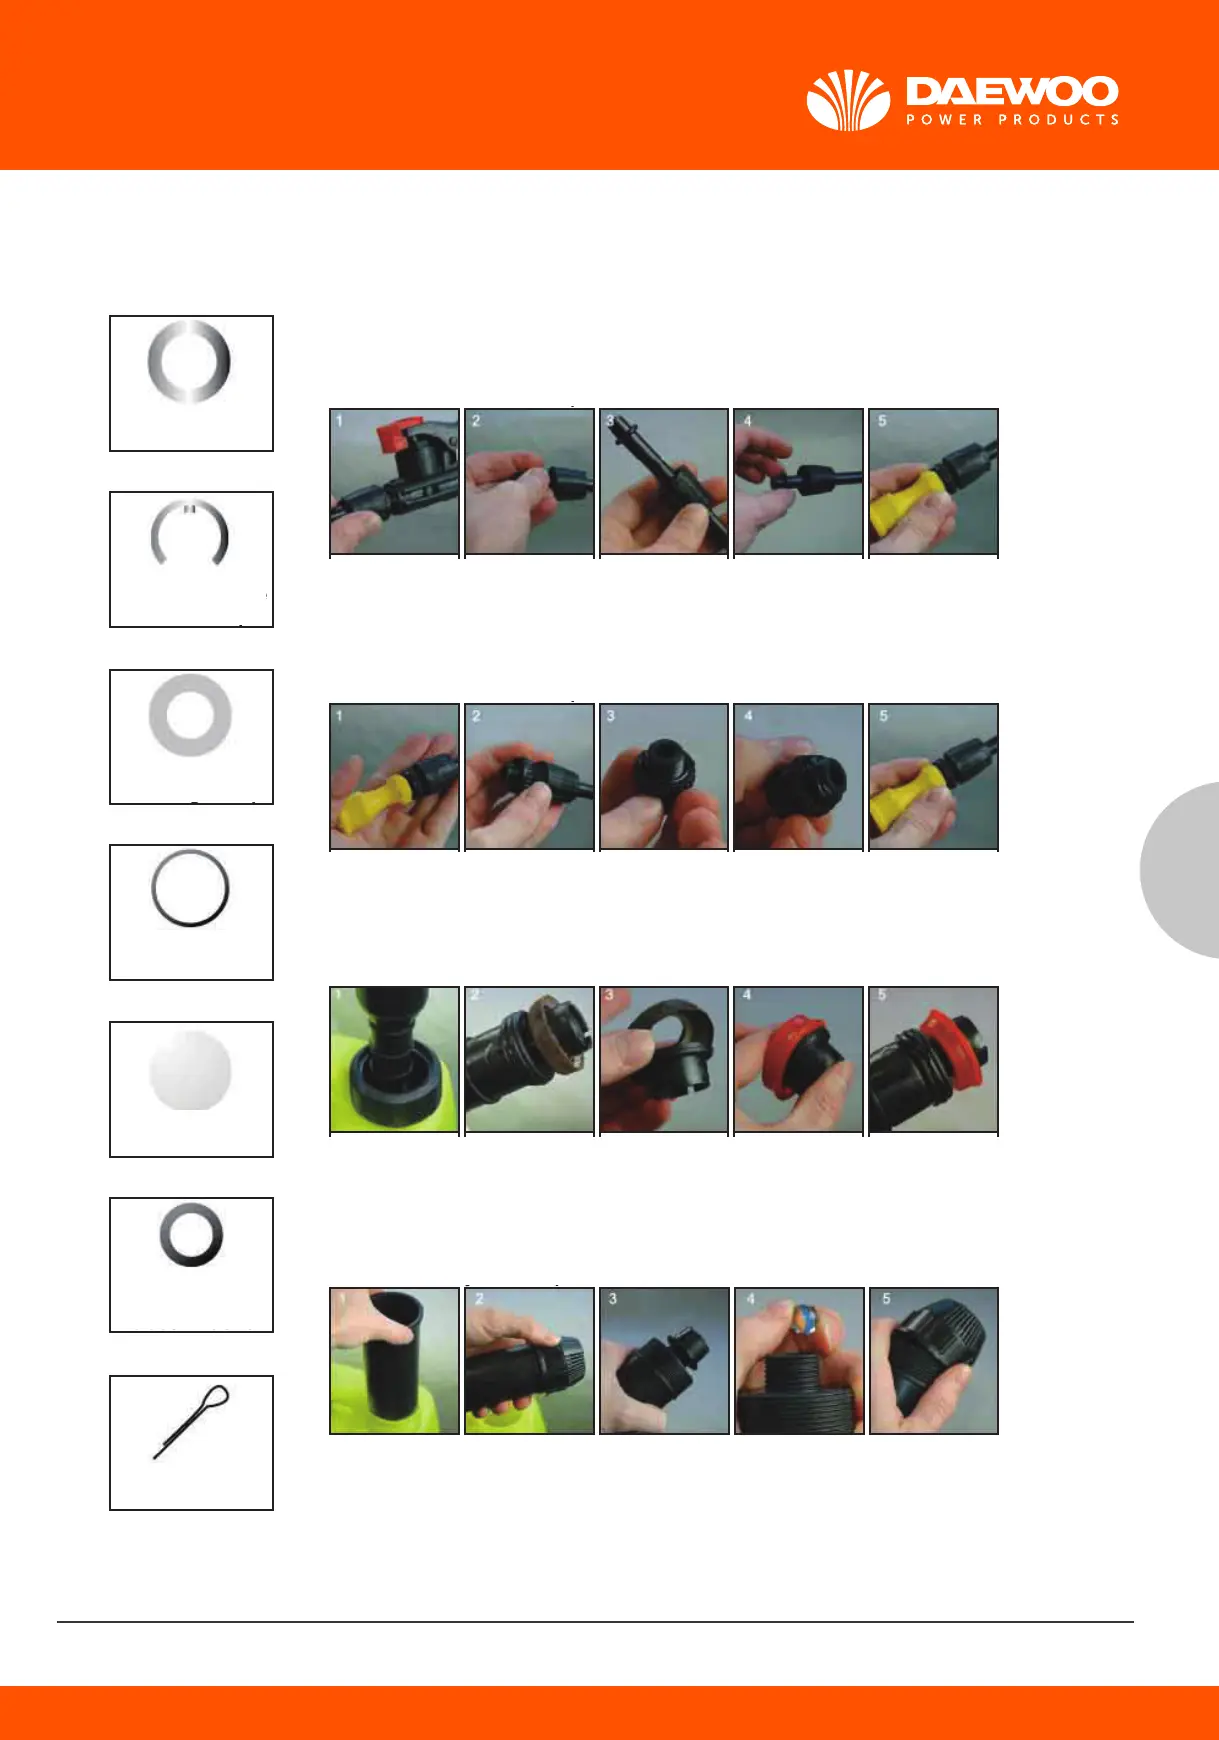
Unscrew the
lance from
the switch
14 mm Rubber washer replacement
Plunger cup replacement
Glass ball in cylinder replacement
18 mm Rubber washer replacement
Unscrew the
nozzle from
the lance
Locate the
orange
screw part
and pull back
Locate, remove
and replace the
washer
Push the screw
back up and
reconnect the
lance to switch and
the nozzle to the
lance
Unscrew the
nozzle from
the lance
Remove the
plunger from
the tank
Remove the
cylinder from
the tank
Unscrew the
adapter from
the lance
Unscrew the
plunger cup
retaining screw
and remove
Unscrew the
bottom of the
cylinder.
Locate the washer
Remove the
plunger cup
Unscrew the
glass ball housing
Remove and
replace the
washer
Replace the
plunger cup
Replace the
glass ball
Reconnect
the adapter to
the lance and
the nozzle to
the adapter.
Screw the plunger
cup retaining the
screw back in and
put the plunger
back in the tank
Screw the bottom
of the cylinder
back on and put
the cylinder back
in the tank
1x Metal Washer
1x Pump Handle
Retainer clip
1x Plunger Cup
2x 18mm
Rubber Washer
2x Glass Ball
2x 14mm
Rubber Washer
1x Split Pin
Please see to the left, spare parts (included) and their purpose and instructions for
replacement below.
Glass ball in plunger: to replace follow the steps for the plunger cup
Pump handle retaining clip: to replace follow the steps for the pump handle assembly.
Metal washer and split pin: to replace follow the steps for the connection rod assembly.
8
8. SPARE PARTS LIST
Unscrew the
lance from
the switch
14 mm Rubber washer replacement
Plunger cup replacement
Glass ball in cylinder replacement
18 mm Rubber washer replacement
Unscrew the
nozzle from
the lance
Locate the
orange
screw part
and pull back
Locate, remove
and replace the
washer
Push the screw
back up and
reconnect the
lance to switch and
the nozzle to the
lance
Unscrew the
nozzle from
the lance
Remove the
plunger from
the tank
Remove the
cylinder from
the tank
Unscrew the
adapter from
the lance
Unscrew the
plunger cup
retaining screw
and remove
Unscrew the
bottom of the
cylinder.
Locate the washer
Remove the
plunger cup
Unscrew the
glass ball housing
Remove and
replace the
washer
Replace the
plunger cup
Replace the
glass ball
Reconnect
the adapter to
the lance and
the nozzle to
the adapter.
Screw the plunger
cup retaining the
screw back in and
put the plunger
back in the tank
Screw the bottom
of the cylinder
back on and put
the cylinder back
in the tank
1x Metal Washer
1x Pump Handle
Retainer clip
1x Plunger Cup
2x 18mm
Rubber Washer
2x Glass Ball
2x 14mm
Rubber Washer
1x Split Pin
Please see to the left, spare parts (included) and their purpose and instructions for
replacement below.
Glass ball in plunger: to replace follow the steps for the plunger cup
Pump handle retaining clip: to replace follow the steps for the pump handle assembly.
Metal washer and split pin: to replace follow the steps for the connection rod assembly.
8
8. SPARE PARTS LIST
8
.
СХЕМА И СПИСЪК НА РЕЗЕРВНИТЕ ЧАСТИ
-
-
-
-
-
-
-
-
-
-
-
-
-
-
 Loading...