Home
Daikin
Air Conditioner
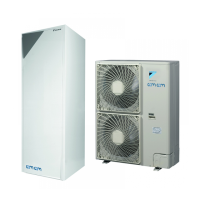
EHBH08DA6V
Daikin EHBH08DA6V - User Manual
112 pages
Manual
Specs
Ask a question
Save Page as PDF
To Next Page
To Next Page
Loading...
Installer reference guide
Daikin Altherma – Low temperature split
English
+
Installer reference guide
Daikin Altherma – Low temperature split
ERGA04DAV3(A)
ERGA06DAV3(A)
ERGA08DAV3(A)
EHBH04DA6V
EHBH08DA6V
EHBH08DA9W
EHBX04DA6V
EHBX08DA6V
EHBX08DA9W
Final
English
-
Tanslations
in
progress
2
Table of Contents
Main Page
Default Chapter
2
Table of Contents
2
1 General Safety Precautions
3
About the Documentation
3
Meaning of Warnings and Symbols
3
For the Installer
4
General
4
Installation Site
4
Refrigerant
4
Brine
5
Water
5
Electrical
6
2 About the Documentation
6
About this Document
6
Installer Reference Guide at a Glance
7
3 About the Box
7
Overview: about the Box
7
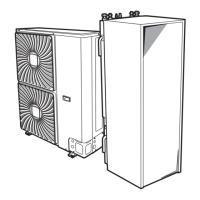
Outdoor Unit
7
7 Installation
7
To Unpack the Outdoor Unit
7
To Handle the Outdoor Unit
7
To Remove the Accessories from the Outdoor Unit
8
Indoor Unit
8
To Unpack the Indoor Unit
8
To Remove the Accessories from the Indoor Unit
8
4 About the Units and Options
8
Overview: about the Units and Options
8
Identification
9
Identification Label: Outdoor Unit
9
Identification Label: Indoor Unit
9
Combining Units and Options
9
Possible Options for the Outdoor Unit
9
Possible Options for the Indoor Unit
9
Possible Combinations of Indoor Unit and Outdoor Unit
10
Possible Combinations of Indoor Unit and Domestic Hot Water Tank
10
5 Application Guidelines
10
Overview: Application Guidelines
10
Setting up the Space Heating/Cooling System
10
Single Room
11
Multiple Rooms - One LWT Zone
12
Multiple Rooms - Two LWT Zones
14
Setting up an Auxiliary Heat Source for Space Heating
15
Setting up the Domestic Hot Water Tank
17
System Layout - Standalone DHW Tank
17
Selecting the Volume and Desired Temperature for the DHW Tank
17
Setup and Configuration - DHW Tank
17
DHW Pump for Instant Hot Water
18
DHW Pump for Disinfection
18
DHW Pump for Tank Preheating
18
Setting up the Energy Metering
18
Produced Heat
18
Consumed Energy
19
Normal Kwh Rate Power Supply
19
Preferential Kwh Rate Power Supply
19
Setting up the Power Consumption Control
20
Permanent Power Limitation
20
Power Limitation Activated by Digital Inputs
20
Power Limitation Process
21
Setting up an External Temperature Sensor
21
6 Preparation
21
Overview: Preparation
21
Preparing the Installation Site
22
Installation Site Requirements of the Outdoor Unit
22
Additional Installation Site Requirements of the Outdoor Unit in Cold Climates
23
Installation Site Requirements of the Indoor Unit
23
Preparing Refrigerant Piping
26
Refrigerant Piping Requirements
26
Refrigerant Piping Insulation
26
Preparing Water Piping
26
Water Circuit Requirements
26
Formula to Calculate the Expansion Vessel Pre-Pressure
27
To Check the Water Volume and Flow Rate
27
Changing the Pre-Pressure of the Expansion Vessel
28
To Check the Water Volume: Examples
29
Preparing Electrical Wiring
29
About Preparing Electrical Wiring
29
About Preferential Kwh Rate Power Supply
29
Overview of Electrical Connections Except External Actuators
30
Overview of Electrical Connections for External and Internal Actuators
30
Overview: Installation
30
Opening the Units
31
About Opening the Units
31
To Open the Outdoor Unit
31
To Open the Indoor Unit
31
Mounting the Outdoor Unit
32
About Mounting the Outdoor Unit
32
Precautions When Mounting the Outdoor Unit
32
To Provide the Installation Structure
32
To Install the Outdoor Unit
33
To Provide Drainage
34
To Prevent the Outdoor Unit from Falling over
35
Mounting the Indoor Unit
35
About Mounting the Indoor Unit
35
Precautions When Mounting the Indoor Unit
35
To Install the Indoor Unit
35
To Connect the Drain Hose to the Drain
36
Connecting the Refrigerant Piping
36
About Connecting the Refrigerant Piping
36
Precautions When Connecting the Refrigerant Piping
36
Guidelines When Connecting the Refrigerant Piping
37
Pipe Bending Guidelines
37
To Flare the Pipe End
37
To Braze the Pipe End
37
Using the Stop Valve and Service Port
38
To Connect the Refrigerant Piping to the Outdoor Unit
38
To Connect the Refrigerant Piping to the Indoor Unit
38
Checking the Refrigerant Piping
39
About Checking the Refrigerant Piping
39
Precautions When Checking the Refrigerant Piping
39
To Check for Leaks
39
To Perform Vacuum Drying
39
Charging Refrigerant
40
About Charging Refrigerant
40
Precautions When Charging Refrigerant
40
To Determine the Additional Refrigerant Amount
40
To Determine the Complete Recharge Amount
40
To Charge Additional Refrigerant
40
To Fix the Fluorinated Greenhouse Gases Label
41
Connecting Water Piping
41
About Connecting the Water Piping
41
Precautions When Connecting the Water Piping
41
To Connect the Water Piping
41
To Fill the Water Circuit
42
To Fill the Domestic Hot Water Tank
42
To Insulate the Water Piping
42
Connecting the Electrical Wiring
42
About Connecting the Electrical Wiring
42
About Electrical Compliance
42
Precautions When Connecting the Electrical Wiring
42
Guidelines When Connecting the Electrical Wiring
42
Specifications of Standard Wiring Components
43
To Connect the Electrical Wiring on the Outdoor Unit
43
To Connect the Electrical Wiring on the Indoor Unit
44
To Connect the Main Power Supply
44
To Connect the Backup Heater Power Supply
45
To Connect the Shut-Off Valve
46
To Connect the Electricity Meters
46
To Connect the Domestic Hot Water Pump
46
To Connect the Alarm Output
46
To Connect the Space Cooling/Heating ON/OFF Output
47
To Connect the Changeover to External Heat Source
47
To Connect the Power Consumption Digital Inputs
47
To Connect the Safety Thermostat (Normally Closed Contact)
47
Finishing the Outdoor Unit Installation
48
To Finish the Outdoor Unit Installation
48
Finishing the Indoor Unit Installation
48
To Close the Indoor Unit
48
8 Configuration
48
Overview: Configuration
48
To Access the most Used Commands
48
Configuration Wizard
49
Possible Screens
49
Possible Screens: Overview
49
Home Screen
50
Main Menu Screen
50
Menu Screen
51
Setpoint Screen
51
Detailed Screen with Values
52
Detailed Screen with Weather-Dependent Curve
52
Schedule Screen: Example
52
Settings Menu
54
Malfunctioning
54
Room
54
Main Zone
55
Additional Zone
60
Space Heating/Cooling
62
Tank
65
User Settings
68
Information
70
Installer Settings
70
Menu Structure: Overview User Settings
78
Menu Structure: Overview Installer Settings
79
9 Commissioning
80
Overview: Commissioning
80
Precautions When Commissioning
80
Checklist before Commissioning
80
Checklist During Commissioning
80
To Check the Minimum Flow Rate
81
Air Purge Function
81
To Perform an Operation Test Run
81
To Perform an Actuator Test Run
82
Underfloor Heating Screed Dryout
82
10 Hand-Over to the User
83
11 Maintenance and Service
83
Overview: Maintenance and Service
83
Maintenance Safety Precautions
84
Checklist for Yearly Maintenance of the Outdoor Unit
84
Checklist for Yearly Maintenance of the Indoor Unit
84
About Cleaning the Water Filter in Case of Trouble
85
To Remove the Water Filter
85
To Clean the Water Filter in Case of Trouble
85
To Install the Water Filter
86
12 Troubleshooting
86
Overview: Troubleshooting
86
Precautions When Troubleshooting
86
Solving Problems Based on Symptoms
86
Symptom: the Unit Is NOT Heating or Cooling as Expected
86
Symptom: the Compressor Does NOT Start (Space Heating or Domestic Water Heating)
87
Symptom: the System Is Making Gurgling Noises after Commissioning
87
Symptom: the Pump Is Making Noise (Cavitation)
87
Symptom: the Pressure Relief Valve Opens
87
Symptom: the Water Pressure Relief Valve Leaks
88
Symptom: the Space Is NOT Sufficiently Heated at Low Outdoor Temperatures
88
Symptom: the Pressure at the Tapping Point Is Temporarily Unusually High
88
Symptom: Decoration Panels Are Pushed Away Due to a Swollen Tank
88
Symptom: Tank Disinfection Function Is NOT Completed Correctly (AH-Error)
88
Solving Problems Based on Error Codes
89
To Display the Help Text in Case of a Malfunction
89
Error Codes: Overview
89
13 Disposal
90
Overview: Disposal
90
To Pump down
91
To Start and Stop Forced Cooling
91
14 Technical Data
92
Piping Diagram: Outdoor Unit
92
Piping Diagram: Indoor Unit
93
Wiring Diagram: Outdoor Unit
94
Wiring Diagram: Indoor Unit
95
Indoor Unit
98
Ventilation: Indoor Unit
99
ESP Curve: Indoor Unit
100
Other manuals for Daikin EHBH08DA6V
Installation Manual
28 pages
Need help?
Do you have a question about the Daikin EHBH08DA6V and is the answer not in the manual?
Ask a question
Daikin EHBH08DA6V Specifications
Print Specification
General
Energy Efficiency Class
A++
Refrigerant
R-32
Noise Level (Indoor Unit)
28 dB(A)
Type
Heat Pump
Power Supply
220-240V / 50Hz / 1 Phase
Related product manuals
Daikin EHBH08EA6V
44 pages
Daikin EHBH04DA6V
112 pages
Daikin EHBX08EA6V
44 pages
Daikin EHBX08DA6V
112 pages
Daikin EHBX08DA9W
112 pages
Daikin EHFZ03S18DJ3V
212 pages
Daikin Altherma EHVH04S23DAV
108 pages
Daikin Altherma EHVH04S18CB3V
120 pages
Daikin Altherma EHVH/X11+16S18CB
108 pages
Daikin Altherma EHVH/X16S18+26CA
92 pages
Altherma 3 R F EHVZ04S18E 6V Series
256 pages
Daikin E Series
453 pages