IOM 1266-2 • MAGNITUDE
®
MODEL WME CHILLERS 16 www.DaikinApplied.com
InsTallaTIon
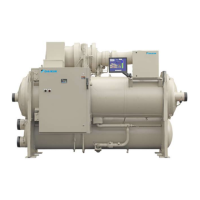
Compressor Rigging Requirements
To properly rig the compressor, install swivel lifting eye-bolts
in the two holes on the top of the compressor (see Figure 15,
ag #9). Use a spreader bar between the two chain hoists,
as shown in Figure 13, to safely lift the compressor. Note
compressor weights and dimensions in Table 5 and unit rigging
instructions in Figure 5 on page 8.
Figure 13: WME Compressor Rigging Setup
NOTE: The spreader bar in Figure 13 is a representation
only and may not reect the appearance of the actual
spreader bar needed.
Compressor Removal and
Re-Attachment Instructions
Follow the steps listed to remove and re-attach the
compressor.
Compressor Removal Preparation
1. Close shut-off king valve at condenser liquid line outlet.
2. Close all other related shut-off valves.
3. Pump the refrigerant charge down into the condenser.
4. Ensure that the charge has been removed from the
compressor and evaporator and that the discharge check
valve is holding the charge in the condenser.
5. Loosen and remove bolts on the top side of the
compressor discharge nozzle (see Figure 14, ag #5).
6. Loosen and remove bolts at ange on condenser and
remove discharge piping.
7. Cover openings to prevent foreign objects entering.
WARNING
Improper rigging, lifting, or moving of a unit can result in
property damage, severe personal injury or death. Follow
rigging and moving instructions carefully.
Figure 14: Compressor Removal Preparation
Compressor Removal
1. Loosen and remove bolts/screws on either side of the
cast suction elbow (see Figure 15, ag #1).
Figure 15: Compressor Removal/Re-Attachment
2. Remove rotor cooling return line on the underside of the
compressor motor housing along with both rotor cooling
supply lines.
3. Remove (2) DIN connectors from the solenoid coils along
refrigerant piping.
4. Remove rotor stepping valve control wire. The wire ties
will have to be cut away during this process.
5
6
335652806
9
8
TYP
4 PLACES
1
335652807
 Loading...