EasyManuals Logo

Daikin R410A Split Series User Manual

Daikin R410A Split Series
40 pages
To Next Page IconTo Next Page
To Previous Page IconTo Previous Page
Page #13 background imageLoading...
Page #13 background image
9
English
Installation of indoor unit
4. Wrap the indoor pipe and joint of
connection pipe with insulating pipe,
and then wrap it with tape.
Step six: install drain hose
1. Connect the drain hose to the outlet pipe of
indoor unit.
2. Bind the joint with tape.
Step seven: connect wire of indoor unit
1. Open the panel, remove the screw on
the wiring cover and then take down
the cover.
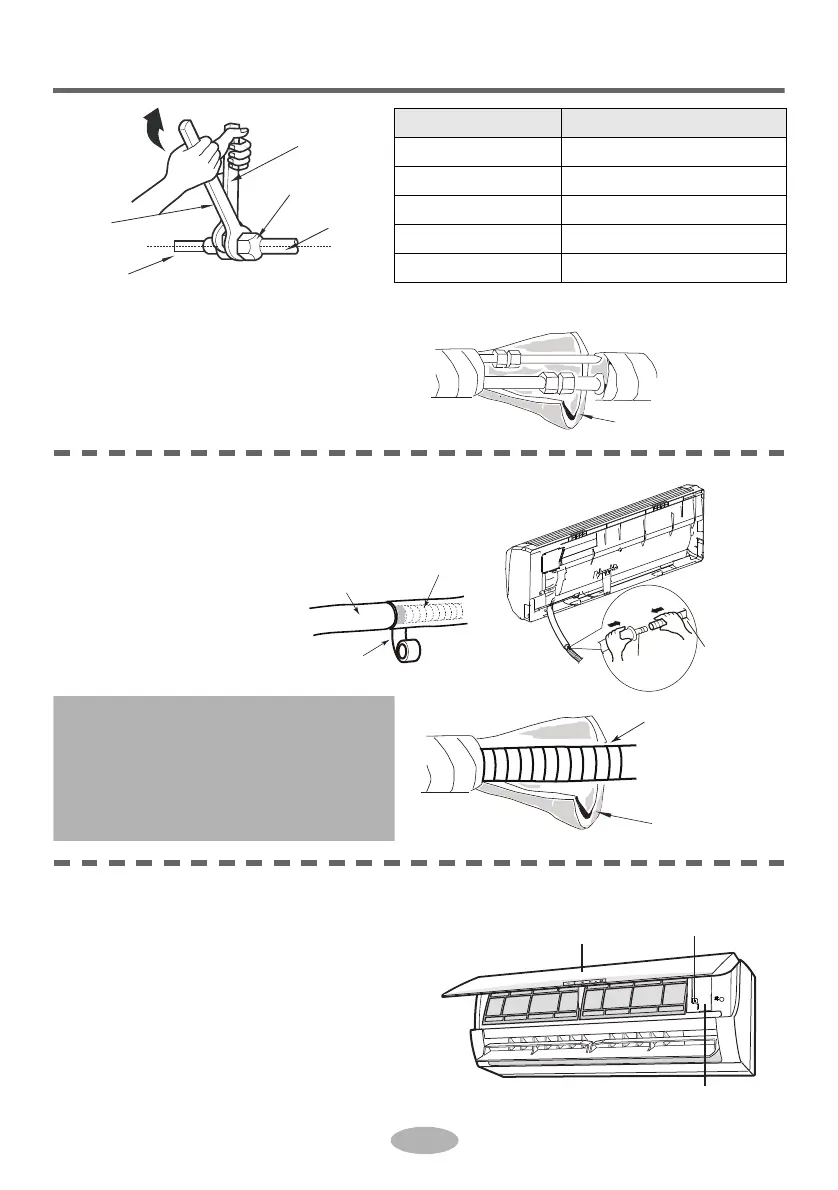
Hex nut diameter Tightening torque (N·m)
Ø 6 15~20
Ø 9.52 30~40
Ø 12 40~55
Ø 16 60~65
Ø 19 70~75
torque wrench
indoor pipe
union nut
pipe
open-end
wrench
insulating pipe
drain hose
outlet
pipe
drain hose
outlet pipe
tape
drain hose
insulating pipe
Note:
Add insulating pipe in the indoor
drain hose in order to prevent
condensation.
The plastic expansion particles
are not provided.
panel
screw
wiring cover

Other manuals for Daikin R410A Split Series

Questions and Answers:

Question and Answer IconNeed help?

Do you have a question about the Daikin R410A Split Series and is the answer not in the manual?

Daikin R410A Split Series Specifications

General IconGeneral
RefrigerantR410A
Cooling CapacityVaries by model
Heating CapacityVaries by model
Energy Efficiency Ratio (EER)Varies by model
Coefficient of Performance (COP)Varies by model
Indoor Unit Noise LevelVaries by model
Outdoor Unit Noise LevelVaries by model
Indoor Unit Dimensions (HxWxD)Varies by model
Outdoor Unit Dimensions (HxWxD)Varies by model
Indoor Unit WeightVaries by model
Outdoor Unit WeightVaries by model

Related product manuals