EasyManua.ls Logo

Daikin ZH(C)3LSF User Manual

Daikin ZH(C)3LSF
51 pages
To Next Page IconTo Next Page
Page #1 background imageLoading...
Page #1 background image
Head office:
Umeda Center Bldg., 4-12, Nakazaki-Nishi 2-chome,
Kita-ku, Osaka, 530-8323 Japan
Tokyo office:
Shinjuku Sumitomo Bldg., 6-1 Nishi-Shinjuku
2-chome, Shinjuku-ku, Tokyo, 163-0235 Japan
Zandvoordestraat 300, B-8400 Oostende, Belgium
« The specifications, designs, and information in this manual are subject to change without notice.
Printed in Japan 02/2003 AK
Semi-Hermetic Single Screw
Compressor Version
For Overhaul and Inspection
[Applied Models]
ZH(C)3LSF ZH3LMF ZH(C)3LTG
ZH(C)5MLF ZH5SLF ZH(C)3WLG
ZH(C), (A)5LLF ZH5LMF ZH(C), (A)5LMG
ZH(C), (A)7SLF ZHA7MLF ZH(C), (A)5WLG
ZH(C)7LLF ZHA7MSGZH(C)7LSG
ZH(C), (A)9SLF ZH(C), (A)7WSG
ZH(C), (A)9LLF ZH(C), (A)9LSG
ZH(C), (A)9WSG
Si50-203
Question and Answer IconNeed help?

Do you have a question about the Daikin ZH(C)3LSF and is the answer not in the manual?

Daikin ZH(C)3LSF Specifications

General IconGeneral
BrandDaikin
ModelZH(C)3LSF
CategoryAir Compressor
LanguageEnglish

Summary

Scope of Application

Overhaul

Periodic Inspection

Periodic Inspection Items and Intervals

Lists periodic inspection items and their intervals for maintenance.

Periodic Inspection Instructions

Provides detailed instructions for performing periodic inspections.

Changing Refrigerating Oil

Details the procedure for replacing the refrigerating oil.

Inspecting The Gate Rotor

Describes how to inspect the gate rotor for wear and damage.

Cleaning The Suction Filter

Explains the process for cleaning the suction filter.

Overhaul Instructions

Disassembly and Inspection

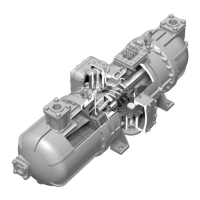
Covers the steps for disassembling the compressor and inspecting parts.

Inspection of The Gate Rotor and Surrounding Parts

Details the inspection of the gate rotor and its adjacent components.

Disassembling The Gate Rotor and Surrounding Parts

Provides instructions on how to disassemble the gate rotor assembly.

Removing and Installation of Gate Rotor

Explains the procedure for removing and installing the gate rotor.

Removing The Suction End Cover

Describes the process for removing the suction end cover.

Removing The Motor Rotor

Details the steps for removing the motor rotor.

Disassembly of The Controller

Covers the disassembly procedure for the controller unit.

Removing and Disassembling The Screw Assembly Pulley

Explains how to remove and disassemble the screw assembly pulley.

Replacing The Bearing

Details the procedure for replacing the compressor bearings.

Final Assembly

Assembling The Screw Shaft and Main Bearing Holder

Instructions for assembling the screw shaft and main bearing holder.

Inserting The Screw Shaft

Steps for inserting the screw shaft into the compressor casing.

Installing The Motor Rotor

Procedure for installing the motor rotor onto the shaft.

Installing The Suction End Cover

Details the installation of the suction end cover.

Positioning The Screw Rotor

How to position the screw rotor correctly during assembly.

Installing The Gate Rotor and Adjusting The Slit Clearance

Steps for installing the gate rotor and adjusting slit clearance.

Installing The Discharge End Cover

Instructions for installing the discharge end cover.

Airtightness Test

Charging Oil

Caution in Test Operation

Required Tools

General Tools and Measuring Instruments

Lists general tools and measuring instruments required for maintenance.

Special Tools

Lists special tools needed for overhaul procedures.

Related product manuals