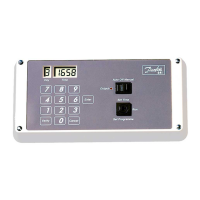
2
The appropriate indicator lights at the top of the keypad will illuminate.
The complete programme may be checked by the use of the ‘Verify’ key.
Each press of this key will advance the programme by one event allowing
a complete review in chronological sequence commencing from the day
and time on display. If a particular day’s programme is to be reviewed then
key the day number followed by
0 0 0 0 and Verify
when the fi rst programmed event for that day will be displayed then
proceed with repeated presses of the ‘Verify’ key.
When reprogramming one or more events, unwanted events must be
cleared by advancing to the event in question using the ‘Verify’ key as
explained above and then clearing it by a single press on the ‘Cancel’
key.
When programming of Channel 1 is complete, turn the key to Set
Channel 2 and enter the programme required for this channel in the
same manner.
When pressing either the Enter keypads the appropriate indicator light at
the bottom left of the keypad will illuminate.
Note: The 200 switching operations are able to be freely spread over
both channels. If a common event time is required on both channels this
represents only one switching operation.
To clear the entire programme on both channels, press and hold down the
‘Cancel’ key for approximately 3 seconds until the display shows
E EEEE
On completion of the programming return the key to Run and both selector
switches to Auto.
Extend Facility
The mains electricity supply must be ON and the keyswitch set to Run
before carrying out the operations detailed on this page.
The unit is supplied with an extend facility to allow additional periods of
operation without disturbing the set programme.
At the time of installation, the extend period is set to 1 hour on each
channel but this can easily be altered. Different extend periods can be set
for each channel.
To alter the extend period:
Insert the key and turn to Set Channel 1.
Press Channel 1 ‘Extend’ and the display will show the extend period set
for Channel 1.
Press any of the numerical keypads to alter the extend period to 1 to 8
hours or 0 to disable the function (display will show ‘nil’), or 9 for a constant
extend period (display will show ‘con’).
Once the required extend period is displayed, press ‘Enter On’ and the
new extend period will be stored.
To alter the extend period on Channel 2, use the above procedure on
Channel 2.
Using the Extend Function:
With the keyswitch set to Run, pressing the appropriate ‘Extend’ activates
the additional period of operation on that channel.
If the key is pressed when the output is ‘Off’ it will switch the relative
channel on immediately and will automatically switch off after the extend
period has elapsed. The associated red indicator light will be illuminated
throughout the extend period.
If the key is pressed when the output is ‘On’ the current ‘On’ period on the
relative channel will be extended by the length of the extend period. The
red indicator light will be illuminated until the output is switched off.
The Extend facility may be cancelled at any time by pressing the key
again when the indicator light will go out and the unit will revert to the
set programme.
Crop Facility
This facility enables a current ‘On’ period to be cancelled without having
to disturb the set programme.
If the ‘Crop’ key is pressed when the output light is illuminated it will switch
the output off on the relative channel until the next programmed ‘On’
event. During the remainder of the present ‘On’ period the associated red
light will be illuminated and the output light will be off. The programme
event lights will remain unchanged.
Pressing the ‘Crop’ key again will cancel the Crop facility and restore the
unit to the set programme.
Note: Pressing the ‘Crop’ key when the output is already programmed to
be off will have no effect.
BATTERY RESERVE
The unit does not rely on the internal battery in order to work satisfactorily
providing the mains power supply is connected to the unit. The battery is
fi tted purely to memorise the Time of Day and selected Switching Times
in the event of a power failure or disconnection of supply.
When the unit is fi rst connected it will require a minimum of 24 hours to
become suffi ciently charged in order to perform this memory function.
Thereafter the battery is automatically recharged.
If the mains power supply is lost, for any reason, the display and lights on the
unit will go out and the output will be switched off. The battery will maintain
the memory for a period of up to 3 months during this condition. When the
power supply is restored, the unit will automatically switch on again and
resume the set programme without any resetting being necessary.
Danfoss Randall can accept no responsibility for possible errors in catalogues, brochures and other printed material. Danfoss Randall reserves
the right to alter its products without notice. This also applies to products already on order provided that such alterations can be made without
subsequent changes being necessary in specifi cations already agreed.
Danfoss Randall Ltd,
Ampthill Road,
Bedford MK42 9ER.
Tel: (01234) 364621 Fax: (01234) 219705
Email: danfossrandall@danfoss.com
Website: www.danfoss-randall.co.uk
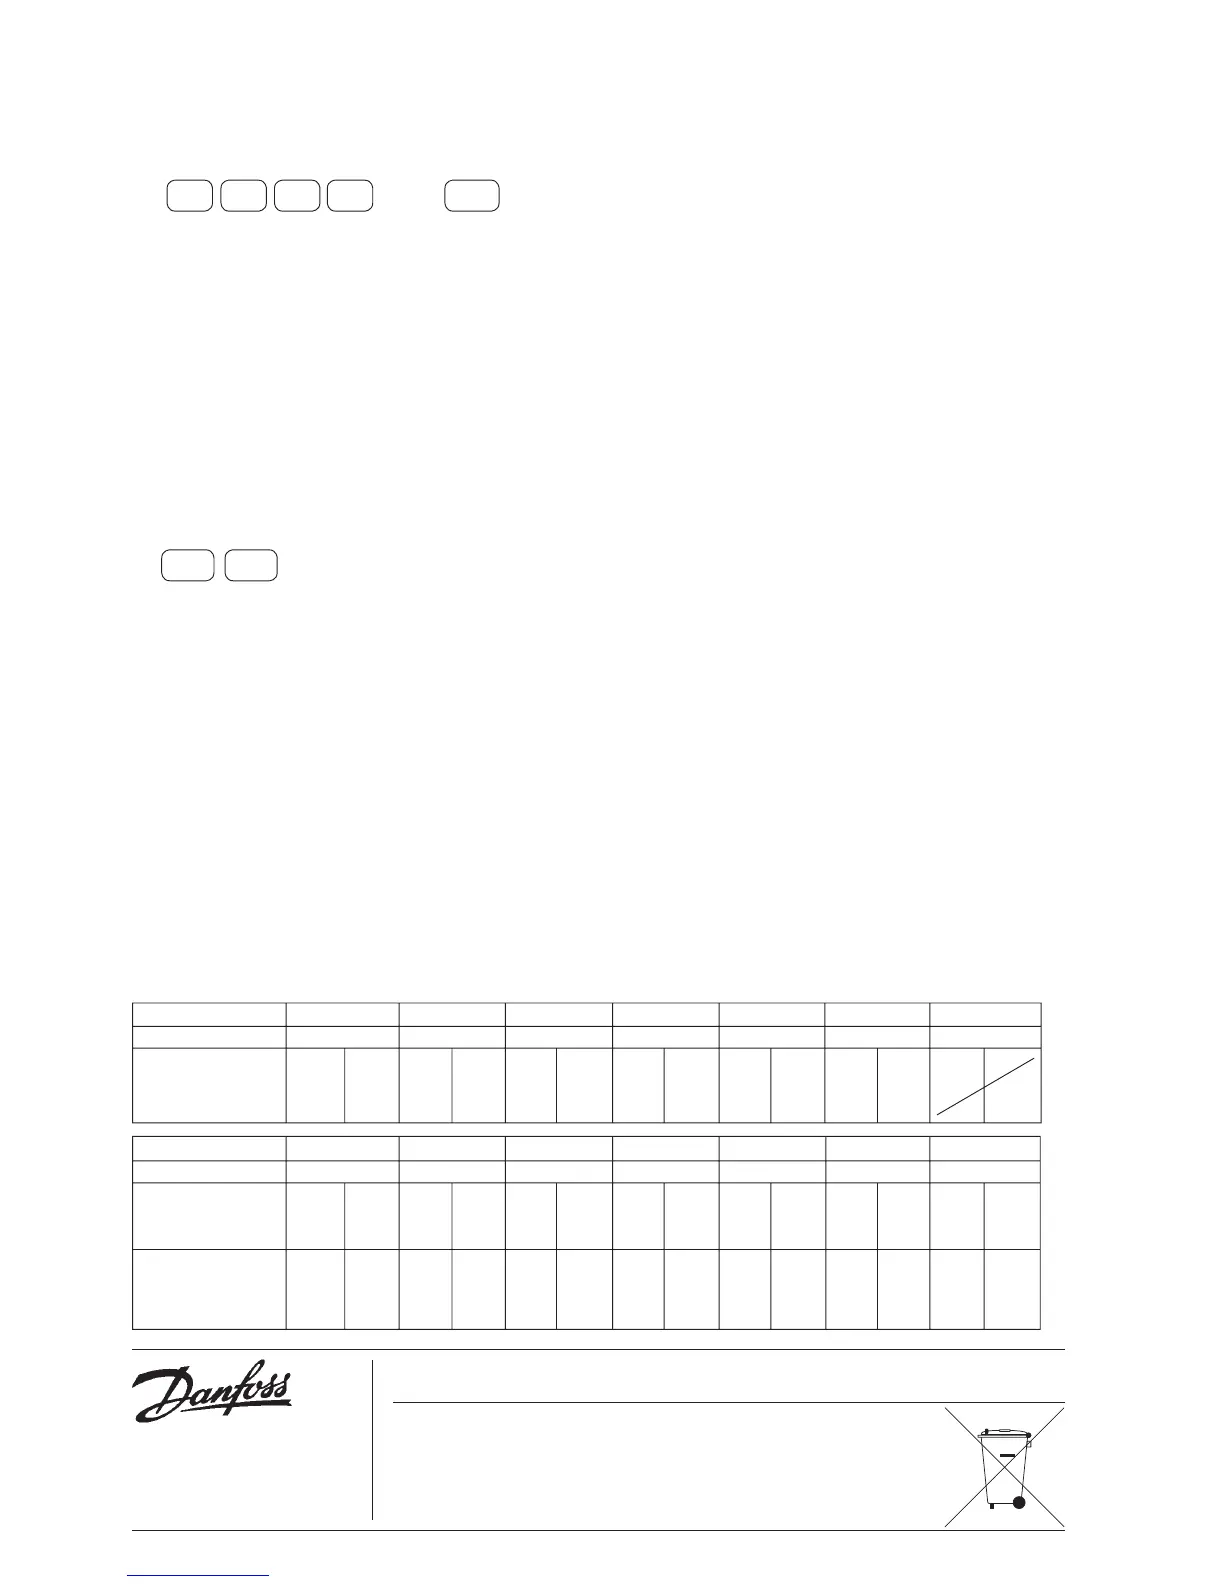
Example Monday Tuesday Wednesday Thursday Friday Saturday Sunday
Assigned Day No. 1 2 3 4 5 6 7
Event /Time ON 0830 ON 0929 ON 0436 OFF 0034 ON 0929 ON 0853
OFF 1342 OFF 2317 OFF 1129 ON 0708 OFF 2317 OFF 1342
ON 1916 OFF 1723
Record Monday Tuesday Wednesday Thursday Friday Saturday Sunday
Assigned Day No.
Event /Time
Channel 1
Event/Time
Channel 2
Part No: 3076 Issue 6 12/05

 Loading...