Page 2 of 12
INSTALLING THE LCD EWP
®
/FAN DIGITAL CONTROLLER
1. The Controller should be installed inside the passenger compartment to minimise its
ambient temperature and exposures to water as the unit is not waterproof. Also
minimise exposure to direct sunlight. Locate a hole in the firewall (approx. 20mm in
diameter) and pass the wiring harness (including the sensor & pump “T-connector”)
through. If a hole of adequate size cannot be located, then wires may be cut then re-
joined as a last resort. Connect T-Plug in wiring loom to the pump.
2. Connect black Sensor Plug to the thermal sensor located in the thermostat
housing/inline adaptor (Refer to Digital Controller Wiring diagram, Page 3).
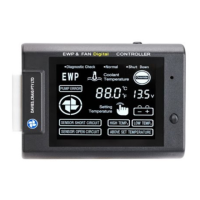
3. Connect the white plug in the wiring harness to the controller then mount the
controller with Velcro supplied. Ensure it is mounted where access to the
temperature adjustment button is easy. NOTE: Ensure a good earth connection
using the self-tapping screw provided. The earth lead must be connected to a metal
part of the car body.
4. Connect the Red wire from the wiring harness to the battery positive using the ring
terminal provided. Connect the Green wire from the wiring harness to an ignition
source (accessory +12V/24V or switched 12V/24V), the wires may be spliced then
soldered if necessary. Ensure no wire is exposed, by insulating the join with
electrical tape.
5. Connect the Green and Black striped wire to the fan relay if you wish to control the
Thermatic
®
Fan 3ºC above the set temperature. NOTE: The Controller will earth the
fan relay, not power it.
6. Mount ‘Remote Test Light’ in a location where it will be visible. The ‘Test Light’ may
be fitted by inserting it through a 4.6mm diameter drilled hole in a plastic area of the
interior/dashboard or simply with adhesive tape. The ‘Remote Test Light’ has a two
pin connections. Heat shrink or insulation tape can be applied to these pin
connections once the test light is mounted. This will ensure the connection points are
insulated and secure.
NOTE:
In carrying out the wiring procedure, please bear in mind that it is advantageous
to minimise voltage drop by keeping the wiring as short as possible.
Remove the engine thermostat from the thermostat housing and install the sensor
using Method 1 or 2 as shown below.
If you often operate in very cold climates, drill 2 x 5mm holes in the thermostat
plate before reinstalling.
Ensure there is no damage to the thermostat-housing gasket, and re-fit the
thermostat housing without the thermostat.
 Loading...