Page 5 of 12
cooling efficiency can be improved further with the use of high performance Davies
Craig Thermatic
®
Fan/s.
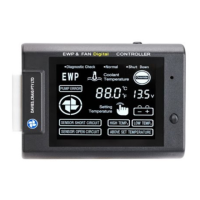
VOLTAGE DISPLAY:
Indicates the controller input voltage.
OVERRIDE:
When controller is at “Normal” mode, by pressing & holding the “Set Button” for 5
seconds the EWP
®
will override (7 Seconds for EWP & FAN). This feature benefits for
drive the EWP
®
at full speed similar as hot wire the pump. To cancel the “Override”
mode, press & hold the set button for 5 seconds or switch off the ignition.
°C to °F change:
When controller is at “Normal” mode, by pressing & holding the “Set Button” for 3
seconds the controller will change to °C to °F or °F to °C.
DIGITAL CONTROLLER THERMAL SENSOR INSTALLATION
There are two installation methods available.
METHOD 1: IN-LINE ADAPTOR METHOD (supplied & recommended)
As with other Davies Craig products the In-line Adaptor has universal application.
NOTE: Top Radiator Hose Measurements to Sleeve.
30 to 35 mm inside diameter (ID) – use adaptor without sleeves.
36 to 42 mm ID – use 2 sleeves included in the kit
42+mm ID – contact Davies, Craig for thicker 6mm sleeves (Part #18511)
1. Thermal Sensor Fitting
Apply a couple of layers of Teflon sealant tape around the threaded body of the
sensor, Fit the sensor assembly into the threaded black In-line Adaptor and tighten.
Do not over tighten, which may damage the sensor body or adaptor.
2. Hose Fitting
• When the cooling system is cold, remove top radiator hose and confirm that the
inside diameter of your top radiator hose is between 30 to 42 mm prior to cutting
hose. If the hose is more than 42mm, call Davies Craig and await 6mm sleeves.
 Loading...