however, may make gentler,
longer-phrased
music
sound a little
out
of breath or
sometimes
staccato
and jabbing (e.g., piano), so a
slower
release rate
is
more suitable, to preserve the
proper
spaciousness.
And
these are just the extremes
of music.
Experi-
ment to find
what
sounds best
to you
most of the
time; the factory setting is just a
starting
point. The
control is
easily turned with a small
flat-bladed
screwdriver, such as often come with
phono car-
tridges.
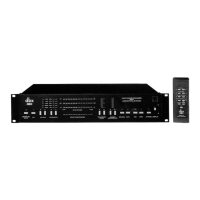
HF TRANSITION
LEVEL. This control
raises and
lowers the
transition level (see the
Front Panel discus-
sion) of the high
band only, the band
most likely to
require changing
for different kinds of
music and
speakers.
Altering this band's
transition level
means
increasing
and decreasing the high
treble, the up-
per-range
brightness, of the
sound (above
approxi-
mately
6
kHz). A
lower transition level (turn the
control clockwise)
produces more
upward expan-
sion of the
very high frequencies
relative to the rest
of the sound; a
higher transition
level (turn the
control
counterclockwise) does
the opposite,
taming
the
sound a bit (if it's
hissy, for example)
and provid-
ing
more noise reduction.
The
control is set at the
factory for what
we be-
lieve is typical
program material, but
feel free to
adjust it to your
musical tastes
—
violins
don't need
to sound as
intense as cymbals, and
dull or
spitty
recordings
and broadcasts don't
have to stay
that
way. When you do
your experimenting,
make sure
that the
4BX is set at its
EXPANSION
midpoint
(1.3:1
or above, say)
and that the front-panel
TRANSITION
LEVEL,
which
governs
the
proportion of
upward to
downward expansion
for all of the
frequencies, is
set such
that the
red and yellow
LEDs in the MF
and
LF bands are
lighting
up
about
equally.