Page 16
(This function depends on the model and must be read selectively on the basis of configuration
and model). The pressure level may vary with cooking food, you can choose the length of the
pressure holding time at your discretion.
x When cooking a food that is not on the current level, or if the current function level fails to
meet your texture requirements, you can utilise the pressure level function to achieve the
optimal cooking effect.
x Less time is consumed for a food easily to be cooked, more time is consumed for a food
more difficult to be cooked.
1.Finish cooking preparation according to page 10.
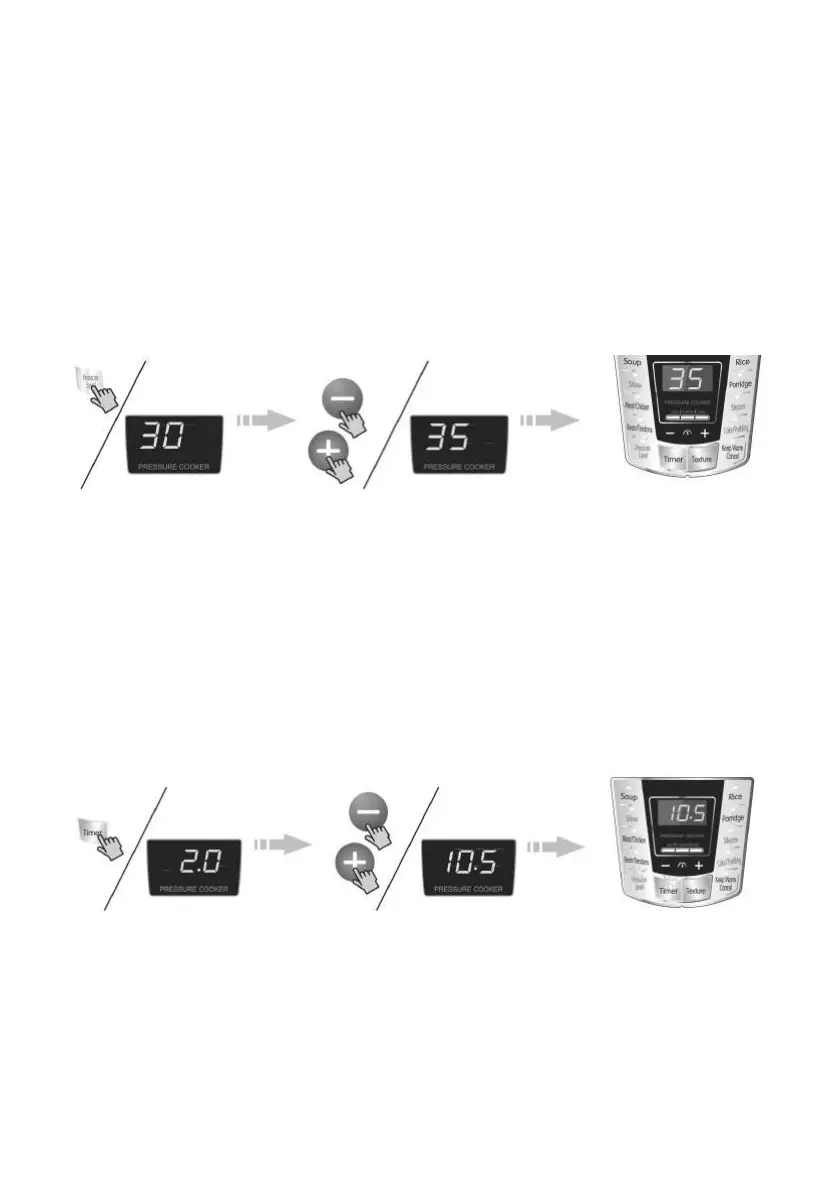
2. By pressing the “Pressure level” key, select a cooking time.
x After pressing “Pressure level”, the “Pressure level” indicator illuminates. For first time, use
default 30min by pressing “+”and “- key, adjust the times between “00” and “60”min.
Pressure Level function. Selecting own cooking time
By pressing the “pressure level”
key, select Pressure Level
function.
By pressing “+”or “-”
key, select pressure
holding time.
After 10s ,the unit enters working
modes, with the Pressure Level
indicator illuminating.
x For delayed start cooking, press the “Timer” key to select preset time. (Select within 10s
after selecting pressure holding time).
x After pressing the “Timer” key, the screen displays “2.0”, The hour portion flashes, and “+”or
“-” key is used to adjust the hour portion. After setting the hour portion, the “Timer” key is
pressed again, the minute portion flashes, and “+” or “-” key is used to adjust the minute
portion until the desired preset time is reached. The time displayed on the screen means the
working end time of the pressure cooker.
x After selecting the preset time, the “Timer” indicator flashs,10s after flashing, the “Timer”
indicator illuminates until the unit begins to work and the screen displays the preset time.
x When the preset indicator goes out, the pressure cooker has begun work.
Pressing the “Timer” key
selects the preset function.
By pressing “+”or “-” key
sets the preset time.
This diagram illustrates
the cooking end time.
3. After cooking, you can open the cover to enjoy the food.
x After a prompt emits a sound, the “Pressure level” indicator goes out, the warm indicator
illuminates, with the unit going to warm mode; if warming is not required press the “Keep
Warm/Cancel” key to cancel the function, open the cover as per the method on page 11;
The food is now ready to be served.

 Loading...