10
•
Remove the jug from the unit and open the lid (turn counter clockwise )with caution as the content is hot.
•
For best performance the recommended food should be in cubes of 1 x 1 x 1 cm.
NOTE: The content after nished cycle is hot. Open the lid carefully to prevent scalding. Do not open the lid during the HB cycle.
4.1.6 PULSING
USE WITH 700 ML CUP/6 WING BLADE ASSEMBLY, 200 ML CUP/2 WING BLADE ASSEMBLY OR HEATING JUG
NOTE: As individual function pulsing can only be used in B mode.
•
Use the pulse “P” for short bursts or when the food gets stuck in the cup (see Pictures, pic. 24).The pulse will operate for as long as the button is pressed. Use pulse function
continuously for maximum 5 seconds.
•
IMPORTANT NOTE – OVERHEATING PROTECTION: To maintain the device at its best performance and to prolong the motor life, the total operating time of the unit is 230s, which for
example is 6 cycles in B mode. After the max operating time is reached, the device will turn o automatically to cool down for 10 min, before it can be used again.
4.1.7 TIPS AND RECOMENDATIONS
•
Due to the high friction created in cup by the blades the content temperature could raise slightly. To prevent this, an ice cube or two can be added to maintain the temperature.
•
If the food sticks to the wall of the blender jar, switch o the appliance and unplug it. Then use soft spatula (not supplied with the product) to remove the food from the wall.
•
The potatoes for creamy soups should be precooked.
•
If ingredients get stuck in the 700 ml or 200 ml cup, remove them from the base, shake or tap it slightly and continue with the process.
5 CLEANING AND MAINTENANCE
Before you clean the device, unplug it.
The blades are sharp. Be careful when you clean blade units.
Make sure that the cutting edges of the blades do not come into contact with hard objects. This may cause the cutting edges to become blunt.
Clean the motor unit with a damp cloth and dry thoroughly.
Clean other parts in lukewarm water with some cleaning agent or in a dishwasher. Refer to the cleaning table.
If ingredients dry inside the blending vessels, ll the cups about 2/3 full with warm soapy water. Assemble according to the instructions and blend the content for 20-30 seconds. Scrub gently
and rinse.
Clean the 6 wing blade assembly rubber gasket regularly. Grab and lift the gasket from the base and wash under warm water (see Pictures, pic. 25).
Before storing the device you can wind the cable in cable storage at the bottom of the device (see Pictures, pic. 1, No. 27).
6 TROUBLESHOOTING
Issue Possible solution
The device does not start to work. Check if the plug is properly inserted into the power supply socket.
Check if all the removable parts are properly assembled.
The smoke comes out of the air vent. Stop and unplug the appliance immediately. Leave to cool down for 15 minutes before further use.
The device stopped working during the cycle. Total continuous operation time 230 s could be exceeded. Set to mode 0, unplug it and leave to cool down for 10 minutes.
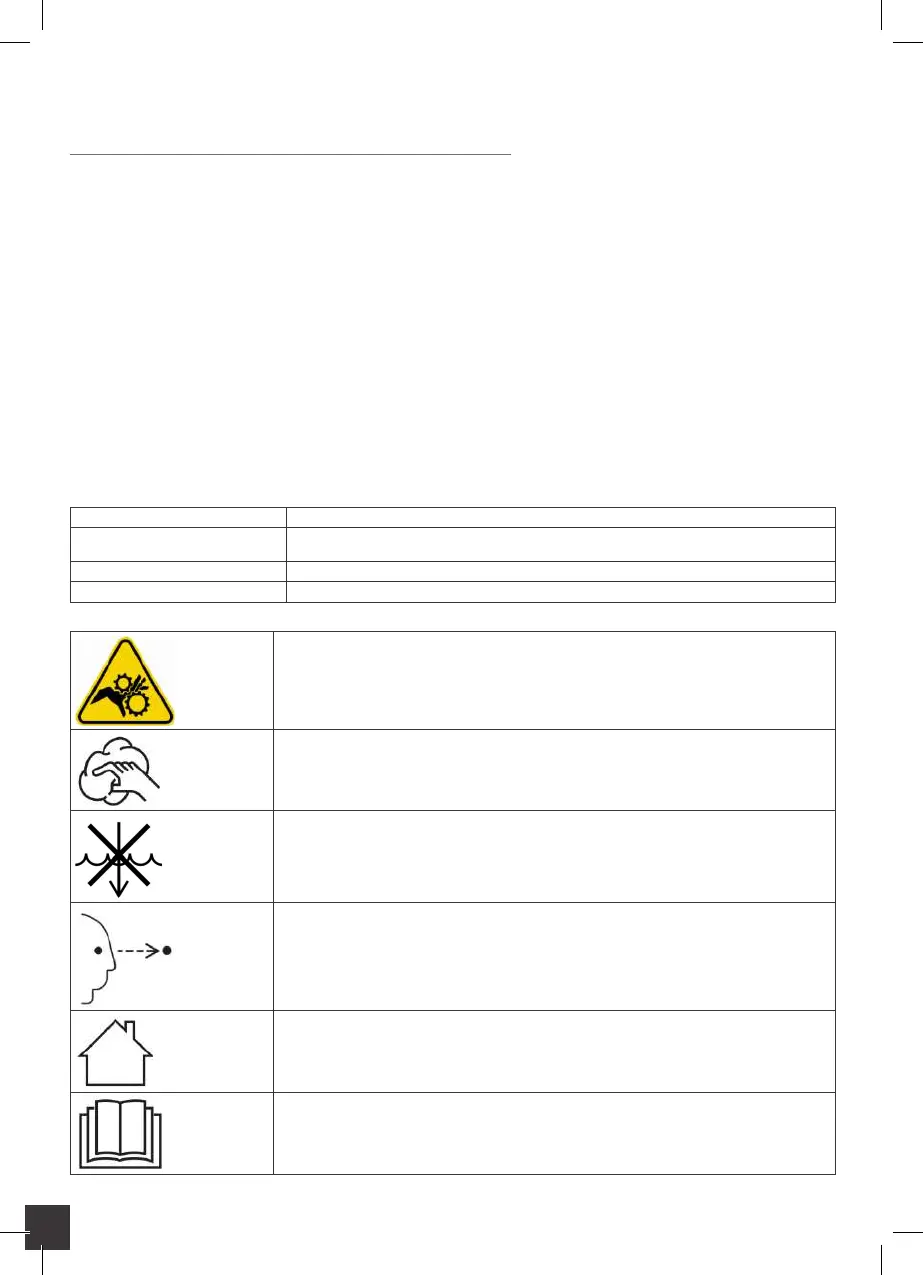
SYMBOL CHART
CAUTION! Rotating parts. Do not touch, clean or replace before unplugging the device from power supply.
Regular cleaning is necessary. Inspect and clean any spillages, residues or dirt after each use.
Failing to do that could greatly reduce performance of the device and/or increase the possibility of device or personal damage.
Do not immerse in water/liquid.
Make sure that all the attachments and parts are securely tightened and/or locked before use.
Indoor use only.
Make sure you have read and fully undersood user manual before operating this device.