Stacking Dell PowerConnect Switches: 8132, 8132F, 8164, 8164F
46
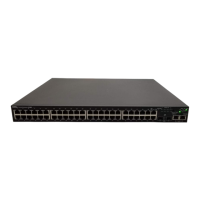
Removal of a stack unit
Figure 16.
ACTLNK
2 864
1 753
18 242220
17 232119
10 161412
9 151311
2 864
1 753
10 161412
9 151311
18 242220
17 232119 ACTLNK
ACT
LNK
2 864
1 753
18 242220
17 232119
10 161412
9 151311
1 2
ACT
LNK
ACT
LNK
26 323028
25 312927
42 484644
41 474543
34 403836
33 393735
ACT
LNK
2 864
1 753
18 242220
17 232119
10 161412
9 151311
1 2
ACT
LNK
ACT
LNK
26 323028
25 312927
42 484644
41 474543
34 403836
33 393735
2 864
1 753
10 161412
9 151311
18 242220
17 232119 ACTLNK
SWITCH REMOVED
FROM STACK
Removal of a stack unit results in one or more freed cables. In this example, there is a freed quad-
breakout cable (red) that was used to link the bottom unit to the one directly above it. The second
quad-breakout cable is then used to connect the top and bottom units to again complete the ring
topology.
Note: A QSFP+ quad-breakout cable is one that allows the user to connect one QSFP+ 40GE port
to four SFP+ 10GE ports.
Alternatively, once the unit is removed, the remaining quad-breakout cable could be replaced with a
QSFP+ cable to connect the top and bottom stack members. This would free up four SFP+ interfaces,
but requires the use of another QSFP+ interface. The interfaces used for stacking is based on the
user’s preference.
Validation
To validate the stack unit was removed and that the remaining stack members are still intact, go to
System > Stack Management > Stack Summary.
 Loading...