Do you have a question about the DeLonghi EC155 and is the answer not in the manual?
Explains safety symbols and provides fundamental recommendations for safe appliance operation.
Defines proper appliance use and emphasizes reading all instructions carefully.
Instructions for environmentally responsible disposal of the appliance.
Lists and describes the main components of the coffee maker.
Covers essential safety measures for installation and connecting the appliance.
Step-by-step guide on how to fill the water tank.
Initial steps before first use and how to pre-heat the machine.
Detailed instructions for making espresso with ground coffee.
Instructions for preparing espresso using ESE standard coffee pods.
Instructions on how to dispense hot water from the appliance.
General safety precautions for cleaning and specific steps for the filter.
Procedure for cleaning the espresso boiler outlet.
Advice on cleaning other parts like the filter-holder, drip tray, and water tank.
Provides key technical specifications and measurements of the appliance.
Information about voltage, power, and specific electrical connections.
Addresses problems like no flow, slow flow, or dripping from the filter holder.
Explains why coffee might be cold and how to resolve loud pump noise.
Diagnoses issues with coffee crema quality and milk frothing.
Explains why the appliance might switch off unexpectedly.
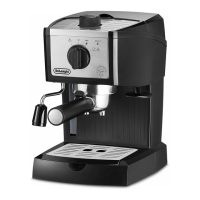
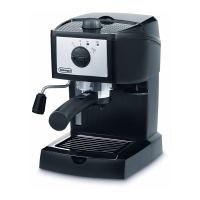
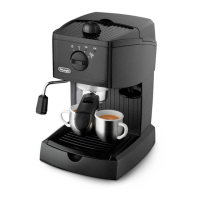
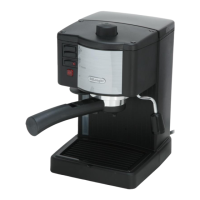
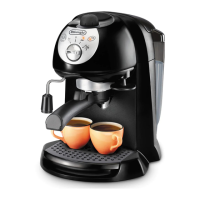
The De'Longhi EC155 is a coffee maker designed for preparing espresso and heating drinks, suitable for household use. It is not intended for commercial use, and any such use will invalidate the manufacturer's warranty. The appliance is equipped with a filter holder for ground coffee, offering both a large filter for two cups and a small filter for one cup. It also features a steam dial, tamper, drip tray, and a power cable. Operational indicators include a Temperature OK light for coffee/hot water or steam, and a light indicating the appliance is on. A function selector dial allows users to choose between coffee/hot water delivery, an off position, and a steam position. Additional components include a coffee measure, boiler outlet, steam/hot water tube, cappuccino maker, water tank, and water tank lid.
To begin using the EC155, the water tank must first be filled with fresh water, ensuring it does not exceed the "MAX" level. The tank can be removed for filling or filled directly with a jug. It is crucial to operate the appliance only when the tank contains water, and to refill it when the water level is a few centimeters from the bottom. For first use, the internal ducts of the device should be rinsed by operating the machine as if making coffee until at least one water tank has been emptied.
For optimal espresso temperature, pre-heating the coffee machine is recommended. This involves attaching the empty filter-holder, placing a cup underneath, and turning the selector dial to the coffee position. Once the OK light illuminates, the dial is turned to allow water to run until the OK light switches off, then returned to the "W" position. This process should be repeated until the cup is empty and the OK light illuminates again.
To prepare espresso using ground coffee, the appropriate filter (small for one cup, large for two) is placed in the filter holder. For one coffee, approximately 7 grams of ground coffee are used, while for two cups, two less-than-level measuring spoons (about 6+6 grams) are recommended. The ground coffee should be distributed evenly and lightly pressed with the coffee tamper. Proper tamping is essential for a good espresso; too hard results in slow flow and dark crema, while too light leads to fast flow and very light crema. After tamping, any excess coffee from the rim of the filter-holder is removed, and the filter holder is attached to the machine by turning the grip to the right to prevent water from escaping. Cups, ideally pre-heated, are placed under the filter-holder outlets. Once the OK light is on, the dial is turned to the coffee position until the desired quantity is delivered. To stop, the selector is returned to the "W" position. It is recommended not to run the coffee for more than 45 seconds. The filter-holder is released by turning the grip from right to left, and used coffee is removed by knocking the overturned filter-holder. The appliance is turned off by rotating the selector dial to the "O" position.
For espresso using pods, the appliance should be preheated as described for ground coffee, ensuring the filter holder is attached for a hotter coffee. The small 1 coffee or pod filter is placed in the filter holder, ensuring correct insertion. A pod, conforming to the ESE standard, is then inserted and centered on the filter, following the pod pack's instructions. The filter holder is attached to the appliance, rotated as far as it will go, and the process for dispensing coffee is followed as with ground coffee.
To make cappuccino, espresso coffee is first prepared in larger cups or glasses. The drip tray can be removed to accommodate larger glasses. The selector dial is then rotated to the steam position, and the user waits for the OK light to come on, indicating the boiler has reached the ideal temperature for steam production. A container with about 100 grams of fresh, semi-skimmed milk (ideally from the refrigerator at +/-5°C) is filled for each cappuccino. The cappuccino maker is immersed about 5 mm into the milk, and the steam dial is rotated anticlockwise to release steam, which increases the milk's volume and creates a creamy appearance. Once the milk has doubled in volume, the cappuccino maker is immersed deeper, and heating continues until the desired temperature (ideally 70°C) is reached. Steam delivery is then interrupted by rotating the steam dial clockwise and placing the selector in the "O" position. The frothed milk is poured into the cups containing the espresso coffee, and sweetened to taste, with cocoa powder optional. For subsequent coffee preparation after frothing milk, the boiler must be cooled by placing a container under the boiler outlet, turning the selector to the coffee position, and running off water until the OK light goes out, then returning the selector to the "W" position. Maximum steam delivery is 60 seconds, and milk should not be frothed more than three times consecutively.
Hot water can also be produced by turning the selector dial to the "W" position. A recipient is placed under the cappuccino maker, and once the OK indicator light comes on, the selector dial is turned to the coffee position while simultaneously rotating the steam dial anticlockwise. Hot water will be delivered from the cappuccino maker. To stop, the steam dial is rotated clockwise, and the selector dial is positioned to "O". Hot water should not be delivered for more than one minute at a time.
Before any cleaning of the external parts, the appliance must be switched off, unplugged, and allowed to cool down.
The filter and filter holder require regular cleaning, approximately every 200 coffees or if coffee drips slowly or not at all. This involves removing the filter from the filter holder and cleaning the inside of the filter holder. The filter cap is unscrewed, the frother is pushed out from the cap end, and the gasket is removed. All components are rinsed, and the metal filter is thoroughly cleaned in hot water with a brush, ensuring all holes are clear. The filter and gasket are then replaced on the plastic disk, ensuring the pin on the plastic disk is inserted into the hole in the gasket. The assembly is then placed back into the steel filter container, ensuring the pin is inserted into the support, and the cap is screwed back on. Failure to clean as described will invalidate the guarantee.
The espresso boiler outlet should be cleaned approximately every 300 coffees. This involves ensuring the machine is not hot and unplugged. A screwdriver is used to remove the screw fixing the espresso boiler outlet, which is then removed. The boiler and outlet are cleaned with a damp cloth and a brush, ensuring no holes are blocked. The outlet is rinsed under the tap, rubbing continuously, and then re-mounted, paying attention to its correct position on the gasket. The warranty is not valid if these cleaning operations are not performed regularly.
For general cleaning, solvents or abrasive detergents should not be used; a soft, damp cloth is sufficient. The filter-holder cup, filters, drip tray, and water tank should be cleaned regularly. The machine must never be immersed in water as it is an electrical appliance.
Descaling is essential approximately every 200 coffees, especially in hard water areas. De'Longhi descaler is recommended. The descaling solution, prepared according to the descaler pack's instructions, is filled into the tank. The selector dial is rotated to the "W" position, and the user waits for the OK indicator light to come on. The filter holder should not be attached, and a container should be placed under the machine outlet. The selector knob is rotated to the coffee position, allowing about 1/4 of the solution to flow out. The steam dial should be turned occasionally to allow a small amount of solution to escape. The flow is then interrupted by pressing the button, and the solution is left to act for about 5 minutes. This process (point 4) is repeated three more times until the tank is completely empty. To eliminate residues, the tank is rinsed well and filled with clean water (without descaler). The selector dial is rotated to the coffee position, and the appliance is operated until the tank is completely empty. Operations 6 and 7 are then repeated.
The cappuccino maker must always be washed after use to ensure hygiene. This involves discharging a little steam for a few seconds, waiting for the steam tube to cool down, unscrewing the cappuccino maker by rotating clockwise, and washing it thoroughly with warm water. The three holes in the cappuccino maker must be checked for blockages and cleaned with a pin if necessary. The steam tube is cleaned carefully, avoiding burns, and the cappuccino maker is screwed back into place.
| Type | Espresso |
|---|---|
| Product type | Espresso machine |
| Built-in grinder | No |
| Capacity in cups | 2 cups |
| Coffee input type | Coffee pod, Ground coffee |
| Coffee maker type | Manual |
| Appliance placement | Countertop |
| Water tank capacity | 1 L |
| Product color | Black, Silver |
| Cappuccino making | Yes |