To install, proceed as follows:
IMPORTANT:
• When installing the appliance, respect the safety distances specified in fig. 3.
• The appliance must be positioned in such a way that someone in the bath or shower is not able to
touch the controls.
• Keep the appliance at a distance or at least 50 cm from inflammable objects and substances and at
least 30 cm from the ceiling.
• The socket used by this appliance must be outside the safety distances indicated in (fig. 3).
• If necessary, have the appliance installed by a qualified person.
• Identify the most suitable location to install the appliance, respecting safety distances from surroun-
ding materials and in such a way that the electrical disconnecting devices are easily accessible;
• Before drilling the wall make sure there are no wires or pipes in that area;
•To fix your towel warmer to the wall, use the "D" brackets, screws and anchors provided (four for
the single model SCF1000 and six for the double model SF2000) (see fig. 1).
• Drill the top holes "A" to fix the brackets "D" using the drilling template provided (as a double check,
make sure the distance between the holes coincides with the distance indicated in fig.1).
• Fix the brackets "D" in the drilled holes, using the screws and anchors provided.
• Hang the towel warmer on the two brackets previously mounted on the wall, check that the applian-
ce is perpendicular to the floor and if necessary adjust by regulating the brackets "D" as shown in
figure 5. Mark the positions of the remaining fixing points on the wall ("B" only for the single version
SCF1000, "B" and "C" for the double version SCF2000);
• Remove the towel warmer, drill the remaining holes in the wall and insert the anchors.
• Re-hang the towel warmer on the brackets and fix with the screws supplied, then fit the covers pro-
vided (fig. 2);
The appliance must not be installed immediately under a fixed socket and must be positioned in such
a way that the plug is accessible.
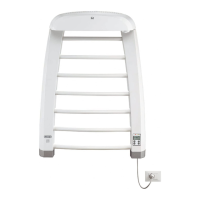
A. Fixing points (SCF1000/SCF2000)
B. Fixing points (SCF1000/SCF2000)
C. Fixing points (SCF2000)
D. Bracket
E. “ON" indicator light
F. "Timer on" indicator light
G. Programme “P ” (heated rail)
H. Programme “P (convection heater)
I. “MAN” button
L. “Clock set” button (setting time)
M. Thermostat knob
12
DESCRIPTION
INSTALLATION