4
5
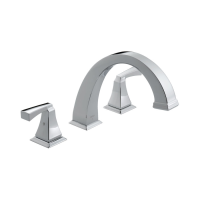
Models T4751
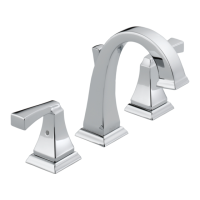
Make sure the lift rod (1) is in the down position. Turn faucet handles (2) all
the way on. Turn on hot and cold water supplies and flush water lines for
one minute. Important: This flushes away any debris that could cause
damage to internal parts.
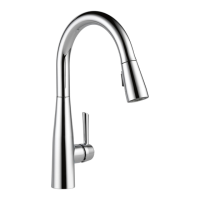
Models T2751
Turn faucet handles (1) all the way on. Turn on hot and cold water supplies
and flush water lines for one minute. Important: This flushes away any debris
that could cause damage to internal parts.
Modelos T4751
$VHJXUHTXHODEDUULWDGHDO]DUHVWiHQSRVLFLyQKDFLDDEDMR*LUHFRPSOHWD-
PHQWHDELHUWDODVPDQLMDVGHODOODYHGHDJXD$EUDORVVXPLQLVWURV
GHDJXDFDOLHQWH\IUtD\GHMHFRUUHUHODJXDSRUODVOtQHDVSRUXQPLQXWR
Importante: Esto limpia cualquier residuo que pudiera causar daño a las
partes internas.
Modelos T2751
*LUHFRPSOHWDPHQWHDELHUWDVODVPDQLMDVGHODOODYHGHDJXD$EUDORV
VXPLQLVWURVGHDJXDFDOLHQWH\IUtD\GHMHFRUUHUHODJXDSRUODVOtQHDVSRU
un minuto. Importante: Esto limpia cualquier residuo que pudiera causar
daño a las partes internas.
Modèles T4751
Assurez-vous que la tirette (1) est abaissée. Tournez les poignées du
URELQHWjIRQG5pWDEOLVVH]O·DUULYpHG·HDXFKDXGHHWG·HDXIURLGHSXLV
ODLVVH]FRXOHUO·HDXXQHPLQXWHImportant: cette procédure sert à évacuer les
corps étrangers qui pourraient abîmer les éléments internes.
Modèles T2751
7RXUQH]OHVSRLJQpHVGXURELQHWjIRQG5pWDEOLVVH]O·DUULYpHG·HDX
FKDXGHHWG·HDXIURLGHSXLVODLVVH]FRXOHUO·HDXXQHPLQXWH
Important: cette procédure sert à évacuer les corps étrangers qui pour-
raient abîmer les éléments internes.
7
86644 Rev. C
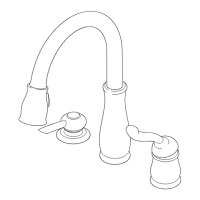
Install handles. Be sure glide ring (1) is properly seated in bottom
of handle before installing. If either handle does not rotate in the cor-
rect direction, do the following:
1. Be sure that the end valves are installed correctly (with the hot valve
on the LEFT and both inlet tubes installed AWAY from the spout).
2. Turn off the water supplies and remove the handle, bonnet nut, and
stem unit.
3. Refer to the Maintenance Section (page 4) for correct stem unit
orientation and reassemble.
,QVWDOHODVPDQLMDVAntes de instalar, asegúrese que el
aro para deslizar (1) esté apropiadamente colocado en la
SDUWHLQIHULRUGHODPDQLMD6LDOJXQDGHODVPDQLMDVQRJLUD
hacia la dirección correcta, haga lo siguiente:
1. Asegúrese que las válvulas extremas están instaladas
FRUUHFWDPHQWHFRQODYiOYXODFDOLHQWHHQOD,=48,(5'$\
ambos tubos de entrada de agua instalados en dirección al
CONTRARIO del surtidor).
&LHUUHORVVXPLQLVWURVGHDJXD\TXLWHODPDQLMDODWXHUFD
tapa, y la unidad de la espiga.
9HDODVHFFLyQGHPDQWHQLPLHQWRSiJLQDSDUDREWHQHU
la orientación correcta de la unidad de la espiga y
ensamble otra vez.
Installez les poignées. $VVXUH]YRXVTXHO·DQQHDXGH
glissement (1) est bien calé au fond de la poignée avant
O·LQVWDOODWLRQ6LO·XQHRXO·DXWUHGHVSRLJQpHVQHWRXUQHSDV
dans le bon sens, suivez les instructions ci-après.
1. Assurez-vous que les soupapes sont installées
FRUUHFWHPHQW/DVRXSDSHG·HDXFKDXGHGRLWVHWURXYHU
j*$8&+(HWOHVGHX[WXEHVG·HQWUpHG·HDXGRLYHQWVH
WURXYHU/·e&$57GXEHF
,QWHUURPSH]O·DUULYpHG·HDXHWHQOHYH]ODSRLJQpHO·pFURXj
FKDSHDXHWO·REWXUDWHXU
3. Consultez la section Entretien (page 4) pour voir comment
SRVLWLRQQHUO·REWXUDWHXUSXLVUHPHWWH]OHVpOpPHQWVHQSODFH
T2751
T4751
1
2
1
2
2
1
 Loading...