Do you have a question about the Delta HYDRACHOICE T50210 Series and is the answer not in the manual?
Warranty for parts and finishes of Delta faucets.
Warranty for electronic parts and batteries of Delta faucets.
Remove and store the plaster guard from the installed rough body.
Apply silicone adhesive to trim module edge and tighten with tool.
Apply silicone adhesive to escutcheon flat surface, avoiding weep hole.
Align escutcheon with retention tabs, ensuring weep hole faces down.
Gently pry off escutcheon starting at the weep hole without damaging finish.
Use the provided tool to remove the trim module from the valve body.
Carefully remove filter screen and flush with water to clear debris.
Place the cleaned filter screen back into the trim module.
Reinstall trim module into rough body and reapply silicone/adhesive.
Place escutcheon back onto trim module, ensuring proper alignment and snap.
Identifies the trim module part.
Identifies the escutcheon part.
Identifies plasterguard and bonnet parts for replacement.
Identifies copper tubes, test cap, and reusable plug parts.
Lists tools and materials required for faucet installation.
Important safety and installation instructions for the installer.
Instructions to turn off water supply before installation.
How to position and mount the valve body using mounting holes.
Connect valve body to copper, iron pipe, or PEX with proper fittings.
Instructions for soldering, including warnings about high temperatures.
Connect top and bottom outlets to shower pipe and tub spout.
Procedure for testing pressure and flushing the installation.
Instructions for installing the diverter, including shut-off water supplies.
Lists specific parts like bonnet, plasterguard, etc. for diverter install.
Illustrates water flow for 3-function diverter positions.
Illustrates water flow for 6-function diverter positions.
General guidance on cleaning the product and finish.
Instructions for installers on setting temperature limits and informing owners.
Explains valve limitations regarding automatic temperature adjustment.
States compliance with industry standards like ASME and ASSE.
Important safety warnings and installation responsibilities for installers.
Warranty coverage for faucet parts and finishes.
Warranty for electronic parts and batteries.
Specific limited warranty for Delta HDF faucets.
Steps to turn off water and remove cover, bonnet nut, and test cap.
Insert adapter assembly into valve body and remove retainer.
Rotate cartridge for correct orientation and install into valve body.
Instructions for back-to-back or reverse installations (hot/cold reversed).
Connect showerhead to shower arm and apply plumber tape.
Instructions for combining handshower with showerhead for models 58045 and 58065.
Instructions for installing a slip-on tub spout onto copper tube.
Instructions for installing tub spout with iron pipe nipple.
Instructions for installing tub spout with copper sweat adapter.
Slide O-ring and sleeve onto cartridge and body for trim installation.
Instructions for installing escutcheon and backplate for specific models.
Install volume control handle and set screw, but do not secure with screw.
Place temperature control knob and test water temperature.
Adjust rotational limit stop clockwise or counterclockwise based on water temperature.
Secure temperature control knob with screw and snap on cover.
Secure temperature control knob with screw and attach cover.
Notes on maximum allowable water temperature and adjustments.
Warning about scald injury from blocked outlets or cross flow.
Gentle cleaning methods to preserve product finish.
Steps to shut off water and replace the valve cartridge for leaks.
Tips for removing, replacing, and testing the valve cartridge.
Identifies cartridges shipped from March 2006 onwards.
Identifies cartridges shipped before March 2006.
States compliance with standards and provides warnings for installers.
Instructions for installers regarding temperature settings and warnings.
Identifies the trim module part.
Identifies the escutcheon part.
Identifies the adapter assembly part.
Identifies the temperature knob and cover.
Identifies the handle assembly part.
Illustrates trim options for the Addison collection.
Illustrates trim options for the Ara collection.
Illustrates trim options for the Ashlyn collection.
Illustrates trim options for the Cassidy collection.
Illustrates trim options for the Classic collection.
Illustrates trim options for the Compel collection.
Illustrates trim options for the Dryden collection.
Illustrates trim options for the Grail collection.
Illustrates trim options for the Linden collection.
Illustrates trim options for the Pivotal collection.
Illustrates trim options for the Tesla collection.
Illustrates trim options for the Trinsic collection.
Illustrates trim options for the Vero collection.
Illustrates trim options for the Victorian collection.
Illustrates trim options for the Zura collection.
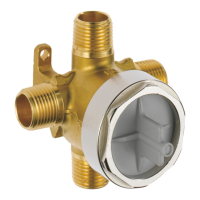
Remove plasterguard, bonnet, and test cap from the diverter body.
Install cartridge assembly into body, aligning pin and plugging unused port.
Place backplate and escutcheon over diverter and thread trim sleeve.
Place handle onto stem and tighten set screw.
Identifies 2, 3, and 6-function diverter cartridges.
Identifies diverter extension kit and plug parts.
Identifies trim sleeves and various handle types.
Identifies escutcheons for 3 and 6-function diverters.
Identifies handles and escutcheons for the Ashlyn collection.
Identifies handles and escutcheons for the Pivotal collection.
Identifies handles and escutcheons for the Arzo collection.
Identifies handles and escutcheons for Vero, Ara, and Zura collections.
Lists parts needed for new trim compatibility with R11600 rough-in.
Identifies specific parts for R11600 trim, including extension kits.
Shows water flow for each position of a 3-function diverter.
Shows water flow for each position of a 6-function diverter.
General guidance on cleaning the product and finish.
Lists series numbers for shower mount hand showers.
Lists tools and materials for easy installation.
Instructions for mounting slide bar using brackets and anchors.
Instructions for mounting slide bar for model 57021, including caps and screws.
Instructions for installing slide mechanism, brackets, and covers.
Instructions for installing slide mechanism and mounting posts for model 59210.
Steps to install wall mount bracket, including locknut, anchors, and glide ring.
Instructions to remove shower head, screw bracket, and connect hose.
Identifies transitional hand pieces with 2 and 3 settings.
Identifies traditional hand pieces with 3 settings.
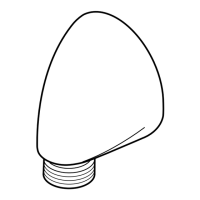
Identifies the Dryden™ hand piece with single setting.
Identifies Trinsic™ / Compel™ hand pieces with single function.
Identifies the Vero™ hand piece with single setting.
Identifies Addison® hand piece with single setting.
Identifies Ara™ hand piece with single setting.
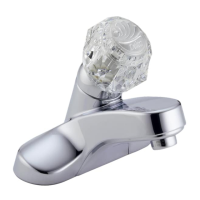
Identifies hand piece with 4 settings.
Identifies hand piece with 5 settings.
Identifies hose and gaskets parts.
Identifies mounting hardware for 57021 series slide bar.
Identifies mounting hardware and slide mechanism for 57011/57014/57085.
Identifies end caps, slide mechanism, and mounting brackets.
Identifies mounting bracket, bar, and slide mechanism for 59210 series.
Information on the integrated backflow protection system in handshowers.
Remove existing shower head and arm assembly.
Apply plumber tape and thread supply elbow onto riser elbow.
Attach hose to supply elbow and follow cautions for installation.
Lists model numbers for body sprays.
Instruction to specify the desired finish for the body spray.
Pull out the sliding pop-out mechanism from the trim kit.
Use wrench to stop mechanism rotation and thread spray head.
Secure the spray head using a set screw and hex wrench.
Swivel spray head to check full range of motion.
Press spray head back into pop-out mechanism until flush.
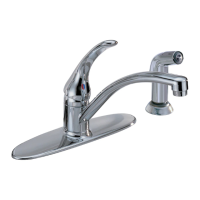
Lists tools and materials for easy faucet installation.
Crucial installation instructions and responsibilities for the installer.
Instructions to shut off water supplies before proceeding with installation.
Notes on stringer face depth based on finished wall thickness (1/2" and 3").
Connect valve body to water supplies using proper fittings; no back-to-back install.
Instructions for soldering, including warnings about high temperatures and reinstalling parts.
Procedure to test pressure, flush system, and reinstall parts.
Illustrates recommended balance loops for body spray systems.
| Brand | Delta |
|---|---|
| Series | HYDRACHOICE T50210 |
| Handle Style | Lever |
| Color/Finish | Chrome |
| Category | Plumbing Product |
| WaterSense Certified | Yes |
| Hand Shower Included | No |
| Rough-In Valve Included | No |
| Warranty | Limited Lifetime Warranty |
| Spray Patterns | Full Spray |
| Installation | Wall Mounted |