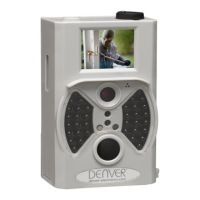
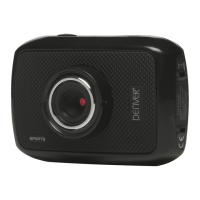
This document describes the DENVER HSC-5003 Wild Camera, a digital trail camera designed for surveillance and monitoring. It is an automatic surveillance camera that triggers upon detecting movement from humans or animals within its region of interest, utilizing a highly sensitive Passive Infrared (PIR) motion sensor. Once triggered, it automatically captures high-quality pictures (up to 12M pixels) or records 1080p HD video clips (WVGA or QVGA).
Function Description:
The camera operates in different modes to suit various surveillance needs. During daylight hours, from sunrise until there is insufficient light (dusk), the unit captures color photos and videos. As light diminishes, it transitions to taking infrared (monochrome) photos and videos, ensuring continuous monitoring regardless of lighting conditions. The camera is designed for outdoor use and is resistant to water and snow.
The core functionality revolves around its PIR motion sensor, which detects movement and initiates recording. The camera supports sound recording, embedding audio into video clips. It features a 2.0-inch colorful LCD display for easy operation and viewing.
Usage Features:
The DENVER HSC-5003 offers several features to enhance its usability and effectiveness in the field:
- Easy Operation: The camera is designed for straightforward use. To power it on, the power switch is slid to the ON position. Before automatic capturing begins, there's a 15-second buffering time, indicated by a blinking red motion indication LED, allowing users to secure the camera and walk away.
- TEST Mode: A dedicated TEST mode allows users to customize camera settings, manually capture photos or videos, and preview captured media. In this mode, the camera will automatically shut down after 3 minutes of inactivity to conserve power but can be re-activated by movement detection.
- Custom Settings: Users can access a settings menu via the remote control to customize various parameters. These settings are displayed on the camera's LCD screen or an external TV monitor.
- Remote Control: An infrared wireless remote control is provided for customer settings and password input. It has a maximum range of 9 meters and features fifteen buttons for navigation. The remote control is stored inside the camera.
- Power Supply: The camera requires four or eight AA size batteries (1.5V output). High-density, high-performance alkaline batteries are recommended, but rechargeable NiMH batteries can also be used. The battery depot has four slots, with slots 1 and 2 forming one group and slots 3 and 4 forming another, each group supplying power individually. The camera will automatically shut down in a low-battery state, prompting users to change batteries.
- SD Card Support: The camera uses an SD-card for storage. Users must unlock the write-protect switch on the SD-card before insertion. It is recommended to insert the SD-card when the power switch is in the OFF position and to format the SD-card using the camera for optimal performance, especially when used for the first time. The camera functions as a removable disk when connected to a computer via USB.
- Viewing Images/Videos: Captured media can be viewed directly on the camera's 2.0-inch LCD screen or on an external TV monitor connected via a TV cable. In TEST mode, users can navigate through images and videos, viewing the latest capture, previous, or next.
- Camera Modes: The camera supports three distinct modes: Camera (for photos), Video (for videos), and Camera + Video (for both). These modes can be selected and configured through the settings menu.
- Photo and Video Resolution: Users can set the desired photo resolution (12MP, 8MP, 5MP) and video resolution (1080P, 720P, WVGA, QVGA).
- Delay Setting: This parameter determines the duration the PIR sensor is disabled after each trigger in ON mode. It can be set from 5 seconds (for continuous media capture) to 30 minutes (for longer intervals between triggers). The default delay is 5 seconds.
- Multi-Shot Feature: Users can configure the camera to take multiple pictures per trigger, with options for 1, 3, 6, or 9 photos.
- ISO Setting: For improved night photography, the ISO sensitivity can be adjusted (100, 200, 400).
- Video Length: The duration of video clips can be set to 10s, 30s, 60s, or 90s.
- Video Sound: The sound recording feature for videos can be toggled on or off.
- Date and Time Stamp: The camera allows setting the date and time, which is imprinted on captured media. The date format can be customized (day/month/year, month/day/year, or day/month/year), and the valid year range is 2010 to 2050.
- Timer Function: A timer can be set to define specific periods during the day when the camera is active and can be triggered. Outside these hours, the device remains shut off.
- Password Protection: The camera offers a password setting to prevent unauthorized access. The default password is off, but users can set a 4-digit password.
- Wall Mount: A dedicated wall mount is included, designed for indoor camera placement. It supports up to 10kg and allows for 360° rotation and 90° vertical adjustment. The camera connects to the threaded stud on top of the wall mount.
Maintenance Features:
The DENVER HSC-5003 incorporates features and recommendations for proper maintenance and longevity:
- SD Card Formatting: It is recommended to format the SD-card using the camera itself, especially when used for the first time, to ensure compatibility and optimal performance. Formatting also serves as a way to delete all images and videos from the card.
- File Numbering: Images and videos are saved in a pre-named folder (104MEDIA) with continuous numbering (e.g., PTDC0001.JPG or PTDC0001.AVI), making it easy to identify and manage files.
- Firmware Upgrade: The camera supports automatic firmware upgrades. When an improved firmware is available, users can copy the update file (FW18NA.bin) to the SD card, insert it into the camera, and power it on in TEST mode. The camera will automatically update. After the update, the FW18NA.bin file should be deleted from the SD card to prevent the camera from re-entering update mode upon subsequent power-ons.
- Battery Management: In low-battery conditions, the camera automatically shuts down, signaling the need for battery replacement. Removing batteries is advised if the camera will not be used for an extended period, as it still consumes a minimal amount of power even when switched off.
- Safe Mode: The OFF mode is designated as a safe mode for replacing SD-cards or batteries and during camera transportation.
- Environmental Resistance: The camera's resistance to water and snow makes it suitable for outdoor use, reducing the need for extensive weather protection.
- Troubleshooting: If issues arise with reading the SD-card on other equipment, formatting the card in the camera or a computer and then reinserting it is suggested.
- Data Backup: Before formatting the SD-card, users are advised to back up any important data, as formatting will delete all stored images and videos.
- PIR Sensor Placement: To avoid false triggers, it's important to place the camera away from temperature and motion disturbances like trees exposed to direct sunlight or other heat sources. The recommended height for placement is 1 to 2 meters from the ground, depending on the target object.