INSTRUCTION MANUAL
GUIDE D'UTILISATION
MANUAL DE INSTRUCCIONES
INSTRUCTIVO DE OPERACIÓN, CENTROS DE SERVICIO Y
PÓLIZA DE GARANTÍA. ADVERTENCIA: LÉASE ESTE
INSTRUCTIVO ANTES DE USAR EL PRODUCTO.
Questions? See us on the World Wide Web at www.dewalt.com
DEWALT Industrial Tool Co., 701 East Joppa Road, Baltimore, MD 21286
(MAR04) Form No. 612150-01 D51822, D51844 Copyright © 2003
The following are trademarks for one or more DEWALT power tools: the yellow and black color scheme;
the “D” shaped air intake grill; the array of pyramids on the handgrip; the kit box configuration; and the
array of lozenge-shaped humps on the surface of the tool.
IF YOU HAVE ANY QUESTIONS OR COMMENTS ABOUT THIS OR ANY DEWALT TOOL, CALL US TOLL FREE AT: 1-800-4-DEWALT (1-800-433-9258)
POUR TOUTE QUESTION OU REMARQUE AU SUJET DE CET OUTIL OU DE TOUT AUTRE OUTIL D
EWALT, COMPOSEZ LE NUMÉRO SANS FRAIS : 1 800 4-DEWALT (1 800 433-9258)
SI TIENE ALGUNA PREGUNTA O DESEA HACER ALGÚN COMENTARIO SOBRE ESTA O CUALQUIER OTRA HERRAMIENTA D
EWALT, LLAME SIN COSTO AL: 1-800-4-DEWALT (1-800-433-9258)
SAVE THESE INSTRUCTIONS
Important Safety Instructions for Pneumatic Tools
WARNING: When using any pneumatic tool, all safety precautions, as outlined below, should be followed to avoid the risk of death or serious injury. Read and understand all instructions
before operating the tool.
CONSERVER CES DIRECTIVES
Consignes de sécurité importantes pour les outils pneumatiques
AVERTISSEMENT : Lorsqu'on utilise un outil pneumatique, toutes les mesures de sécurité mentionnées ci-dessous doivent être respectées pour éviter les risques de blessures sérieuses
ou de mort. Il faut lire et comprendre toutes les directives avant de faire fonctionner l'outil.
CONSERVE ESTAS INSTRUCCIONES
Instrucciones importantes de seguridad para las herramientas neumáticas
ADVERTENCIA: Cuando utilice una herramienta neumática, debe seguir todas las precauciones de seguridad descritas a continuación, con el fin de evitar el riesgo de muerte o lesiones
graves. Lea todas las instrucciones hasta comprenderlas antes de operar la herramienta.
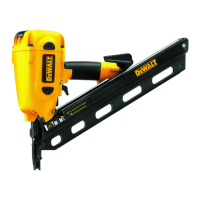
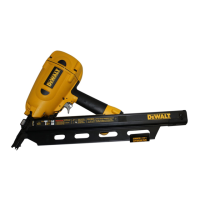
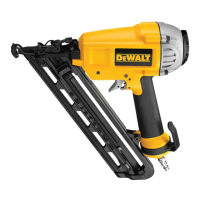
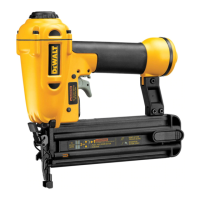
D51822 (31˚ Clipped Head), D51844 (20˚ Full Round Head) Framing Nailers
Cloueurs pour charpentes, modèles D51822 (clous à tête entaillée de 31 º)
et D51844 (clous à tête ronde ppleine de 20 º)
Clavadoras D51822 (31˚ media cabeza), D51844 (20˚ cabeza redonda completa)
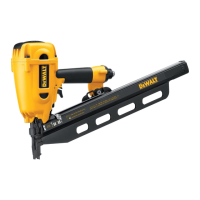
EXTERNAL TOOL PARTS
PIÈCES EXTERNES DE L'OUTIL
PIEZAS EXTERNAS DE LA HERRAMIENTA
• La mise en marche de l'outil peut projeter des
débris, du matériel amalgamé ou de la
poussière pouvant causer des blessures
oculaires à l'opérateur. L'opérateur et toutes les
personnes dans la zone environnante doivent
porter des lunettes de sécurité avec écrans
latéraux fixes. Les lunettes de sécurité
approuvées sont estampillées avec la mention
“Z87.1”. L'employeur a la responsabilité d'imposer
à l'opérateur et à toutes autres personnes dans la
zone de travail le port d'équipement de protection
des yeux. (fig. A)
• Toujours porter des protecteurs d'oreilles
appropriés et autres dispositifs de protection
durant l'utilisation. Selon les conditions et la
durée d'utilisation, le bruit émis par cet outil peut
causer une perte auditive. (fig. A)
• Utiliser uniquement de l'air propre, sec et
régulé. La condensation provenant d'un
compresseur d'air peut faire rouiller et
endommager les composantes internes de l'outil.
(fig. B)
• Réguler la pression d'air. Utiliser une pression
compatible avec la pression nominale
indiquée sur la fiche signalétique de l'outil. (Ne
doit pas excéder 120 psi, 8,3 bars.) Ne pas
raccorder l'outil à un compresseur d'une
puissance nominale supérieure à 175 psi. La
pression de fonctionnement de l'outil ne doit
jamais excéder 175 psi même dans l'éventualité
d'une défaillance du régulateur. (fig. C)
• Utiliser des tuyaux d'air approuvés pour un
fonctionnement sécuritaire de l'outil. Des
tuyaux approuvés pour une pression de
fonctionnement maximum de 150 psi ou 150 % de
la pression maximum du système, selon la
pression la plus élevée, doivent être utilisés. (fig. D)
• Ne pas utiliser de gaz en bouteille pour faire
fonctionner cet outil. Les gaz comprimés en
bouteille comme l'oxygène, le bioxyde de carbone,
l'azote, l'hydrogène, le propane, l'acétylène ou l'air
ne doivent pas être utilisés avec les outils
pneumatiques. Leur utilisation peut entraîner un
risque d'explosion et de blessures graves. (fig. E)
• Utiliser des raccords qui libèrent toute la
pression de l'outil lorsqu'il est débranché de la
source d'alimentation. Utiliser des connecteurs
de tuyau qui coupent l'alimentation d'air du
compresseur quand l'outil est débranché. (fig. F)
• Débrancher l'outil de la source d'alimentation
en air lorsqu'il n'est pas utilisé. Toujours
débrancher l'outil de la source d'alimentation
en air et retirer les attaches qui se trouvent
dans le magasin avant de quitter la zone de
travail ou de remettre l'outil à un autre
opérateur. Ne pas transporter l'outil vers une
autre zone de travail alors que l'alimentation en
air est raccordée. Ne pas effectuer de réglages,
retirer le magasin, effectuer l'entretien ou
débloquer des attaches coincées pendant que
l'outil est raccordé à la source d'alimentation
en air. Une décharge accidentelle pourrait se
• Actuating tool may result in flying debris, col-
lation material, or dust which could harm
operator’s eyes. The operator and all those per-
sons in the general area should wear safety
glasses with permanently attached side shields.
Approved safety glasses are imprinted with the
characters “Z87.1”. It is the employer’s responsi-
bility to enforce the use of eye protection equip-
ment by the tool operator and other people in the
work area. (Fig. A)
• Always wear appropriate personal hearing
and other protection during use. Under some
conditions and duration of use, noise from this
product may contribute to hearing loss. (Fig. A)
• Use only clean, dry, regulated air. Conden-
sation from an air compressor can rust and dam-
age the internal workings of the tool. (Fig. B)
• Regulate air pressure. Use air pressure com-
patible with ratings on the nameplate of the
tool. (Not to exceed 120 psi, 8.3 bar) Do not con-
nect the tool to a compressor rated at over 175
psi. The tool operating pressure must never
exceed 175 PSI even in the event of regulator
failure. (Fig. C)
• Use air hoses rated for safe operation of the
tool. Hoses rated for a maximum operating pres-
sure of 150 PSI or 150% of the maximum system
pressure, whichever is greater, must be utilized.
(Fig. D)
• Do not use bottled gases to power this tool.
Bottled compressed gases such as oxygen, car-
bon dioxide, nitrogen, hydrogen, propane, acety-
lene or air are not for use with pneumatic tools.
Danger of explosion and/or serious personal
injury may result. (Fig. E)
• Use couplings that relieve all pressure from
the tool when it is disconnected from the
power supply. Use hose connectors that shut off
air supply from compressor when the tool is dis-
connected. (Fig. F)
• Disconnect tool from air supply when not in
use. Always disconnect tool from air supply
and remove fasteners from magazine before
leaving the area or passing the tool to anoth-
er operator. Do not carry tool to another work
area with air supply connected. Do not make
adjustments, remove magazine, perform
maintenance or clear jammed fasteners while
connected to the air supply. If the contact trip is
adjusted when the tool is connected to the air
supply and nails are loaded, accidental discharge
may occur. (Fig. G)
• Do not remove, tamper with, or otherwise
cause the tool, trigger, or contact trip to
become inoperable. Do not tape or tie trigger or
contact trip in the ON position. Do not remove
spring from contact trip. Uncontrolled discharge
could result.
• El funcionamiento de la herramienta puede
despedir residuos, material de colación o
polvo, que podrían dañar los ojos del
operador. El operador y todas las personas
cercanas deben llevar lentes de seguridad con
protectores laterales permanentes. Los lentes de
seguridad certificados se distinguen por los
caracteres impresos “Z87.1”. Es responsabilidad
del empleador asegurarse de que tanto el
operador de la herramienta como las personas
situadas en el área de trabajo utilicen equipos
de protección ocular. (Fig. A)
• Utilice siempre la apropiada protección, tanto
auditiva como de otro tipo, durante la
utilización. En determinadas condiciones y con
utilizaciones prolongadas, el ruido generado por
este producto puede contribuir a la pérdida
de audición. (Fig. A)
• Utilice solamente aire limpio, seco y regulado.
La condensación debida al compresor de aire
puede oxidar y dañar las piezas internas de la
herramienta. (Fig. B)
• Regule la presión del aire. Utilice una presión
compatible con los valores indicados en la
placa de características. (No debe exceder de
120 psi, 8.3 bar.) No conecte la herramienta a un
compresor con un valor superior a 175 psi.
La presión de funcionamiento de la herramienta
no debe exceder nunca los 175 psi, incluso en
el caso de que falle el regulador. (Fig. C)
• Utilice mangueras para aire diseñadas para un
funcionamiento seguro de la herramienta. Se
deben usar mangueras diseñadas para una
presión máxima de funcionamiento de 150 psi
o un 150% de la presión máxima del sistema,
cuando sea superior. (Fig. D)
• No utilice gas embotellado para suministrar
energía a esta herramienta. Los gases
comprimidos y embotellados, como el oxígeno, el
dióxido de carbono, el nitrógeno, el hidrógeno, el
propano, el acetileno o el aire no se deben usar
para las herramientas neumáticas. Existe riesgo
de explosión o de graves lesiones personales.
(Fig. E)
• Utilice conexiones que alivien toda la presión
de la herramienta cuando se desconecte de la
toma de corriente. Utilice conectores de
mangueras que bloqueen el suministro de aire del
compresor cuando la herramienta se desconecte.
(Fig. F)
• Desconecte la herramienta del suministro de
aire cuando no se vaya a usar. Siempre
desconecte la herramienta del suministro de
aire y retire los clavos del cargador antes de
dejar la zona de trabajo o de pasar la
herramienta a otro operador. No lleve la
herramienta a otra zona de trabajo con el
suministro de aire conectado. No realice
ajustes ni extraiga el cargador ni realice
labores de mantenimiento o desatascado de la
herramienta con el suministro de aire
conectado. Si se ajusta el activador por contacto
PUSHER
POUSSOIR
LIBERADOR DEL PROPULSOR
MAGAZINE
MAGASIN
DEPÓSITO
TRIGGER
DÉTENTE
GATILLO
CONTACT TRIP
DÉCLENCHEUR
ACTIVADOR POR
CONTACTO
DEPTH
SETTING
RÉGLAGE DE LA
PROFONDEUR
AJUSTE DE LA
PROFUNDIDAD
EXHAUST
ÉCHAPPEMENT
CÁMARA DE
ESCAPE
D51822 Clipped Head D51844 Full Round Head
Clous à tête entaillée Clous à tête ronde pleine
Media cabeza Cabeza redonda completa
Height - Hauteur - Altura 12-3/4'' (32.4 cm) 12-3/4'' (32.4 cm)
Width - Largeur - Anchura 5'' (12.7 cm) 5'' (12.7 cm)
Length - Longeur - Longitud 18 5/8'' (47.3 cm) 20 3/4'' (52.7 cm)
Weight - Poids - Peso 7.3 lb (3.40 kg) 7.4 lb (3.44 kg)
Magazine Angle
Angle du magasin 31˚ 20˚
Ángulo del depósitor
Recommended Operating Pressure
Pression de fonctionnement 70 - 120 psig 70 - 120 psig
recommandée (4.9 to 8.3 bar, (4.9 to 8.3 bar,
Presión de funcionamiento 5 to 8.5 kg/cm
2
) 5 to 8.5 kg/cm
2
)
recomendada
Air consumption per 100 cycles 7.2 cfm @ 100 psi 7.2 cfm @ 100 psi
Consommation d'air par 100 cycles 203.9 l/m @ 6.9 bar 203.9 l/m @ 6.9 bar
Consumo de aire por cada 100 ciclos
Air consumption per single shoot .072 cfm @ 100 psi .072 cfm @ 100 psi
Consommation d'air par coup 2.039 l/m @ 6.9 bar 2.039 l/m @ 6.9 bar
Consumo de aire por cada disparo
Loading capacity Up to 80 Nails Up to 65 Nails
Capacité de chargement Jusqu'à 80 clous Jusqu'à 65 clous
Capacidad de carga Hasta 80 clavos Hasta 65 clavos
TOOL SPECIFICATIONS
CARACTÉRISTIQUES DE L'OUTIL
ESPECIFICACIONES DE LA HERRAMIENTA
FIG. A
FIG. B
FIG. C
FIG. D
FIG. E
FIG. G
FIG. F