12
ENGLISH
WARNING: Never attempt to lock
a switch in the ON position.
WARNING: Do not cut stems
greater than 3/4 inch (19 mm).
Use the trimmer only for cutting
normal shrubbery around
houses and buildings.
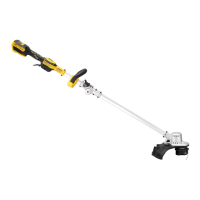
Trimming Instructions
WORKING POSITION (FIG. 6)
Maintain proper footing and balance and do not
overreach. Wear safety goggles, non-skid footwear
when trimming. Hold the unit firmly in both hands
and turn the unit on. Always hold the trimmer as
shown in Figure 6, with one hand on the switch
handle (c) and one hand on the bail handle (e).
Never hold the unit by the blade guard (d).
TRIMMING NEW GROWTH (FIG. 8)
Using a wide, sweeping motion, feeding the blade
teeth through the twigs, is most effective. A slight
downward tilt of the blade in the direction of
motion gives the best cutting.
LEVEL HEDGES (FIG. 9)
To obtain exceptionally level hedges a piece of string
can be stretched along the length of the hedge as
a guide.
SIDE TRIMMING HEDGES (FIG. 10)
Orient the trimmer as shown and begin at the bottom
and sweep up.
DANGER: KEEP HANDS AWAY
FROM BLADES.
WARNING: To guard against injury,
observe the following:
• READ INSTRUCTION MANUAL
BEFORE USING. SAVE
INSTRUCTION MANUAL.
• Check the hedge for foreign objects
such as wires or fences before each use.
• KEEP HANDS ON HANDLES. DON’T
OVERREACH.
• DO NOT USE UNDER WET
CONDITIONS.
CAUTION: BLADE MAY COAST
AFTER TURN OFF
FUEL GAUGE BATTERY PACKS (FIG. 5)
Some D
WALT battery packs include a fuel gauge
which consists of three green LED lights that
indicate the level of charge remaining in the battery
pack.
To actuate the fuel gauge, press and hold the fuel
gauge button (k). A combination of the three green
LED lights will illuminate designating the level of
charge left. When the level of charge in the battery
is below the usable limit, the fuel gauge will not
illuminate and the battery will need to be recharged.
NOTE: The fuel gauge is only an indication of the
charge left on the battery pack. It does not indicate
tool functionality and is subject to variation based
on product components, temperature and end-user
application.
OPERATION
Instructions for Use
WARNING: Always observe the safety
instructions and applicable regulations.
WARNING: To reduce the risk of
serious personal injury, turn tool
off and disconnect battery pack
before making any adjustments or
removing/installing attachments or
accessories. An accidental start-up
can cause injury.
Proper Hand Position (fig. 6)
WARNING: To reduce the risk of
serious personal injury, ALWAYS use
proper hand position as shown.
WARNING: To reduce the risk of
serious personal injury, ALWAYS hold
securely in anticipation of a sudden
reaction.
Proper hand position requires one hand on the switch
handle (c), with the other hand on the bail handle (e).
WARNING: Always remove the battery
when:
Switching On (fig. 7)
1. Squeeze and hold the bail handle (e) with one
hand so that the front part of the bail handle is
pulled back into the body of the bail handle.
2. Push the lock off switch (b) forward and
squeeze the trigger switch (a). Once the unit is
running, you may release the lock off switch.
In order to keep the unit running you must
continue to squeeze the trigger. To turn the unit
off, release the trigger.