47
ENGLISH
1. Slide the spring-loaded pusher latch
8
to the base of the
magazine to lock it into place.
2. Select an appropriate collated nail stick. (Refer to Technical
Data.)
would always recommend that you use
branded first fix nails.
WARNING: Since accessories, other than those offered
by D
WALT, have not been tested with this product, use
of such accessories with this tool could be hazardous.
To reduce the risk of injury, only D
WALT recommended
accessories should be used with this product.
3. Insert collated nail stick into the loading slot on side of the
magazine. Be sure the fasteners ride on their heads in the
nail channel.
4. Close the magazine by releasing the pusher latch. Carefully
allow the latch to slide forward and engage the nail strip.
Dry Fire Lock out
The nailer is equipped with a dry fire lock out which restricts the
tool from actuating when the magazine is nearly empty. When
approximately 7 to 9 nails remain in the magazine, the tool dry
fire lock actuates. Refer to Loading the Tool to reload a stick of
collated nails.
NOTE: If heavy force is placed on the tool it is possible to
override the lock out. This protects the tool from potential
damage if dropped.
Adjusting the Driving Depth (Fig. E)
The nail driving depth can be adjusted using the depth
adjustment wheel.
1. To drive the nail shallower, rotate the depth adjustment
wheel
4
to the left, toward the shallow nail icon.
2. To sink a nail deeper, rotate the depth adjustment wheel
4
to the right, toward the deeper nail icon.
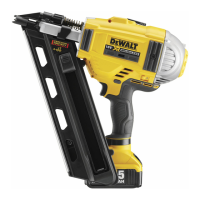
Selecting the Mode (Fig. A)
DCN692
To select sequential action mode, slide the mode selector
switch
9
to display the single nail icon ( .
To select contact trip mode (also known as bump mode), slide
the mode selector switch
9
to display the three nail icon ( .
NOTE: Maximum power for driving long nails is achieved in
sequential mode, so limit use of bump mode when driving
longer nails.
DCN695
To select standard sequential mode, slide the mode selector
switch
9
to display the single arrow icon.
To select RapidCycle sequential action mode, slide the mode
selector switch
9
to display the double arrow icon.
NOTE: Battery life in RapidCycle sequential mode will be shorter
than in standard sequential mode. Leaving the tool in standard
sequential will give maximum battery life.
Speed Selection (Fig. A)
This nailer is equipped with a dual speed selection switch
14
located on the foot.
• For shorter nails, select speed 1 by setting the switch to the
left most position.
• For longer nails and more rigorous applications, select
speed2 by setting the switch to the right most position.
In the event that nails are not driving to depth in speed
setting1, you may have to switch to speed setting 2 for
additional driving power.
NOTICE: Firing nails under 71mm in length using speed
setting 2 will cause excessive wear to your tool and may
result in early failures.
Speed
Setting
Benefit Application
Typical Nail
Length
2
Power to drive
longer nails
Stud Work
71 – 90 mm
Noggings
Joists
Timber framing
1
Increased tool
durability, Increased
battery life,
Increased speed of
firing, Less recoil
Flooring
50 – 70 mm
Cladding
Fencing
Boarding
Battening
OPERATION
Instructions for Use
WARNING: Always observe the safety instructions and
applicableregulations.
WARNING: To reduce the risk of serious personal
injury, turn tool off and disconnect battery pack
before making any adjustments or removing/
installing attachments or accessories. An accidental
start-up can causeinjury.
WARNING: If the tool has been dropped or you
suspect tool damage perform tool operation
check as defined in the mode selection section of
the manual. If it doesn’t perform according to the
manual, stop using the tool and have it serviced at
an Authorized
Service Centre.
Proper Hand Position (Fig. G)
WARNING: To reduce the risk of serious personal injury,
ALWAYS use proper hand position asshown.
WARNING: To reduce the risk of serious personal
injury, ALWAYS hold securely in anticipation of a
suddenreaction.
Proper hand position requires one hand on the main handle
18
as shown.
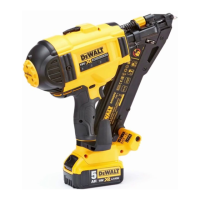
Preparing the Tool (Fig. A)
1. Remove the battery pack
12
from the tool and ensure the
tool is locked off.
2. Remove all nails from the magazine
7
.
3. Check if the contact trip
3
can move freely.
4. Reload the nails to the magazine.
 Loading...