48
ENGLISH
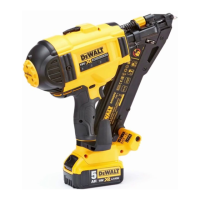
5. Insert battery pack.
WARNING: Do not use the tool if the contact trip or nail
pusher cannot move freely.
NOTICE: NEVER spray or in any other way apply
lubricants or cleaning solvents inside the tool. This can
seriously affect the life and performance of the tool.
Running in the Tool
Please note that this tool requires a run-in period before it
operates with full power due to parts which need to mesh or
wear in together. It may be that the tool does not drive long
nails flush consistently during this period.
After driving between 500 and 1000 nails the tool should have
run-in and perform at full capacity.
Actuating the Tool (Fig. A)
The tool can be operated using one of two modes:
Sequential action mode
The sequential action mode is used for intermittent nailing
when very careful and accurate placement is desired. It
also offers the maximum delivery of power for driving the
longestnails.
1. Using the mode selector switch
9
, select the sequential
action mode ( or .
2. Release the trigger safety lock-off
2
.
3. Push the contact trip
3
against the work surface.
4. Pull the trigger switch
1
to actuate the tool.
5. Release the trigger and raise the nailer from the work
surface.
6. Repeat steps 3–5 to actuate the next nail.
Contact Trip Mode
DCN692
Contact trip mode (also known as bump mode) is used for rapid
nailing on flat, stationary surfaces and typically most effective for
application driving shorter nails.
1. Using the mode selector switch
9
to select the bump
action mode ( .
2. Release the trigger safety lock-off
2
.
3. To drive a single nail, operate the tool as described for
sequential action:
a. Push the contact trip
3
against the work surface.
b. Pull the trigger switch
1
to actuate the tool. Each trigger
pull with the contact trip pushed against the work
surface will drive one nail.
4. To drive several nails, depress and hold the trigger switch
1
,
and then push the contact trip
3
repeatedly against the
work surface.
WARNING: Do not keep the trigger depressed when the
tool is not in use. Keep the trigger safety lock-off
2
in the
locked position to prevent accidental actuation when the
tool is not in use.
5. When changing between sequential and bump modes,
it may be necessary to adjust the driving depth. Refer to
Adjusting the Driving Depth for instructions.
Rapidcycle Mode
DCN695
The RapidCycle mode is ideal for when the user fires many nails
in a sequence and needs to move more rapidly. The tool still
operates in a full sequential mode, but the motor readies itself
for the next nail immediately after firing to minimise time spent
waiting for the motor to get up to speed.
1. Use the mode selector switch
9
to select the RapidCycle
mode .
2. Release the trigger safety lock-off
2
.
3. To drive a single nail, operate the tool as described in the
sequential action:
a. Push the contact trip
3
against the work piece.
b. Pull the trigger switch
1
to actuate the tool. (You will
hear the motor spin up after the nail has been driven).
4. To drive several nails simply repeat the directions in point
3. above. If you do not fire a nail within 2 seconds of the
previous then the motor will coast down to rest.
Using the Trigger Lock-off (Fig. C)
Each
nailer is equipped with a trigger lock-off
2
which
when pushed to the right as shown in FigureC, prevents the
tool from firing a nail by locking the trigger and bypassing
power to the motor.
When the trigger lock-off is pressed to the left, the tool will be
fully operational. The trigger lock-off should always be locked
off whenever any adjustments are made or when tool is not in
immediate use.
No-mar Tip (Fig. A)
When using this tool on materials that you do not want to mark,
such as wood cladding, use the plastic no-mar tip
13
over the
contact trip
3
.
NOTE: For maximum depth of drive, especially with long nails,
the no-mar covered should be removed.
LED Indicator (Fig. A)
Your nailer is equipped with two LED indicator lights
5
located
on the back of the tool just below the back cap. Also refer to to
the Troubleshooting Guide for further instruction.
 Loading...