english
44
WARNING: Use only DeWALT battery
packs and chargers.
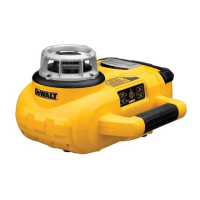
Inserting and Removing the
Battery Pack from the Tool (fig. 2)
TO INSTALL THE BATTERY PACK
1. Release latch (c) to open the hatch door (a).
Insert the battery pack (v).
CAUTION:Thelaserwilloperateeven
if battery door is not fully latched. To
securethebattery,alwaysensure
battery door is closed and latched.
2. Slide the battery pack in firmly.
3. Close the hatch door and fasten latch.
TO REMOVE THE BATTERY PACK
1. Release latch to open the hatch door.
2. Remove the battery pack.
3. Insert battery pack into the charger as to
recharge it. (Refer to ChargingProcedure.)
Setting Up the Laser
The laser facilitates various set-ups, making it useful
for several applications.
MANUAL HEAD ROTATION
The laser is designed with a protective alloy cage
around the rotary head to prevent accidental
damage from work site activities. You can still
access the rotary head and manually direct the
beam to establish or transfer a mark.
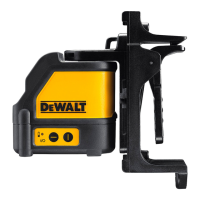
WALL SET-UP (FIG. 3)
The wall mount is used for mounting the laser to a
wall track to aid in drop ceiling installation and other
specialty levelling projects.
CAUTION: Before attaching the laser
leveltowalltrackorceilingangle,be
sure that the track or angle is properly
secured.
1. Place the laser on the mounting base (aa)
aligning the hole (kk) on the bottom of the laser
with the hole (bb) in the mounting base. Turn
the mounting knob (cc) to secure the laser.
2. With the wall mount measuring scale (dd) facing
you, loosen the wall mount clamp locking knob
(ee) to open the clamp jaws.
3. Position the clamp jaws around the wall track
or ceiling angle and tighten the wall mount
clamp locking knob (ee) to close the clamp
jaws onto the track. Be sure that the wall mount
clamp locking knob is securely tightened before
proceeding.
CAUTION: Alwaysuseaceilingwire
hangerorequivalentmaterial,in
additiontothewallmountclamplocking
knob, to help secure the laser level
whilemountingittoawall.Threadthe
wirethroughthehandleofthelaser
level.DONOTthreadthewirethrough
the protective metal cage. Additionally,
screwsmaybeusedtofastenthewall
mountdirectlytothewallasabackup.
Screwholes(ff)arelocatedatthetopof
thewallmount.
4. Using the base leveling knob (gg) approximate a
level position from the wall.
5. The laser can be adjusted up and down to the
desired offset height for working. To change the
height, loosen the locking knob (hh) located on
the left of the wall mount.
6. Turn the adjustment knob (ii), located to the
right of the wall mount, to move the laser level
up and down to set your height. Use the wall
mount measuring scale (dd) to pinpoint your
mark.
NOTE: It may be helpful to turn the power on
and turn the rotary head so that it puts a dot
on one of the laser scales. The DeWALT target
card is marked at 38 mm (1-1/2"), therefore, it
may be easiest to set the offset of the laser to
38 mm (1-1/2") below the track.
7. Once you have positioned the laser at the
desired height, tighten the locking knob (hh) to
maintain this position.
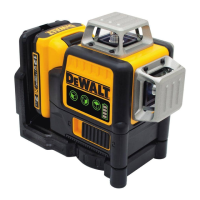
TRIPOD SET-UP (FIG. 4)
1. Position the tripod securely and set it to the
desired height.
2. Make sure that the top of the tripod is roughly
level. The laser will self-level only if the top of the
tripod is within ± 5˚ of level. If the laser is set up
too far out of level, it will beep when it reaches
the limit of its leveling range. No damage will be
done to the laser, but it will not operate in an
“out of level” condition.
3. Secure the laser to the tripod by screwing the
threaded knob (jj) on the tripod into the female
thread (kk) on the bottom of the laser.
NOTE: Be sure that the tripod you are working
with has a 5/8"–11 threaded screw to ensure
secure mounting.
4. Turn the laser on and adjust the rotation speed
and controls as desired.
 Loading...