10
ENGLISH
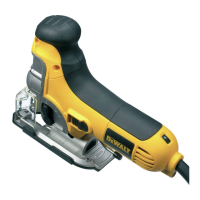
Mounting and removing the anti-splinter shoe
insert (fig. E1 & E2)
The anti-splinter shoe insert (13) which fits close to
the saw blade reduces splintering of the workpiece.
The insert can be mounted both into the shoe and
the shoe cover.
• Hold the insert (13) in the orientation as shown.
• To mount the insert into the shoe (9):
- Slide the edges (14) into the grooves (15).
- Slide the insert back into position against the shoe.
• To mount the insert into the cover (12):
- Slide the edges (14) behind the ribs (16).
- Push the front end of the insert towards the
cover. The insert snaps into place.
• To remove the anti-splinter shoe insert do the
above process in reverse order.
Dust extraction (fig. F)
The dust extraction adaptor (17) in combination with
the dust extraction shroud (18) helps extracting the
dust from the workpiece surface, when connected
to a suitable dust extraction system.
• Place the dust extraction shroud (18) onto the
finger guard (6) until it clicks in place.
• Fit the dust extraction adaptor (17) to the tool as
shown.
• Connect the hose of a suitable dust extraction
system to the adaptor.
When appropriate, connect a dust
extraction system designed in
compliance with the applicable directives
regarding dust emission.
Do not use a dust extraction system
without proper spark protection when
sawing metal.
Instructions for use
• Always observe the safety instructions
and applicable regulations.
• Make sure your workpiece is well
secured. Remove nails, screws and other
fasteners that may damage the blade.
• Check that there is sufficient space for
the blade underneath the workpiece.
Do not cut materials that exceed the
maximum cutting depth of the blade.
• Use sharp saw blades only. Damaged or
bent saw blades must be removed
immediately.
• Do not use the tool for sawing pipes or
tubes.
• Never run your tool without a saw blade.
• For optimal results, move the tool smoothly
and constantly over the workpiece.
Do not exert lateral pressure on the saw
blade. Keep the shoe flat on the workpiece
and lead the cord away in line with the
tool. When sawing curves, circles or other
round shapes, push the tool gently
forward.
• Wait until the tool has come to a standstill
before removing the saw blade from the
workpiece.
After sawing the blade may be very hot.
Do not touch.
Switching on and off (fig. A)
DW331/DW331K
• To run the tool, press the on/off switch (1).
• For continuous operation, press and hold down
the switch (1), press the lock-on button (2) and
release the switch.
DW333/DW333K
• Switching on: slide the on/off switch (1) to the front.
• Switching off: slide the on/off switch to the rear.
Always switch off the tool when work is finished
and before unplugging.
Setting the electronic sawing speed
(fig. G1 & G2)
DW331/DW331K (fig. G1)
The sawing speed varies with the pressure exerted
on the on/off switch (1).
• To stop the tool, release the switch.
• To stop the tool in continuous operation, press
the switch briefly and release it. Always switch off
the tool when work is finished and before
unplugging.
 Loading...