ENGLISH
7
WARNING: To reduce the risk of
injury, turn unit off and disconnect
machine from power source before
installing and removing accessories,
before adjusting or changing set-ups
or when making repairs. Be sure the
trigger switch is in the OFF position. An
accidental start-up can cause injury.
OPERATION
Instructions for Use
WARNING: Always observe the safety
instructions and applicable regulations.
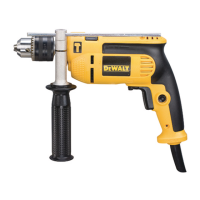
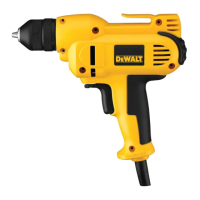
Switches (fig. 1)
To start the drill, depress the trigger switch; to stop
the drill, release the trigger.
A variable speed trigger switch (1) permits speed
control—the farther the trigger is depressed, the
higher the speed of the drill.
For continuous operation, press and hold the
variable speed switch, press the lock-on button (2),
then release the switch.
NOTE: Use lower speeds for starting holes without
a center punch, drilling in metal or plastics,
or drilling ceramics. Higher speeds are better
for drilling wood and composition boards and using
abrasive and polishing accessories.
The forward/reverse lever (3) is used for with drawing
bits from tight holes. It is located above
the trigger switch. To reverse the
motor, release the trigger switch FIRST and then
push the lever to the right. After any reversing
operations, return lever to forward position.
To stop continuous operation, press the switch
briefly and release it. Always switch the tool off when
work is finished and before unplugging.
Drilling
WARNING: To reduce the risk of
personal injury, ALWAYS ensure
workpiece is anchored or clamped
firmly. If drilling thin material, use a wood
“back-up” block to prevent damage to
the material.
Percussion drilling (fig. 1)
s Select the percussion mode.
s Press the switch (1).
Rotary drilling (fig. 1)
s Select the rotary drilling mode.
s Proceed as described for percussion drilling.
Consult your dealer for further information on the
appropriate accessories.
AND OFF IN AN ATTEMPT TO START A
STALLED DRILL — THIS CAN DAMAGE
THE DRILL.
5. To minimize stalling or breaking through the
material, reduce pressure on drill and ease the
bit through the last fractional part of the hole.
6. Keep the motor running when pulling the bit
back out of a drilled hole. This will help prevent
jamming.
7. With variable speed drills there is no need to
center punch the point to be drill
ed. Use a
slow speed to start the hole and accelerate by
squeezing the trigger harder when the hole is
deep enough to drill without the bit skipping
out.
DRILLING IN METAL
Start drilling with slow speed and increase to full
power while applying firm pressure on the tool.
A smooth even flow of metal chips indicates the
proper drilling rate. Use a cutting lubricant when
drilling metals. The exceptions are cast iron and
brass which should be drilled dry.
NOTE:
Large [5/16" (8 mm)] holes in steel can
be made easier if a pilot hole [5/32" (4 mm)] is
drilled first.
1. Use sharp drill bits only. For WOOD, use twist
drill bits, spade bits, power auger bits, or hole
saws. For METAL, use steel twist drill bits or
hole saws.
2. Always apply pressure in a straight line with the
bit. Use enough pressure to keep drill biting, but
do not push hard enough to stall the motor or
deflect the bit.
3. Hold tool firmly with both hands to control the
twisting action of the drill.
4. IF DRILL STALLS, it is usually because
it is being overloaded or improperly used.
RELEASE TRIGGER IMMEDIATELY, remove
drill bit from work, and determine cause of
stalling. DO NOT CLICK TRIGGER ON
 Loading...