27
ENGLISH
Mounting the Dust Extraction Spout
(Fig. F, Q, R)
Your DWE5615 circular saw is supplied with a dust
extractionspout.
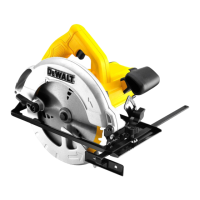
Mounting and Adjusting the Parallel Fence
(Fig. J)
The parallel fence
19
is used for cutting parallel to the edge
of theworkpiece.
Mounting
1. Slacken the parallel fence adjustment knob
17
to allow
the parallel fence topass.
2. Insert the parallel fence in the base plate
7
asshown.
3. Tighten the parallel fence adjustmentknob.
Adjusting
1. Slacken the fence adjustment knob and set the parallel
fence to the desired width. The adjustment can be read
on the parallel fencescale.
2. Tighten the fence adjustmentknob.
Kerf Indicator (Fig. I)
The front of the saw shoe has a kerf indicator
16
for vertical
and bevel cutting. This indicator enables you to guide the
saw along cutting lines penciled on the material being cut.
The kerf indicator lines up with the left (inner) side of the
saw blade, which makes the slot or “kerf” cut by the moving
blade fall to the right of the indicator. Guide along the
penciled cutting line so that the kerf falls into the waste or
surplusmaterial.
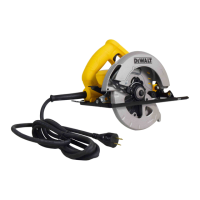
Bevel Angle Adjustment (Fig. H)
The full range of the bevel adjustment is from 0° to 45°. The
quadrant is graduated in increments of 1°. On the front of
the saw is a bevel angle adjustment mechanism consisting of
a calibrated quadrant and a bevel adjustment lever
5
.
To Set the Saw for a Bevel Cut
1. Loosen (counterclockwise) the bevel adjustment lever
5
and tilt shoe (
7
, Fig.A) to the desired angle by aligning
the pointer with the desired anglemark.
2. Retighten lever firmly (clockwise).
5. A method of checking for the correct cutting depth
is shown in Fig.F, G. Lay a piece of the material you
plan to cut along the side of the blade, as shown in the
Figure, and observe how much tooth projects beyond
thematerial.
Adjusting Depth Adjustment Lever
(Fig. F, G)
It may be desirable to adjust the depth adjustment lever
15
.
It may loosen in time and hit the base plate beforetighten‑
ing.
To Tighten the Lever
1. Hold depth adjustment lever
15
and loosen thelocknut.
2. Adjust the depth adjustment lever by rotating it in the
desired direction about 1/8 of arevolution.
3. Retightennut.
Depth of Cut Adjustment (Fig. F, G)
1. Raise the depth adjustment lever
15
toloosen.
2. To obtain the correct depth of cut, align the appropriate
mark on the depth adjustment strap with notch on the
upper bladeguard.
3. Tighten the depth adjustmentlever.
4. For the most efficient cutting action using a carbide
tipped saw blade, set the depth adjustment so that
about one half of a tooth projects below the surface of
the wood to becut.
Lower Blade Guard
WARNING: The lower blade guard is a safety
feature which reduces the risk of serious personal
injury. Never use the saw if the lower blade
guard is missing, damaged, misassembled
or not working properly. Do not rely on the
lower blade guard to protect you under all
circumstances. Your safety depends on following
all warnings and precautions as well as proper
operation of the saw. Check lower blade guard
for proper closing before each use as outlined
in Further Safety Instructions for All Saws.
If the lower blade guard is missing or not
working properly, have the saw serviced before
using. To assure product safety and reliability,
repair, maintenance and adjustment should be
performed by an authorized service center or
other qualified service organization, always using
identical replacementparts.
Checking the Lower Guard (Fig. A)
1. Turn tool off and disconnect from powersupply.
2. Rotate the lower blade guard retracting lever
10
from
the fully closed position to the fully openposition.
3. Release the lever and observe the guard
8
return to the
fully closedposition.
The tool should be serviced by a qualified service center if it:
• fails to return to the fully closed position,
• moves intermittently or slowly, or
• contacts the blade or any part of the tool in all angles
and depth ofcut.
3. Clean any sawdust that may have accumulated in the
guard or clamp washer area and check the condition
and operation of the lower blade guard as previously
outlined. Do not lubricate thisarea.
4. Select the proper blade for the application (see Blades).
Always use blades that are the correct size (diameter)
with the proper size and shape center hole for mounting
on the saw spindle. Always assure that the maximum
recommended speed (rpm) on the saw blade meets or
exceeds the speed (rpm) of thesaw.
5. Follow steps 1through 5under To Install the
Blade, making sure that the blade will rotate in the
properdirection.
 Loading...