Do you have a question about the DeWalt DWE7480 and is the answer not in the manual?
Explains signal words and their severity levels for hazard identification.
Provides essential safety rules to follow before operating the product.
Explanation of double-insulated construction and its safety benefits.
Details on polarized plugs to reduce the risk of electric shock.
Crucial safety instructions for preventing kickback and other injuries.
Specific safety precautions applicable to table saw operations.
Defines key terms used throughout the manual for clarity.
Explains kickback hazards and provides methods to avoid them.
Lists technical details including amperes, angles, blade size, and RPM.
Instructions for unpacking the saw and checking for damaged parts.
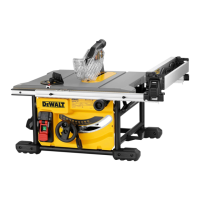
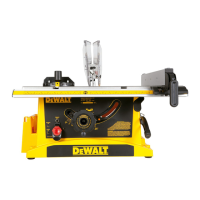
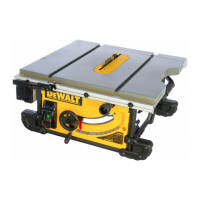
Identifies and illustrates the various parts of the table saw.
Outlines the recommended order for assembling the table saw components.
Step-by-step guide for installing the rip fence onto the saw rails.
Instructions on how to remove the throat plate from the saw table.
Guidance on correctly positioning the riving knife for cuts.
Steps for properly reinstalling the throat plate onto the saw.
Instructions for attaching the anti-kickback assembly for safety.
Procedure for attaching and removing the blade guard assembly.
How to install the miter gauge into the table slots for crosscutting.
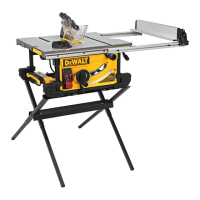
Recommendations and steps for securely mounting the saw.
Ensuring proper power connection before operating the saw.
Details on using the on-off switch and its locking feature.
Instructions for operating and locking the rip fence.
Using the fine adjustment knob and adjusting the rip scale pointer.
Adjusting the rail lock system and the rip scale for accuracy.
Procedure to align the blade parallel to the miter slot.
Steps to ensure the fence is parallel to the saw blade.
Calibrating the bevel stop, pointer, lock, and scale system.
Calibrating the miter gauge pointer for precise angles.
Ensuring correct alignment between the riving knife and saw blade.
Step-by-step guide for safely replacing the saw blade.
Guidance on choosing the correct saw blades for various applications.
Criteria for selecting the appropriate riving knife thickness for blades.
Essential checks before operating the saw for safety and performance.
Explanation of how the blade guard assembly operates.
Detailed procedures and safety precautions for ripping wood.
Instructions for constructing and using a narrow rip auxiliary fence.
Safety advice for safely ripping small or narrow workpieces.
Guidance on how to safely use a push block with the saw.
Instructions for performing ripping operations at a bevel angle.
Detailed procedures and safety precautions for crosscutting wood.
Instructions for performing crosscutting operations at a bevel angle.
Procedure for making miter cuts using the miter gauge.
How to operate the miter gauge for precise angle adjustments.
Instructions for performing combined bevel and miter cuts.
How to make and use featherboards for workpiece control.
Maintenance and clearing instructions for the dust collection system.
Information on lubricating moving parts and storing the saw.
Guidelines for routine maintenance and cleaning of the tool.
Information on recommended accessories and product repair services.
Instructions on how to register the product for warranty service.
Details of the three-year limited warranty and service coverage.
| No Load Speed | 4800 RPM |
|---|---|
| Max Rip to Left of Blade | 12 inches |
| Weight | 48 lbs |
| Amperage | 15 A |
| Blade Diameter | 10 inches |
| Arbor Size | 5/8 inches |
| Max Rip to Right of Blade | 24-1/2 in |
| Depth of Cut at 90° | 3-1/8 inches |
| Depth of Cut at 45° | 2-1/4 in |
| Dust Port Diameter | 2-1/2 inches |